
![]() For an introduction to this ongoing series, click here.
For an introduction to this ongoing series, click here.
For the first part of this adventure, click here.
The bath strap I crocheted from Rub-a-Dub not only survived the practical shower test, but became a pleasant part of my daily scrub.
Meanwhile, all those unexciting rows of double crochet had whet my appetite for something slightly more elaborate. Something so ubiquitous in the crochet world that it could fairly be called iconic. Something I’d tried before without much success.
A granny square.
Do I really have to explain to anyone in the universe what a granny square is? It may well be the most famous needlework motif ever created.
At its most basic, it looks like this.

It grows from the center, in a single piece, in rounds that alternate open and closed spaces. In spite of being worked in rounds, it comes out (as you will have noted) square.
Previous forays into crochet had led me to the foothills of the granny square, but I’d never achieved the summit. Without a proper teacher, I fell back upon the usual modern pick-and-mix of print and online tutorials.
All of them were slightly different. It was maddening. One tutorial said you must turn a corner with three chains. The next said you must do it with two. One began a new round by creeping forward with slip stitches. The next said anyone who would do such a thing should be run out of town on a rail.
Which was the right way?
I have since learned that of course there is no right way. Granny square recipes are like recipes for cornbread or pie crust. Everyone who loves to make them has a pet method in which s/he firmly believes. Arguments over which reigns supreme are at best fruitless, and at worst end in violence.
Only after much frustration and many hilariously unsquare squares did I at last feel that I could produce an acceptable specimen. More importantly, all the fumbling, fuming, and fulminating had at last helped me to understand the underlying structure.
Does that make you giggle–the idea of something as mundane as a granny square having an underlying structure? I don’t blame you. It sounds impossibly pompous.
But that’s how I work. When playing with a new technique, I aim to get beyond the what–the basic mechanics–to the how, and ultimately the how else and the what else.
It’s not everyone’s cup of tea, I know. If it’s not yours, I won’t think less of you. However, I will point out that developing a close knowledge of technique:
- Allows you, in time, to leave patterns behind and produce truly original work;
- Makes you better at spotting and fixing mistakes, which is nice for those of us who make a lot of mistakes.
With that in mind, here’s a detailed sketch of how I, at last, puzzled out the structure of the granny square for myself.
The Ingredients
Crochet teachers I have met (where were you when I needed you?) tell me the granny square is often the first motif a new crocheter is taught. No wonder, as it does amazing things with a tiny toolkit of only four maneuvers.
They are…
- the slip knot or slip loop, indicated in standard crochet charts with a black oval.
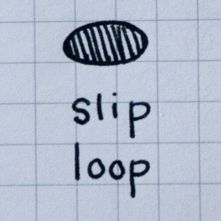
- the chain stitch, indicated by white oval.

- the slip stitch, indicated by a tiny frown.

and of course, in the leading role, the double crochet stitch.
The symbol for double crochet is based upon the symbol for half-double crochet, which looks like a tall capital T,

because T is for “crochet.”
The difference between the half-double and double crochet symbols is the single slash mark through the stem of the T,
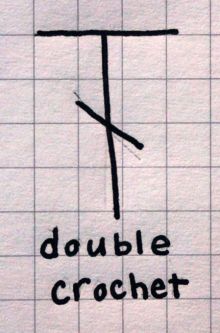
because one is for “double.”*
The half-double crochet doesn’t appear in a standard granny square. The other four are among the most fundamental skills in crochet; and they’re all you need.
The Principles
A granny square is built according to a tidy quintet of fundamental rules.
They are…
- Closed spaces (blocks) alternate with open spaces.
- Blocks and open spaces alternate from round to round.
- A block is made of three double crochet. Exception: the first block of a round substitutes a chain 3 for the first double crochet.
- Corners are always worked into corners.
- Rounds 2 and higher always begin at a corner.
Let’s put these to work and make a square.
The Recipe, Part I: the First Round
Start with the slip knot.
It’s the same slip knot that starts many a piece of knitting; but crochet, unlike knitting, does not count the slip knot as a stitch. Perhaps for this reason, the slip knot doesn’t appear on many charts–the designer just assumes you’ll know it’s there.
Next, work six chain stitches (figure 1)…

…and join the slip knot to the final chain with a slip stitch, creating a ring.
Now, begin the round. This round sets up everything that follows, so take care to do it properly.
We will make four blocks, and these four blocks will be separated by four open corners.
For Block One, begin with a chain three.

Then work two double crochet, right into the ring. The block will look like this.

In Round One, every block is followed by an open corner. To make an open corner, chain two.

(In the chart these chains don’t appear to be connected; but of course they are.)
In Round One, every corner is followed by a block made of three double crochet. Make your next block.

What always follows a block? An open corner–chain two.
Then make the third block, then the third corner, then the fourth block, then the fourth corner.

That’s our completed Round One. Four blocks, separated by four open corners. You haven’t yet joined the end of the round to the beginning, but we’re about to do that. Hang on.
The Recipe, Part II: All the Other Rounds
Some of the granny square tutorials I consulted ran on for upwards of 5,000 words, giving separate round-by-round instructions for the second, third, fourth, fifth, sixth, and sometimes even seventh rounds.
But here’s the thing: after round one, all subsequent rounds follow the same steps.
Rounds Two and up all begin by closing the previous round and scooching to the nearest corner. This is done with four slip stitches.

The first slip stitch–into the top of the chain of the first block in the previous round–closes the old round.
The second and third slip stitches–into the tops of the two double crochet of the first block of the previous round–move us closer to the corner where the new round begins.
The fourth slip stitch–into the opening of the first corner of the previous round–gets us perfectly into position for the next round.
As you work the round, with every step you’ll ask yourself three simple questions.
If the answer to a question is No, move to the next question. If the answer is Yes, follow the instructions.
Question 1: Am I at a corner?

If yes, work a corner unit (Figure 8) as follows.
- Three double crochet into the hole of the corner below. Exception: for the first block of the first corner in a round, substitute chain 3 for the first double crochet.
- Chain two.
- Three double crochet into the hole of the corner below.

Question 2: Is there a block in the round below?

If yes, work an open space: chain 2.
Question 3: Is there a hole in the round below?

If yes, work a block: three double crochet into the hole.
After working a step, go back to Question 1. Continue until your round is complete.
Upon reaching the end of a round, close it and scooch to the beginning of the next round with slip stitches as described above.
When you feel your square is big enough–it could, theoretically, go on forever–end with the slip stitch that closes the final round.
Little Quibbles and Bigger Ideas
Because the granny square has so many variations, some who have made it this far are rolling their eyes and/or gnashing their teeth. They may believe, for example, that a space between blocks is one chain, not two. They may feel sure that the chain in the first block of a round is not three chains, but one. And so forth.
They are right, and I am right, and you are right, and we are all right. The variations seem mainly to address differences in gauge and desired effect (some squares are very lacy and open, some less so).
If you’re not getting what you want, play with what you’re doing. Take notes, judge the work in progress, and adjust accordingly.
Keep in mind that we’ve still only made the simplest possible square. We haven’t played with shape or scale. We haven’t even mentioned changing colors.
Such potential, so many further adventures, all arising from the magic mix of four maneuvers with five principles.
But that’s for another Friday.
Back to the Bathroom
For now, I’d like to show you why I was excited to take my remaining supply of Rub-a-Dub and turn it into granny squares. I do believe I’ve stumbled onto the solution to a universal dilemma.
You know how sometimes, at the end of a long and tiresome day, you find yourself thinking, “Gee, I’d sure love to curl up on the sofa under something soft and warm and read a good book?”.

But then you think, “On the other hand, wouldn’t it be awfully swell to climb into a warm bath and read a good book?”.

How the heck do you choose?

Now you don’t have to…

with the amazing…
Bath-ghan!

Yes, the amazing Bath-ghan combines the cuddly joy of chillin’ on the sofa with the relaxing warmth of time in the tub.
And on really bad days, you can soak away stress and block out the world completely.

I used a 12 mm hook and worked each square for three rounds; then joined them with whipstitch. At my gauge, each square weighs in at about two ounces, so a skein of Rub-a-Dub will squeak out three big (BIG) squares.
Whaddaya think? Pretty cool, eh?
Eh? Eh?
No?
Aw, heck.
If you don’t like that idea…it does make a wonderful bath mat.
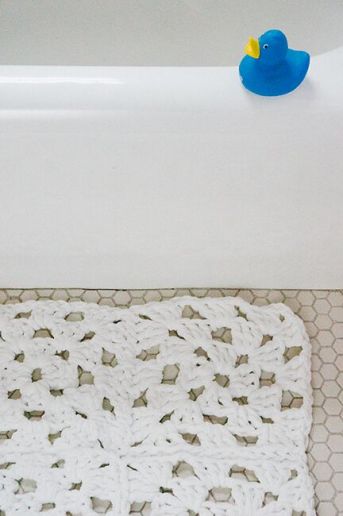
It’s been a long week. I’m heading for the tub.
The next adventure will begin in two weeks.
*Dear Maggie Righetti explains in Crocheting in Plain English that the slash represents the single yarn-over-hook with which the stitch begins. I wish I’d learned that sooner.
Tools and Materials Appearing in This Issue
Hikoo Rub-a-Dub: 100% Microfiber; 108 yd/200g per ball
Premium Crochet Hook (12 mm) by addi®
Crocheting in Plain English by Maggie Righetti (St. Martin’s Griffin, 1988)
About Franklin Habit
Designer, teacher, author and illustrator Franklin Habit is the author of It Itches: A Stash of Knitting Cartoons (Interweave Press, 2008) and proprietor of The Panopticon, one of the most popular knitting blogs on the Internet. On an average day, upwards of 2,500 readers worldwide drop in for a mix of essays, cartoons, and the continuing adventures of Dolores the Sheep.
Franklin’s varied experience in the fiber world includes contributions of writing and design to Vogue Knitting, Yarn Market News, Interweave Knits, Interweave Crochet, PieceWork, Twist Collective; and a regular columns and cartoons for Knitty.com, PLY Magazine, Lion Brand Yarns, and Skacel Collection. Many of his independently published designs are available via Ravelry.com.
He travels constantly to teach knitters at shops and guilds across the country and internationally; and has been a popular member of the faculties of such festivals as Vogue Knitting Live!, STITCHES Events, Squam Arts Workshops, Sock Summit, and the Madrona Fiber Arts Winter Retreat.
Franklin lives in Chicago, Illinois, cohabiting shamelessly with 15,000 books, a Schacht spinning wheel, two looms, and a colony of yarn that multiplies whenever his back is turned.
But, hut, the half double crochet *also* begins w a single wrap over the hook. Thank you for sharing your observations and your path. I love your writing.
Next time I’ll try harder to proofread.