Fridays with Franklin: Fluff My Cushions, Part Three

fwf-logo-columnsize

For an introduction to what does on in this column, click here.

For the first part of this series, click here.

With Upstairs Baby nicely clad in his Five Hour Baby Jacket, I returned to the crochet cushion cover.

I’d hoped this edition would show it to you completed, but I’ve been very much on the run for weeks and weeks. February and March are busy months for those of us who teach at shows and shops and festivals, and the cushion had to be fit in between flights and classes and banquets and chatting with students and readers at the Madrona Fiber Arts Winter Retreat and Stitches West, not to mention a lovely dinner with fellow makers at Makers’ Mercantile itself.

That being said, I’ve made considerable progress and I’m excited about how the project is shaping up.

I finished the cross stitching over the Tunisian crochet front panel on my flight home from Stitches West.

28336985_10215683213537968_1175092489739333512_o
Cross stitch at 35,000 feet.

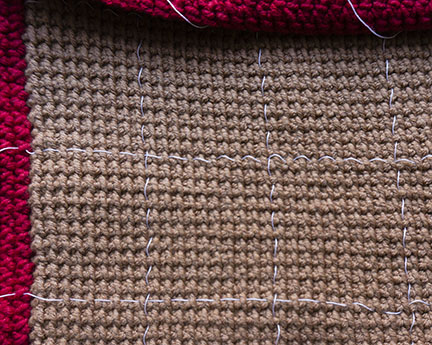
There was more cross stitching than I had intended, because I failed to follow my own advice. I told you to take the time to carefully baste in your thread guidelines before starting the embroidery, right? And told you I’d done it every ten squares, right?

I did. But what I couldn’t admit to you until now is that I’d begun with only the horizontal and vertical center guidelines basted–the bare minimum. My excuse, my feeble excuse, is that I did it in a rush just before leaving for a trip to London; and I persuaded myself that just those two lines would be fine.

I was wrong. I miscounted, you see, and ended up placing the horizontal guideline several squares off the true center. Only after ripping out a major mistake, and putting it my proper grid of guidelines to avoid more such mistakes, did I discover this monumental goof. Well more than half of the center motif had been stitched.

If I’d put in the proper number of guidelines, I’d have found the error right away. Rushing never saves time in the end, does it?

I had a choice. Rip out all the cross stitch, and start over. Or keep going, and hope for a way to fudge things later on.

No matter how virtuous a needleworker you are, this is going to happen from time to time.

So the completed motif had gaps–significant gaps–on three sides. On four sides, it would have been a border. On three sides, it just looked weird.

I decided to go for broke and fill in the gaps with a simple motif, and move on with my life.

cushion-cover-chart-bordered
Testing the border motif on the chart, to make sure it not only looked well, but also fit into the space available.
cushion-bordershot
The border was inspired by a filling motif from the same Edwardian filet crochet book that gave me the main motif.

Those of you who must have absolute symmetry at all times will grind your teeth. But I like it–I often enjoy asymmetry–and I’m keeping it.

cushion-aerialshot-fridayswithfranklin-crochet-tunisian

With the stitching on the front complete, I subjected the fabric to a wet block. As usual, I’m happy that I did.

cushion-soakblock
Crochet soup.

A wet block truly settles the stitches and gives the work a more professional, finished appearance–quite aside from cleaning the yarns, which will have acquired a shocking amount of grime during the transformation from fiber to skein to fabric.

blocked-corner-closeup

cushion-cover-crochet-lowangle-tunisian

On the Flip Side

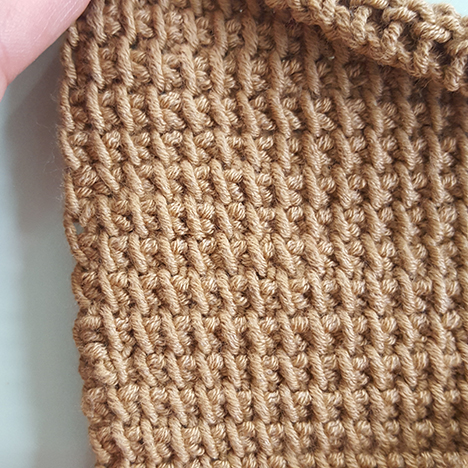
I thought I’d use double crochet, but even at a firm gauge it just didn’t work for me–too loose, too likely to allow the pillow form (which is white) to show through the gaps.

So I swatched a bit of single crochet

singleanddoubleswatch

and felt better about that. It’s strikingly handsome, especially when worked in the stripes with some of the leftover Color 063 (Amber Waves) that was used for the front.

Both sides look nice, but I decided this side

cushion-backpanel-rightside-crochet

was preferable to this side

cushion-cover-crochet-stripes-wrongside

because it’s slightly neater–no color blips at all where the yarns change. I also like the jazzy zigzag effect.

The fabric curls at the left and right selvedges, but as those will be sewn down in the finished cover that’s not an issue.

cushion-cover-back-panel

You can do an envelope back on a cushion cover without buttons, but I think they give you a neater closure. Plus it’s an excuse to play with buttons. I chose these Skacel buttons from their enamel line.

cushion-buttons-skacel-enamel

I think the style carries some of the florid beauty of the front over to the back.

This means I that I’ll be able to try crochet buttonholes for the first time when I work the top flap. Quite exciting, really. Who could ever be bored, when there’s yarn in the world?

See you in two weeks.

Tools and Materials Appearing in This Issue
HiKoo CoBaSi Plus (55% Cotton, 16% Bamboo, 8% Silk, 21% Elastic Nylon; 220 yards per 50 gram hank). Shown in Color 063 (Amber Waves) and Color 047 (Really Red).

Size D (3.25mm) Color Coded Crochet Hook by addi.

Enamel “Elegant Flowers” Buttons by Skacel Buttons in Black, size 22mm.

About Franklin

Designer, teacher, author and illustrator Franklin Habit is the author of It Itches: A Stash of Knitting Cartoons (Interweave Press, 2008). His newest book, I Dream of Yarn: A Knit and Crochet Coloring Book was brought out by Soho Publishing in May 2016 and is in its second printing.

He travels constantly to teach knitters at shops and guilds across the country and internationally; and has been a popular member of the faculties of such festivals as Vogue Knitting Live!, STITCHES Events, the Maryland Sheep and Wool Festival, Squam Arts Workshops, the Taos Wool Festival, Sock Summit, and the Madrona Fiber Arts Winter Retreat.

Franklin’s varied experience in the fiber world includes contributions of writing and design to Vogue Knitting, Yarn Market News, Interweave Knits, Interweave Crochet, PieceWork, Twist Collective; and a regular columns and cartoons for Mason-Dixon Knitting, PLY Magazine, Lion Brand Yarns, and Skacel Collection/Makers’ Mercantile. Many of his independently published designs are available via Ravelry.com.

He is the longtime proprietor of The Panopticon, one of the most popular knitting blogs on the Internet (presently on hiatus).

Franklin lives in Chicago, Illinois, cohabiting shamelessly with 15,000 books, a Schacht spinning wheel, four looms, and a colony of yarn that multiplies whenever his back is turned.

Follow Franklin online via Twitter (@franklinhabit), Instagram (@franklin.habit), his Web site (franklinhabit.com) or his Facebook page.

Fridays with Franklin: Welcome Wagon, Part Two (includes Five Hour Baby Jacket pattern)

fwf-logo-columnsizeFor an introduction to what does on in this column, click here.

For the previous installment, and an introduction to the Five Hour Baby Jacket, click here.

Rosamund’s worries were unfounded. I finished the jacket for Upstairs Baby in due course, and he came down for a fitting.

fwf-61-finished-front

fwf-61-finished-side

Upstairs Baby didn’t say much of anything about the jacket; he was too interested in his fingers and Rosamund kept licking his toes. But his mother was enormously pleased. The fit is spot-on. Upstairs Baby is about two-and-a-half months old; exact finished measurements are in the pattern below.

fwf-61-threequarter-5hbj

Speaking of the pattern…

The biggest difference between the original and my version is the closure. The original (and all the subsequent variations I have found) have simple buttonholes made with yarn overs. Upstairs Baby’s has a single button-and-loop closure, because that’s what his parents said they would prefer.

fwf-61-closure-detail

The closure is extremely easy to make. The most difficult part is choosing the buttons. Skacel Buttons offers so many that Makers’ Mercantile is still in the process of adding them all to the online shop.

I used shank buttons; but whether you choose a shanks or flats, I highly recommend that you also use button backers on this or any other piece of knitwear. Backers add strength and stability. They can be purpose-made, or you can use (as I have here) plain, flat buttons out of your button stash. I’m guessing my grandmother cut these off an old shirt in the 1980s.

fwf-61-buttonback

The stitch counts and gauge in this version differ from than those in the original. If followed exactly, the numbers in the original worked in a slender yarn at the recommended gauge of 4 stitches to the inch yield a very open, slack fabric. That’s not to my taste, and Chicago babies need warmth.

I want to be very clear that I do not consider the pattern that follows to be in any way an improvement on the original, which is a wonderfully clever and practical design. Aside from the changes noted above, all I’ve done is try to make the instructions very (very very) explicit, based in part on the questions that newbies left most often in the comments on other versions I’ve checked out. They may be annoyingly explicit for experienced knitters, who may find (for example) that the markers which set off the seed stitch borders are unnecessary.

If that’s so, that’s okay by me. Take the bits you like, set the rest aside. Do what suits you. That’s what patterns like this are for, after all.

(And by the way, though I’ve done my best to keep the errors at bay–well, you know how it is. Drop a note to Makers’ Mercantile if you find a goof, and we will correct it. Thank you!)

Franklin’s Five-Hour Baby Jacket: Yet Another Variation on the Theme

fwf-61-5hbj-front

Yarn

The sample was knit with 6 balls Zitron Gesa & Flo **held double throughout**. Note that knitting with a single strand of Gesa & Flo will not give you a sweater of the desired size.

You may substitute any yarn that will give you the indicated gauge and a fabric that makes you happy. Worsted weight yarns are a good bet; you might also test sport weight and aran weight yarns to see if they will work–yarn weights are notoriously shifty.

I recommend both HiKoo Simpliworsted and HiKoo CoBaSi Plus. The latter is especially nice for those who live in climates where wool might be too hot.

If you do not take the time to knit a gauge swatch, your finished sweater will end up becoming a gauge swatch.

Needles and Notions

1 circular needle, length about 24 inches, size US 6 or size needed to give you proper gauge; always take time to check your gauge

1 16-inch circular needle or one set short straight needles of same size as the circular above

two small buttons (sample uses these, size 18mm in silver finish)

7 stitch markers

2 rigid stitch holders (recommended) or 2 lengths of contrasting scrap yarn

blunt tapestry needle

scissors (these, from Bohin, are my current favorites for keeping handy in my project bag and sewing box)

Gauge

5 sts and 7 rows = 1 inch in stockinette stitch

Finished Dimensions

Chest: 18 inches
Body Length: 9 inches
Yoke Depth: 3 inches
Arm Length: 7 inches
Arm Circumference: 6 inches

Notes

Seed Stitch. This very simple texture pattern is used in the collar, cuffs, and hem instead of the garter stitch found in the original version. Seed stitch is usually worked on an even number of sts as follows:

RS: (P1, k1) across.
WS: (K1, p1) across.

When worked across an odd number of sts (as in the collar), the texture is symmetrical, with a k1 at each end.

kfb (increase). Knit into the front of the st in the usual way, then into the back. Makes 1 new stitch.

m1 (increase). Cast on 1 new st by making a backward loop over the tip of the right needle (sometimes referred to as the loop cast on, thumb cast on, or “e” cast on).

Instructions

Yoke
Using the method of your choice, co 39 sts. (Model shown uses the knitted CO.)

Rows 1-4. Work in seed stitch (see “Notes,” above), ending each row with k1.

Row 5 (WS). K1, p1, k1; place marker; p to last 3 sts; place marker; k1, p1, k1. (Note that the first 3 and last 3 sts of all yoke and body rows–the stitches outside these two stitch markers–will be worked in this way, including WS rows. Assume that these markers will always be slipped when you encounter, them unless otherwise noted.)

Row 6. K1, p1, k1; *(kfb, k1), rep from * to last 4 sts; kfb, k1, p1, k1. (56 sts)

Row 7. K1, p1, k1; p to last 3 sts; k1, p1, k1.

Row 8. K1, p1; k to last 2 sts; p1, k1.

Row 9. K1, p1, k1; p to last 3 sts; k1, p1, k1.

Row 10. K1, p1, k1; *(kfb, k2), rep from * to last 4 sts; kfb, k1, p1, k1. (73 sts)

Row 11. K1, p1, k1; p to last 3 sts; k1, p1, k1.

Row 12. K1, p1; k to last 2 sts; p1, k1.

Row 13. K1, p1, k1; p to last 3 sts; k1, p1, k1.

Row 14. K1, p1, k2; *(kfb, k3), rep from * to last 5 sts; kfb, k2, p1, k1. (90 sts)

Row 15. K1, p1, k1; p to last 3 sts; k1, p1, k1.

Row 16. K1, p1; k to last 2 sts; p1, k1.

Row 17. K1, p1, k1; p to last 3 sts; k1, p1, k1.

Row 18. K1, p1, k2; *(kfb, k4), rep from * to last 6 sts; kfb, k3, p1, k1. (107 sts)

Row 19. K1, p1, k1; p to last 3 sts; k1, p1, k1.

Row 20.  K1, p1; k to last 2 sts; p1, k1.

Row 21. K1, p1, k1; p to last 3 sts; k1, p1, k1.

Row 22. K1, p1, k3; *(kfb, k5), rep from * to last 5 sts; k3, p1, k1. (124 sts)

Row 23. K1, p1, k1; p to last 3 sts; k1, p1, k1.

Row 24. K1, p1; k to last 2 sts; p1, k1.

Row 25. K1, p1, k1; p to last 3 sts; k1, p1, k1.

Row 26. (On this row, you will place additional markers to indicate the fronts, back, and sleeves.)

K1, p1, k5, m1, k6, m1, k6, m1, k1, place marker. (23 sts for front)
K1, m1, k7, m1, k6, m1, k7, m1, k2, place marker. (27 sts for sleeve)
K2, m1, (k7, m1) 2x, k6, m1, (k7, m1) 2x, k2, place marker. (44 sts for back)
K2, m1, k7, m1, k6, m1, k7, m1, k1, place marker. (27 sts for sleeve)
K1, m1, k6, m1, k6, m1, k5, p1, k1. (23 sts for front)

Row 27. K1, p1, k1; p to last 3 sts; k1, p1, k1.

Row 28. K1, p1, k1. Knit across, inc by m1 before and after the 5 markers you placed in Row 26. DO NOT inc before or after the border markers you placed in Row 5. (152 sts)

Row 29. K1, p1, k1; p to last 3 sts; k1, p1, k1.

Row 30. Repeat Row 28. (160 sts)

Row 31. K1, p1, k1; p to last 3 sts; k1, p1, k1.

Sleeves
Work across right front as follows:

K1, p1, k1, slip marker, k22. Place these 25 sts (and the marker) on a stitch holder or length of scrap yarn. Remove the marker that indicates the beginning of the first sleeve.

**Begin sleeve (RS row):

(K1, kfb) 2x, k to 4 sts before next marker, (k1, kfb) 2x. Remove marker.

With second set of needles, work these 35 sleeve sts in stockinette st (k all RS rows, p all WS rows) for 26 more rows, ending by completing a WS row.

Decrease (RS) row:

K2; (k2tog, k3) 6x. (29 sts)

Purl 1 (WS) row.

Work in stockinette stitch (all RS rows, k; all WS rows, p) for 5 more rows.

Work in seed stitch (see “Notes,” above) for 4 rows, or for 8 rows if a turned-back cuff (shown on model) is desired. End each row with k1.

Break working yarn, leaving a tail of 10-12 inches.

With RS facing, join working yarn and k24 sts; m1; k across the remaining 24 sts before the next marker. Remove marker.

(IMPORTANT NOTE: the m1 in this row is designed to give the body an odd number of sts, and maintain the symmetrical seed stitch at the borders and hem. If you are adapting the pattern for yourself, and your border/collar/hem pattern does not require an odd number of sts, omit this increase and simply knit across the 48 sts of the back.)

The original pattern suggests that the back sts now be placed on a holder. I find I am able to leave them where they are on the circular needle cable, and knit the second sleeve with the same needle. Do whichever you prefer; what follows will be the same either way.

Return to ** and work the second sleeve exactly as the first.

Body
With both sleeves complete and with RS facing, join working yarn and work across remaining 25 sts (left front), ending with k1, p1, k1. This completes the first (RS) row of the body.

In the next row, you will join the live stitches on the needle to the back and right front sts that have been placed on holders. To do this, either knit them directly from the holder; or slip the empty left needle into the held sts from left to right, removing the holder once they have all been transferred. Take care not to twist sts as you transfer them.

Row 2 (WS). K1, p1, k1; p to last 3 sts; k1, p1, k1.

Row 3 (RS). K1, p1; k to last 2 sts; p1, k1.

Row 4. K1, p1, k1; p to last 3 sts; k1, p1, k1.

Rows 5-28. Repeat body rows 3 and 4. In Row 28, remove markers.

Work 8 rows in seed stitch (see “Notes,” above), ending each row with k1.

BO.

Seaming and Blocking

Sew underarm seams using tails from BO. Weave in ends. Soak and gently block.Allow to dry completely. Embellish if and as desired. (For information about the embroidery in the sample, click here .)

Loop-and-Button Closure

With circular needle (or a pair of double-pointed needles of the same size) CO 3 sts and work i-cord for a length of five inches. BO, leaving a 6-inch tail.

Using the CO and BO tails, sew the i-cord into a loop on the left-hand lapel of the jacket as shown, just below the final round of yoke increases.

Sew one button where the ends of the loop come together on the left front, and another in the corresponding place on the right front.

Tools and Materials Appearing in This Issue

Zitron Gesa & Flo Yarn (100% Ultra Fine Merino. 98 yards per 25 gram ball) shown in Color 08, Pastel Lavender.

Schoppel-Wolle Edition 6 Yarn (100% Merino extrafine Superwash wool; 328 yards per 50 gram ball) shown in Color 2296, English Garden)

Metal Dragonfly buttons by Skacel Buttons (shown in 18mm, silver finish)

About Franklin

Designer, teacher, author and illustrator Franklin Habit is the author of It Itches: A Stash of Knitting Cartoons (Interweave Press, 2008). His newest book, I Dream of Yarn: A Knit and Crochet Coloring Book was brought out by Soho Publishing in May 2016 and is in its second printing.

He travels constantly to teach knitters at shops and guilds across the country and internationally; and has been a popular member of the faculties of such festivals as Vogue Knitting Live!, STITCHES Events, the Maryland Sheep and Wool Festival, Squam Arts Workshops, the Taos Wool Festival, Sock Summit, and the Madrona Fiber Arts Winter Retreat.

Franklin’s varied experience in the fiber world includes contributions of writing and design to Vogue KnittingYarn Market News, Interweave KnitsInterweave CrochetPieceWorkTwist Collective; and a regular columns and cartoons for Mason-Dixon Knitting, PLY Magazine, Lion Brand Yarns, and Skacel Collection/Makers’ Mercantile. Many of his independently published designs are available via Ravelry.com.

He is the longtime proprietor of The Panopticon, one of the most popular knitting blogs on the Internet (presently on hiatus).

Follow Franklin online via Twitter (@franklinhabit), Instagram (@franklin.habit), his Web site (franklinhabit.com) or his Facebook page.

A Little Change of Plans

Last month I had big plans…I was going to stitch a bear. I had a great family story to go with it.

I had Mom help me cut out the fabric. It’s velvet and it’s so pretty. It reminds me of Victorian crazy quilts.

I stitched carefully. I haven’t done a lot of hand sewing like this so I tried to get the stitches even…

And then Mom and I realized I really don’t have enough sewing skills for it to be my project and not Mom’s project. It was frustrating. I wanted to share my Great-Grandmother’s quilt and the bear my Grandmother made from it.

Mom knew I was struggling so she told me a couple of good stories and we decided that with the legacy of making things there is also a legacy of being frustrated when things don’t go as planned. Mom says she can remember Grandmother hurling her sewing across the room a time or two. And Great-Granny evidently tried to wallpaper the ceiling one time and when the paper kept falling down she beat it senseless with a broom. I’ve even seen Mom rip out knitting when she was angry…she probably could have saved it but got mad at her work and started over.

The other thing Mom did was send a text to Franklin…and he said “it happens all the time”and that made me feel so much better. I’ve goofed up stuff before, but not when we had a deadline, and people expecting my work. And I’m going to finish the bear… But I’m going to learn more and take my time and get it right.

I still wanted to keep my quilt theme, so Mom helped me brainstorm a new plan. Kyle sent me a bag of fabric scraps from Makers’ and challenged me to do something with them. So I got out the bag and first thing I did was pick out all the scraps with cats. Cats are my favorite.

And then I got a big letter C.

I did the inside and outside edges in polka dot scraps because I didn’t have enough cat scraps. I think it makes the cats show up better too.

And I laid out the whole top so I could see where to place the cats. I wish I had a bunch more of the fabric with the little cats all over it. I love that one.

The other challenge I had was figuring out what to do with the two bigger cute cats.

I used tacky glue and a foam brush. The brush helped the glue go on really smooth and made it easy to wrap fabric around the sides and edges. I think I’m going to hang it in my room but it looks pretty cool in my Great-Grandfather’s chair. And isn’t it sweet where the two little cats have their tails making a heart?

My Great-Grandmother loved quilting so I think she’d be happy I found a way to use scraps to make something. She raised 6 kids and lived through the Depression so she had to mend and use what she had.I’m glad her creativity has been passed down to me.

Here’s a picture of my quilt bear. My Great-Grandmother made this quilt a long time ago. Mom thinks its close to 100 years old. In the 1980’s Grandmother made bears for Mom and her cousin.

I have made ten more hats on the addi® Express for our local shelter. I love being that I can make really nice hats quickly. If I had to knit them by hand it would go slower and I might not have time to do very many. Next month I am sharing an Easter craft… We’re going to marble Easter eggs! Did you know Makers’ Mercantile® has paint? I can’t wait to try it.

And today I’m going to leave you with a quote from  Benjamin Levisay. “The only thing better than being creative is being kind to each other. The good news is we can do both.” I hope that we all find opportunities to do both until I share again next month.

-Cee Cee

Select fabrics featured in this project:

Seven Islands Inc. CoCoLand Cats 100

Seven Islands Inc Kiyohara Canvas 85 Cotton 15 Linen Grey with Cats

RJR Fabrics Crazy for Dots & Stripes – Black Dots on White 45″ Wide


ABOUT 

CeeCee1Cee Cee Creech is growing up in a home full of creativity. Mom BeLinda loves making things, and Cee Cee loves it too. In 2011, Cee Cee changed their lives when she wanted to knit elephants to comfort the residents of Joplin, MO after a tornado destroyed their town.

This mom/daughter team has raised thousands of dollars, and made/distributed toys for charities all over the world. Today, Cee Cee is a high school student, curious maker, and the teen craft ambassador for Makers’ Mercantile. Follow their adventures on the Craft Corner.

Fridays with Franklin: Welcome Wagon

fwf-logo-columnsize

As I mentioned last time, progress on the cross-stitch cushion has been temporarily halted due to the arrival of a new neighbor, to whom I shall refer in this space as Upstairs Baby. I haven’t got any photographs, but this is the general idea.

upstairs-baby

Upstairs Baby is the second, newborn child of the same couple who brought us Rosamund’s best pal, Little Girl Upstairs.

They are a lovely family and we adore them. Rosamund has been particularly excited to have a baby to play with, even if so far all the baby does when presented with the finest of chewy rubber bones and slightly mauled stuffed otters is lie in his basket and coo.

Clearly, a child of such quality must be in need of knitted clothes. We have undertaken to address this with all due haste.

Not that all due haste is enough to satisfy Rosamund, who has been perched on my shoulders, supervising.

27628730_10215446095090155_1660424957625722737_o
“Is he done yet? Why isn’t he done yet? He needs to hurry up. That weird bald puppy upstairs must be so chilly. “

I don’t know how she puts up with me.

27173145_10215446288174982_8288552108026571747_o
“He’s still not finished. Why is this taking so long? I thought he was supposed to be good at this. That bald puppy is going to be grown up soon.”

Time is precious, and so my thought has been to turn out yet another Five Hour Baby Jacket, also known as the Five Hour Baby Sweater.

The best online information available, a preamble to the earliest version I could find, credits the design of this piece as follows:

“This pattern was received by Sue Hulbert, sent to her by Anne Stoddard, was typed in by Jo Azary, and attempted-to-be-posted to the KnitList by Samantha Garbers and finally posted by Jo as Samantha’s post got lost in cyberspace.

Anne Stoddard writes,

‘Here is the explanation that I gave Sue H[ulbert] when I sent her the pattern. In approximate[ly] the year of 1950, I was frequenting a small yarn shop in my town run by two elderly sisters, one of them was very kind to me as she loved that I both knitted and crocheted. She wrote out this pattern for me to knit for my new little sisters that my mother was ‘continuously’ having (VBG). There are 8 of us. The two sisters have since gone to the big Yarn Store in the Sky but I remember their kindnesses every time I knit the sweater. I also gave this pattern to the women in the BAKG that knit for Charity for me and we have produced over a hundred baby sweaters for the maternity home “Siena House” in the Bronx. I sincerely hope that the women knitting from this pattern give at least one sweater to charity as this is what I meant the pattern to be used for.'”

As you would expect of any pattern that has been passed from hand-to-hand-to-hand-to-hand-to-hand for nearly seventy years, variations abound. Most of them fiddle with the yoke, adding or subtracting design elements. Some add a hood. Others include companion booties or a hat. The wording varies, and with it the accuracy and clarity.

I have made five of these jackets, which truly can be worked (if you are a reasonably capable knitter) from start to finish in five hours. However, I had misplaced my printed copy. Then I found that the source I’d used four or so years ago had vanished from the Internet.

No matter, I thought. I’ll just get it from somewhere else.

After the fifth variation from somewhere else went off the rails before I could finish the yoke, I decided I’d work out and write up my own variation–and you’ll find it in this space in two weeks, in the very next column.

Will my variation be better? I’d hesitate to use the word “better.” I will try to make it something you can use without putting a(nother) permanent angry crease in your forehead.

The Yarns

The Five Hour Baby Sweater’s claim to fame is its speed of construction–top down, one piece, minimal seaming.

What I love about it is that it lends itself to alteration and personalization. Do it once, and you’ll start to imagine how you could switch it up with different borders, necklines, stitch patterns, trims, and so forth.

I settled on these yarns for Upstairs Baby’s sweater.

fwf-59-newballs

The lavender is Zitron Gesa & Flo a German pure wool that is both soft and washable. It’s also on the fine side, so in order to meet the demands of the pattern’s gauge (again, more on that next time) I decided to use it doubled, knitting two strands as one.

The other ball–the one with the zillion colors–is Schoppel-Wolle Edition 6, in a colorway (2296, English Garden) that makes my heart sing and that plays well with the lavender. I want to use that to make the sweater a little different, and little more special.

The Basic Model

When knit up in most versions (including mine) the sweater is simplicity itself. Just a little stockinette cardigan collar and cuffs in something contrasting. The original uses garter stitch; I switched to seed stitch.

27625035_10215450606442936_984697185531786887_o

For embellishment, I decided to indulge myself with more embroidery. Embroidering my knitting is my current obsession. You may have gathered as much, as I’ve used it on the cushion cover, on Rosamund’s most recent sweater, and on the freeform crochet scarf, and so forth.

Running and Running

I could have gone bananas with covered the whole body and yoke in flowers and swirls and dinosaurs and kitty cats and Latin mottoes. In the end, though, with an eye on the clock, I settled on the simplest embroidery I could think of: running stitch.

Running stitch is the first stitch most people learning to sew or embroider learn. Even people who have never held a needle recognize it as “sewing.”

There is no easier stitch to work. You come up at A, you go down at B.

step-01

Then you continue, working right to left (unless you’re left handed) taking identical stitches until you have a dotted line as long as you like. Up at C, down at D.

step-02

You can make your stitches (and the spaces between) even or uneven. In the interest of simplicity and speed, I elected to go with stitches and spaces all equal to the width of one stitch.

And I determined that I would work them in blocks made of staggered rows, moving up one row with each line of stitching.

step-03
The Schoppel-Wolle Edition 6 is one jolly, slow blend color after color, and I wanted some of each color in the sweater. In a piece this tiny, that meant unwinding the ball into a bunch of mini-balls. If I hadn’t done that, I doubt I’d have used all of the first color in the ball.

27368423_10215468644173868_4115458386527043127_o

With the palette ready, all I did was choose a color at whim and work it into a block that might be fat, skinny, tall, short–it didn’t much matter. There was no real plan, no thought of symmetry.

sleeve-detail-01

detail-fronts

detail-back

I wanted the end to have some of the cuckoo joy of crazy quilting (another current obsession).

aerial-back

Closure

I consulted Upstairs Baby’s parents about the question of closure–would they prefer buttonholes (as written in the original pattern), ties, or loops? They chose loops.

So next time–in two weeks–I’ll show you how I decided to make the loops, and give you my version of the pattern.

aerial-front
I think I have enough time and yarn to add some additional embroidery (bringing the color up into the yoke) and make a matching hat, too. What do you think?

Dinner with Franklin at Makers’ Mercantile: February 20!

burien-caresI’m wildly excited to be making an in-person visit to Makers’ Mercantile on February 20, for a dinner to benefit the shop’s local animal rescue society and shelter, Burien C.A.R.E.S. . We will have merriment and frivolity and good food and piles of fun. Rumor has it we may even have a visit from some furry friends.

For information and tickets, click here!

Tools and Materials Appearing in This Issue

Zitron Gesa & Flo Yarn (100% Ultra Fine Merino. 98 yards per 25 gram ball) shown in Color 08, Pastel Lavender.

Schoppel-Wolle Edition 6 Yarn (100% Merino extrafine Superwash wool; 328 yards per 50 gram ball) shown in Color 2296, English Garden)

About Franklin

Designer, teacher, author and illustrator Franklin Habit is the author of It Itches: A Stash of Knitting Cartoons (Interweave Press, 2008). His newest book, I Dream of Yarn: A Knit and Crochet Coloring Book was brought out by Soho Publishing in May 2016 and is in its second printing.

He travels constantly to teach knitters at shops and guilds across the country and internationally; and has been a popular member of the faculties of such festivals as Vogue Knitting Live!, STITCHES Events, the Maryland Sheep and Wool Festival, Squam Arts Workshops, the Taos Wool Festival, Sock Summit, and the Madrona Fiber Arts Winter Retreat.

Franklin’s varied experience in the fiber world includes contributions of writing and design to Vogue KnittingYarn Market News, Interweave KnitsInterweave CrochetPieceWorkTwist Collective; and a regular columns and cartoons for Mason-Dixon Knitting, PLY Magazine, Lion Brand Yarns, and Skacel Collection/Makers’ Mercantile. Many of his independently published designs are available via Ravelry.com.

He is the longtime proprietor of The Panopticon, one of the most popular knitting blogs on the Internet (presently on hiatus).

Franklin lives in Chicago, Illinois, cohabiting shamelessly with 15,000 books, a Schacht spinning wheel, four looms, and a colony of yarn that multiplies whenever his back is turned.

Follow Franklin online via Twitter (@franklinhabit), Instagram (@franklin.habit), his Web site (franklinhabit.com) or his Facebook page.


Fridays with Franklin: Fluff My Cushions, Part Two

fwf-logo-columnsizeFor an introduction to what goes on in this column, click here.

For the first part of this series, click here.

Somebody call the Vatican, because we’ve had a miracle.

Before I set out to make this pillow cover I measured the pillow. Of course.

My trusty tape measure said (and still says) it is 16 inches square. Measure twice, crochet once.

I worked the Tunisian crochet bit of it to be a bit smaller than that, so I could add a contrasting border in single crochet. That made for a fun change, and was quite simple.

fwf-59-edging-chart

I’m very pleased with the effect. Crochet borders are, as the kids on my lawn say, da bomb.

fwf-59-edge-corner
The finished dimensions of the front panel after wet blocking were almost identical to finished dimensions of the pillow itself, because what I like in pillow cover is zero ease. I want the cover to fit snugly. A loose cover, to me, resembles a sagging diaper or ill-fitting skirt.

Then something extraordinary happened. The moment I began the next stage–cross stitch embroidery of the center panel–the work expanded to cover 400 square miles.

fwf-59-relative-sizes
It’s all fun and games until your crochet blots out the sun.

Or so it has felt at times.

Cross Stitch Over Tunisian Crochet

There are so many excellent guides to cross stitch readily available that I will forbear for the moment to write one here. I do want to talk a bit about what I’ve encountered working cross stitch over a foundation Tunisian crochet.

What makes this crochet fabric so ideal for cross stitch are the nearly perfect little squares that are its hallmark.

If you have only worked cross stitch before on even-weave fabrics like Aida canvas, it can seem confusing at first as to where exactly you ought to take your stitches. There’s some wiggle room here; but you do want to make sure that once you establish your choice with the first stitches, you stick with it throughout

Here’s where I chose to make my stitches–in and out of the four orange dots. The orange cross to the right of them shows the size and shape of the typical resulting stitch.
fwf-59-stitching-holes

Since this is a crocheted fabric, the grain of it is not perfectly square like a true even-weave. The individual cross stitches will show variation.

To keep them as consistent as possible, I’ve worked with the fabric always oriented in the same direction (that is, the same edge always at the bottom while I stitched).

The Importance of Guidelines

When I teach cross stitch, I hammer home the importance of first laying out your guidelines with running stitches in thread. Don’t skimp on your guidelines! The larger your design, the more guidelines you put in.

This is the chart I’m using. My guidelines are marked with dashed lines. You’ll note they’re every tenth stitch, in both directions.
fwf-59-cushion-cover-chart

Why so many? Why not just the customary two, to pinpoint the center?

Because in large designs–especially large abstract (non-representational) designs like this, it can be too easy to make a mistake and not realize you’ve done so. The design looks fine, at a glance. You move along, and count from a bit of finished work to establish your next row of stitching–and then, only after doing a bunch more work, you realize your error.

Nobody enjoys ripping out. Put in a bunch of guidelines; and when you count, count from them first. Use stitches you know to be correct as a secondary reference point.

fwf-59-fabric-guidelines
To mark my guidelines, I used regular old sewing thread.

These guidelines also allowed me to look at the design as manageable blocks instead of a large and potentially confusing whole. So I could focus on working one 11×11 square, like this.

fwf-59-cushion-chart-excerpt
That’s  harder to goof up and, frankly, less daunting psychologically.

Keeping Your Twist

I got a very alarmed e-mail from a reader who told me you cannot, simply cannot, embroider with yarns designed for knitting and crochet.

I beg to differ, seeing as I and many others have done so for years. In fact, the booklet I referenced last time, from the early 20th century, was quite gung-ho about it. If it were impossible, someone would have twigged it by now.

I will say that any yarn or thread you choose for embroidery must be strong enough to withstand the repeated abrasion that comes from being pulled through the fabric. Most lightly spun and all unspun yarns are unsuitable–they will fall apart as you work.

Yarns with lots of texture (like coils) won’t pull readily through the small hole made by your needle, nor will yarns with additives like sequins. Beaded yarns may work, if the beads are quite small, but beaded embroidery is a topic I’ll leave for another time.

fwf-58-hikoo-cobasi-plus
HiKoo CoBaSi Plus

HiKoo CoBaSi Plus has worked very well, with one caveat. Like any embroidery strand made from fibers that do not stick together (this includes purpose-made embroidery cottons with multiple plies), the yarn will tend to untwist as you work.

Just pause every so often and twiddle the needle to put the twist back in. That’s all.

Some Now, Some Later

I began working the central motif as I’ve always worked cross stitch: row by row, laying in the first part of the cross from left to right, then completing the row by working back from right to left.

Then, after realizing how much of this piece would be done on the road while teaching or in company when I was liable to mis-read my chart, I decided to take a different tack.

When I’ve been in a situation that allowed me to focus–at home, in my workroom, or alone in a hotel room–I’ve worked only the first part of each cross stitch, filling out the design.

fwf-59-embroidery-progress-shot

Then, when I’ve been in distracting situations like airplanes and airport lounges and cafés, I’ve worked over those established stitches–in other words, that’s when I’ve done the mindless work that requires no counting.

Where Am I?

It’s gone well, though I have not as I hoped finished all the embroidery yet. As I said at the beginning of this installment, what began as a cover for a tiny little pillow keeps growing larger, and larger and larger. Still–I’m pleased. The entire first layer is in, so now I merely fill in the second layer. (I may add borders in the blank areas to the right and left, but I’m not sure yet.)

fwf-59-firstlayer

We’re going to have to pause this project for a bit, anyhow–because a newborn baby in the apartment upstairs needs a warm sweater, quickly, and I have just the thing waiting to be knit up: Zitron Gesa & Flo, with a dash of Schoppel-Wolle Edition 6 Light Fingering.

fwf-59-newballs

I’ll show you in two weeks.

Tools and Materials Appearing in This Issue
HiKoo CoBaSi Plus (55% Cotton, 16% Bamboo, 8% Silk, 21% Elastic Nylon; 220 yards per 50 gram hank)
Zitron Gesa & Flo (100% Ultra Fine Merino. 98 yards per 25 gram ball; shown in Color 8: Lavender)
Schoppel-Wolle Edition 6 (100% Merino Extrafine Superwash Wool. 328 yards per 50 gram ball; shown in Color 2296: English Garden)
Addi HeartStopper
Addi Click Crochet Hook Interchangeable Set

About Franklin

Designer, teacher, author and illustrator Franklin Habit is the author of It Itches: A Stash of Knitting Cartoons (Interweave Press, 2008). His newest book, I Dream of Yarn: A Knit and Crochet Coloring Book was brought out by Soho Publishing in May 2016 and is in its second printing.

He travels constantly to teach knitters at shops and guilds across the country and internationally; and has been a popular member of the faculties of such festivals as Vogue Knitting Live!, STITCHES Events, the Maryland Sheep and Wool Festival, Squam Arts Workshops, the Taos Wool Festival, Sock Summit, and the Madrona Fiber Arts Winter Retreat.

Franklin’s varied experience in the fiber world includes contributions of writing and design to Vogue KnittingYarn Market News, Interweave KnitsInterweave CrochetPieceWorkTwist Collective; and a regular columns and cartoons for Mason-Dixon Knitting, PLY Magazine, Lion Brand Yarns, and Skacel Collection/Makers’ Mercantile. Many of his independently published designs are available via Ravelry.com.

He is the longtime proprietor of The Panopticon, one of the most popular knitting blogs on the Internet (presently on hiatus).

Franklin lives in Chicago, Illinois, cohabiting shamelessly with 15,000 books, a Schacht spinning wheel, four looms, and a colony of yarn that multiplies whenever his back is turned.

Follow Franklin online via Twitter (@franklinhabit), Instagram (@franklin.habit), his Web site (franklinhabit.com) or his Facebook page.

Do you wanna build a snowman…or maybe knit some hats?

I almost always do a charity project of some sort for my birthday and this year I chose  Linda’s Hats for Hope Initiative. When I was younger I collected lots of hand knit toys for charity and every year Linda would knit my age in donated toys. She’s sweet and generous  and has helped me with so many projects so many times so this year I’m helping her by knitting my age in hats! It’s only January 15th when I’m writing this (I have to turn it in early for approval and stuff) and I’m already at 15 hats and a couple of scarves… So I think I’m going to send her a few extra if I keep knitting until January 27th.

Kenzie yarn makes a nice soft drapey hat and the colors are lovely too. But my favorite thing is Makers’ gives you yarn when you get a knitting machine. It’s soft and squishy and two balls makes a great hat.

Are you a process person or a product person? Mom is process person but I am a product person.  Having a knitting machine is awesome because I can make so many hats in a short amount of time. I just have to be careful not to go too fast and drop stitches.

First off you need to watch the video Karin Skacel has for how to use a knitting machine. I watched the video and in an hour I had my first hat. Mom still helped with finishing, but a hat in an hour and it was so much fun to watch the knitting machine go around and around. Karin had some really important tips that helped me set the machine up successfully so that it wasn’t frustrating, like how to start and how to watch the counter.

Most of my hats are two colors and reversible. Sometimes if I have smaller amounts of yarn I add more stripes, but it is important for these hats to hold up well, so I try not to cut the yarn for no reason.

I do a total of 108 rounds on a hat. So its pretty easy…just 54 rounds of each color.  I can divide by 3 to get even sections of 3 stripes.

I gather each end up tightly and carefully finish each end.

Then I turn one end inside the other. Make sure you leave a tail of yarn to join the inside so it will turn inside out without coming apart. The video I suggested has the cute topknot finish.

I hear weather reports about how cold it is up north and I hope these hats keep people warm this winter and that they know people care.

Next month I’m making an “unbearably” cute kit….it reminds me of a craft project my Grandmother did. I’ve been excited about making it ever since I got it and I can’t wait to show you guys. My Grandmother and Great -Grandmother were both really good at sewing, so I’m looking forward to more of that.

Mom is getting ready to start a knit a long over in the Makers‘ group on Ravelry…I love the scarf pattern. It’s called Holey scarf  and it’s a free pattern. She’d love it if she had some friends to knit with.

And then! We’ve been snowed in for two days… probably tomorrow too because it just keeps snowing…Mom said “hey! I bet we could make a snowman.” She made the nose and I did the rest….we made a knitting machine snowman! I don’t have a pattern for him yet, but we’re working on it so you can make one too!

And p.s. if you want to join in the fun and get your own knitting machine, this is the one I have. I just love it!

 I will see you in February! Post in the comments and tell me about projects you like to do when you are snowed in.

Fridays with Franklin: Fluff My Cushions

fwf-logo-columnsizeFor an introduction to what goes on in this column, click here.

If you ask me, you can tell a civilization is in decline when it stops caring about good throw pillows.

Most of us, if we are lucky, spend quite a bit of time with our throw pillows, and they do so much for us. They hide that coffee stain on the sofa from visitors, they add a certain quelque chose to the bed on days when we make the bed, they support our backs as we knit in a favorite chair, they cradle our heads while we fall blissfully asleep during a weekend binge of The Crown or America’s Next Top Cake Hero.

Yet how much thought do we put into the selection of these small but essential elements of the well-appointed home? Judging from the pillows I’ve seen lately (including on my own sofa), shamefully little.

roz-and-pillow.jpg
Rosamund doesn’t like it, either.

I’ve taken a hard look at the soft furnishings of our nest this winter, in part because for a couple of weeks I couldn’t leave the nest or the Chicago weather would have killed me. And I feel the need of an upgrade.

I don’t even know where that green sofa pillow and its twin came from. They mystify me, because I don’t like that depressing olive green and I don’t like that clammy fabric.

I suspect they came home because I was out at some discount store, remembered that we needed new pillows, and grabbed the least offensive pair off the shelf because they were a) cheap and b) meh, good enough.

Is that any way for a man who claims to be a fancier of fine textiles to act? No, it is not.

Out of the Past

A few years ago I was visiting a friend’s great-aunt, and the friend told her that I knit and crochet. The great-aunt said languidly that the afghan over the back of the couch upon which we were sitting was her own work, circa 1950; and it was the first and last thing she’d ever made because needlework was boring as all hell.

It was quite a showpiece, fashioned entirely from wool, weighing in at about three hundred and forty thousand pounds. Most fascinating to me were five square panels set into the center and corners, each embroidered with florals in cross stitch.

I asked if I could photograph it. She thought that was a weird request, and said no. She changed the subject to the voracious and seismic lovemaking of the newlywed couple in the apartment above. They, on cue, went into action at that very moment and we scrambled to keep the tea service from bouncing off the table. The afghan was forgotten.

Months and months later, I came into possession of a 1916 book of knitting and crochet patterns that included an afghan with cross-stitched panels.

fwf-58-bookpage
I strained my rudimentary crochet skills to understand the method, which the book called “afghan stitch,” and realized it was what I had seen demonstrated at a couple of fiber shows as “Tunisian crochet,” and had read about in a few Victorian books as “tricot crochet” or “tricot stitch.” (And yes, “tricot” is French for “knitting.” Foreshadowing!)

Ever since, I’ve been looking around for a chance to play with the technique, and at last hit me–why not do up a pretty sofa pillow/cushion cover in Tunisian crochet, and embroider it to suit?


The Apparatus

Now, the world of Tunisian crochet is large and varied. This is not the only stitch, but it’s the one called for in all old manuals for cross-stitched panels.

First, a note about the tools for working it.

Tunisian crochet is usually not made with typical crochet hooks, but specialized hooks intended for the purpose. Maker’s Mercantile sells them, and they are usually either double-ended, like these, or have a hook at one end and a stop at the other, like these.

But they also sell a set-up that interested me particularly because of the size of the panel I wanted to make. It looks like this.

fwf-58-hooksetup
An Addi Click Interchangeable Hook at one end, a cute little Addi Heartstopper at the other.

That’s a hook from the Addi Click Crochet Hook Interchangeable Set, with an interchangeable cable and, to keep the work from sliding off the end, an Addi HeartStopper. A long panel can be heavy, and using a hook on a cable means the weight of the growing fabric slides down the cable to rest, and won’t wreak havoc on your wrists as it might with a traditional hook–one of the same reasons circular knitting needles have become so popular, even for flat knitting.

Also, I knew I’d be working on this project on a lot of airplanes–and a short hook with a short cable is less cumbersome in an airplane seat and less attention-getting at security than a long metal hook.

The Tunisian Crochet or Afghan Stitch, Part I: The Set-Up

You may have noticed that those Tunisian hooks with an end stop look like knitting needles. That’s no coincidence, because this odd form of crochet acts a whole lot like knitting. (Hence the nineteenth century moniker “tricot crochet.”)

In fact, if you are a knitter and think you can’t possibly do this, let me give you all the fundamentals of the basic Tunisian stitch in two steps:

*1. Pick up and knit stitches into your fabric. Don’t turn the work.
2. Now bind off all but one of the stitches you just picked up. Repeat from *.

I’m not kidding. You pick up stitches and you bind them off. You can do that, right?

Let me show you how.

I’ll demonstrate some of the gold HiKoo Simpliworsted left from Rosamund’s superhero sweater. (If you want to crochet a washable afghan that incorporates this sort of fabric, Simpliworsted is a great choice.)

We have to start somewhere, and that somewhere is with a crochet chain. It’s no different than the standard chain you’d use to start a regular piece of crochet.

The chain has two sides to it. The front shows you little Vs.

chainvs

The back shows you little bumps.

chainbumps

We will work the next stage, the “forward” row of picked-up stitches, into the bumps.

Set-Up, Forward Row

Insert the hook into bump nearest the hook,

firstpickup

and pull through a loop of the working yarn. Now–and herein lies a great difference between Tunisian crochet and other sorts–we slip this new loop onto the shaft of the crochet hook. That’s right–just as we keep our knitting stitches on the shafts of our needles.

Continue to pick up a loop through every one of the bumps on the back of your chain, keeping all the newly-created stitches on the hook.

middle-of-setup-forward
In the midst of the set-up forward row.

Do not turn the work. That’s right–don’t turn the work. In fact, never turn the work.

Instead, we will now work a “reverse” row and bind off all these new stitches.

Set-Up, Reverse Row

Yarn over the hook, and pull a new loop through the stitch at the left end of the row.

setup-reverse-01
Yarn over hook, pull a loop through last stitch you made in your forward row.

Yarn over the hook, and pull a loop through the first two stitches on the hook.

set-reverse-02
Yarn over the hook, pull a loop through the first two stitches on the hook.

**Yarn over the hook, and pull a loop through the next two stitches on the hook.

Repeat from ** until you have only one stitch left on the hook.

setup-complete
The forward and reverse rows of the set-up are complete. One stitch remains on the hook. You’re ready to work the rest of the fabric.

Your set-up is now complete. The next section will tell you how to work the remainder of the fabric.

The Tunisian Crochet or Afghan Stitch, Part Two: All the Other Rows

You’ll continue to work your fabric in much the same way–with forward rows (right to left) in which you make new stitches; and backward rows (left to right) in which you bind off all but one of them.

Forward Row

Look at the fabric you’ve created in the set up. You will see a series of vertical “bars.” I’ve marked them here to make them obvious.

verticalbars

Each bar you see has a mate on the back side of the work. We will work only into the bars on the front until the last bar of the forward row.

Put the hook under the second bar in from the right selvedge of the work. Yarn over the hook and pull up a loop.

forward-01
Slide the new loop onto the shaft of the hook.

Repeat into the next bar, and all remaining bars until you reach the final bar–the one at the left selvedge.

forward-02
Working a forward row, making a stitch under each vertical bar at the front of the fabric.

Create the stitch at the left selvedge by sliding the hook under both the front and back bars, yarn over the hook, and pull up a loop.

forward-03
The left selvedge stitch is picked up under both the front and back vertical bars (outlined in orange).

This little change gives you a neat left selvedge that matches the right selvedge.

DO NOT TURN THE WORK.

Reverse Row

Note: This is pretty much identical the reverse row in the set-up!

Yarn over the hook and pull a loop through the first stitch on the hook only.

***Yarn over the hook and pull up a loop through the first two stitches on the hook.

Repeat from *** until one stitch remains on hook.

DO NOT TURN WORK.

first-row-completed
First complete row of fabric (made from one forward and one reverse row) completed.

Begin the next Forward Row, as above.

Bind off as you would any flat piece of crochet.

The fabric this stitch creates is intriguing: dense, cushy, and with a surface texture that reminds me of the little square cells in a waffle.

DSC05149

Destination: Throw Pillow 

For my pillow cover, I settled on HiKoo CoBaSi Plus. It’s a worsted weight–unlike the original CoBaSi, which is a fingering weight, and fabulous for wool-free socks and summer shawls.

fwf-58-hikoo-cobasi-plus
Yes, please.

CoBaSi Plus (a mix of cotton, bamboo, and silk–get it?) is strong, soft, durable, springy, lustrous, washable, and feels nice against your face–all important in a cushion you’d like to be beautiful and useful.

In setting about making my fabric, I learned a few things very quickly.

First, when guides to Tunisian crochet tell you to use a hook size that seems large for the weight of your yarn, they mean it. This fabric is tight. Use a hook that would be reasonable for, say, a granny square, you may find very that your fabric is impossible to work without damaging your fingers.

How do you figure out which hook to use? SWATCH. No way around it.

cobasi-swatch
I tried three sizes of hook. The smallest (at the bottom of the photo above) made a fabric so dense that was nearly impenetrable on forward rows. The largest (at the top) made a fabric loose enough for the fabric of the pillow form to show through…tacky. The hook in between (in the middle), a 5mm, was just right. You can barely see the difference in the photograph–but it’s there.

Also, Tunisian crochet has a reputation for being tough on the hands and wrists. I won’t disagree with that–it can be. Using the loosest suitable tension (therefore, the largest suitable hook) will help, as will avoiding yarns (like pure cottons) that don’t like to stretch.

I also found it was far easier on my hands and wrists when I grasped my hook knife-style (in the palm of the hand, rather than resting pencil-style on the thumb), and held it nearer the lower end of the hook, where it joined the cable.

Coming Up…

The making of the fabric was quite pleasant, if occasionally monotonous. But what I was really looking forward to was turning it into a big, bold piece of cross stitch.

fwf-58-newsletter-promo
For that more on that, see you in two weeks.

Tools and Materials Appearing in This Issue
HiKoo CoBaSi Plus (55% Cotton, 16% Bamboo, 8% Silk, 21% Elastic Nylon; 220 yards per 50 gram hank)
HiKoo Simpliworsted (55% Merino Wool, 25% Acrylic, 17% Nylon. 140 yards per 100 gram hank)
Addi HeartStopper
Addi Click Crochet Hook Interchangeable Set

About Franklin

Designer, teacher, author and illustrator Franklin Habit is the author of It Itches: A Stash of Knitting Cartoons (Interweave Press, 2008). His newest book, I Dream of Yarn: A Knit and Crochet Coloring Book was brought out by Soho Publishing in May 2016 and is in its second printing.

He travels constantly to teach knitters at shops and guilds across the country and internationally; and has been a popular member of the faculties of such festivals as Vogue Knitting Live!, STITCHES Events, the Maryland Sheep and Wool Festival, Squam Arts Workshops, the Taos Wool Festival, Sock Summit, and the Madrona Fiber Arts Winter Retreat.

Franklin’s varied experience in the fiber world includes contributions of writing and design to Vogue KnittingYarn Market News, Interweave KnitsInterweave CrochetPieceWorkTwist Collective; and a regular columns and cartoons for Mason-Dixon Knitting, PLY Magazine, Lion Brand Yarns, and Skacel Collection/Makers’ Mercantile. Many of his independently published designs are available via Ravelry.com.

He is the longtime proprietor of The Panopticon, one of the most popular knitting blogs on the Internet (presently on hiatus).

Franklin lives in Chicago, Illinois, cohabiting shamelessly with 15,000 books, a Schacht spinning wheel, four looms, and a colony of yarn that multiplies whenever his back is turned.

Follow Franklin online via Twitter (@franklinhabit), Instagram (@franklin.habit), his Web site (franklinhabit.com) or his Facebook page.


This Is Not Going to Be Pretty, Part III: Actually Kind of Pretty

fwf-logo-columnsizeFor an introduction to what goes on in this column, click here.

For the beginning of this project, click here.

I knew if I hesitated before setting the uneven warp to rights, I’d never finish this piece of weaving. I had to take the tide of madness at the flood.

The bunny who represents my Better Judgment had given up on me for the time being and was posting Instagram selfies from various scenic locations in central Ohio.

fwf-58-bunny-selfie
After a fitful night’s sleep, I carried the loom back down to the cellar, clamped it to the table, and set about unrolling the warp. In anticipation, had already cut a long strip of freezer paper to the proper width, carefully, using a rotary cutter and self-healing mat.

In theory I would unwind the warp and re-wind it with proper separation (the freezer paper) between the layers. This isn’t a fun thing to do, but it can be done.

I got about three feet of yarn free of the loom. Then it refused to budge. Refused.

I investigated and found my previous sloppiness had allowed about forty strands at the left edge to slide so far off course that they were now tangled around the warp beam, around the cords that hold the bar to the warp beam, around the bar itself, and around each other.

This meant I couldn’t unroll the warp. I’d need to untangle it–one strand at a time. Then tie the untangled ends to the warp beam. Then re-sley the reed. Then re-wind the warp.

Now ensued a dark, dark moment of the soul in which I considered ripping it all to shreds. Not just the warp. Also the loom. And then setting the house on fire, and changing my name, and moving to Mexico, and beginning life anew as one of those people who sells decorated coconuts outside Señor Frog’s in Cozumel.

If you think I’m kidding, you’ve never stood and contemplated how long it will take you to separate two hundred sticky alpaca warp threads, enmeshed together more tightly than an entire subdivision of suburban swingers throwing themselves into the last orgy before school lets out.

I would show you photographs, but I haven’t any. I was so utterly demoralized I couldn’t pick up the camera.

The only thing that got me through the dark moment was you, dear reader. Also you, and you, and those other readers over there.

It turns out the fear of total failure in front of thousands of people is, for me, motivational.

It took me two days to get the warp back on the loom.

Then I had to weave the damn thing.

fwf-58-rewound

Gettin’ Sticky With It

The re-wound warp was evenly tensioned, but still sticky as an entire subdivision of suburban swingers who have just finished throwing themselves into the last orgy before school lets out.

Baby llama likes to cling to itself. It may become stickier still if you paint it.

This extra-sticky yarn will be even more inclined to stick if you sley it close together. That’s what I had done by putting the Delilah Undyed DK Yarn into in the 12-dent reed that would normally hold fingering or lace weight yarns.

Why do this? Because when you want a warp-dominant fabric–which was my original goal–you will tend to pack the warp threads closer together.

The result of all this stickiness? My sheds wouldn’t open. I’d move my reed up or down, and the warp would just kinda sit there and laugh.

I was able to take care of the worse of the two sheds–the down shed–with a pick-up stick. I put the reed into the down position, then carefully opened the shed with the stick. Once it was open, I put the stick into the shed behind the heddle and kept it there.

fwf-58-stickplacement
When it was time for a down shed, I brought it forward to just behind the reed and pressed it downward. Ta-daaa, open shed. It was an extra step, but it was still faster than having to open the down shed bit by bit.

When it was time for an up shed, I slid the stick to the back of the loom.

Unfortunately, I couldn’t insert a corresponding pick-up stick for the up shed. The two sticks wouldn’t slide past each other behind the heddle as they went into and out of service.

The up sheds took a long time to open. The fabric was creeping along.

I was having renewed visions of selling souvenir coconuts when one of the finest weaving teachers I know–Susan, the owner of Yarnorama in Paige, Texas–stepped in with some advice:

1) Crank up the tension on the warp. Crank it as high as it will go without snapping threads.

2) Spray the warp, as it comes off the warp beam, with a bit of hair spray.

The latter suggestion sounded a little Out There, frankly; but at this point I was desperate. If she had told me to dip the entire loom in honey mustard I would have tried it.

6a00d83451ccbc69e20134852ba7f2970c-600wi

It worked. The sheds began to separate. Not always perfectly, but near enough to make me happy.

fwf-58-weavingitoff

Reader, I Finished It

How to describe the feeling of pulling the woven fabric off the loom? My thesaurus fails me. A fizzy cocktail of relief, joy, pride, excitement.

fwf-58-offdaloom
I secured the ends with hemstitching (which is discussed at length in our previous undertaking, The Warp with Two Brains). Because both the warp and weft (HiKoo Alpaca Lace Light) yarns were–have I mentioned this?–sticky, I worked the hemstitching with pure cotton sewing thread in a pale ecru that matched the warp.

fwf-58-newsletter-shot
A wet finish was essential. There are different ways of doing it. Here’s what I did for this project:

1) I tossed the fabric into hot water with some Soak,

2) smacked the heck out of it with a couple of hefty wooden spoons for a good fifteen minutes (therapeutic),

3) plunged it into cold water, then

4) threw it into my washing machine’s normal spin cycle to remove the excess moisture.

Some folks iron their damp woven fabrics dry at that point. I had other things to do, so I laid mine flat in a space where I was reasonably confident it would be left alone. I took care to make sure it was flat, because there is a danger at this point that wrinkles you leave in place may, in fact, become permanent.

When it was dry, I trimmed the ends

fwf-58-edgetrim

and then brushed them with a hairbrush to make them a little looser and bushier. Not a complete frizz, mind you. And that was purely a design choice. I just thought it looked nicer that way.

fwf-58-fringe

Warp a Lot, Weave a Little

I planned a large wrap with a painted lotus pattern. I put on nine feet of warp.

In the end, I created a scarf 13 inches wide and five feet long. The painted warp is dominant and clearly visible, but the lotus pattern is just a shadowy memory.

During the final spin, some of the twist in the warp let go, so and created interesting little passages of looser, fluffier fabric.

fwf-58-untwist
The fabric is buttery soft. The drape is FAB. U. LOUS.

fwf-58-finished-wrap

This is, without question, the most luxurious and interesting textile I have yet woven. I learned a lot, most of it the hard way. I am excited to try a painted, patterned warp again–knowing what I know now.

I’m glad I did it. Even the Bunny admits that, in the end, the destination was worth the journey. Right? Right?

fwf-58-bun-tired
Next Time…

I cannot wait to show you what I’ve been doing to these skeins of HiKoo CoBaSi Plus

fwf-58-hikoo-cobasi-plus
with these things…

fwf-58-addi-hook-addi-heartstopper

Tools and Materials Appearing in This Issue

Schacht Cricket Rigid Heddle Loom (15-inch version shown)
Schacht Cricket 12-Dent Reed (for 15-inch loom)
Schacht Cricket 15-inch Pick-Up Stick (also available in 10-inch length)
Delilah Undyed DK Yarn (100% Baby Llama, De-Haired)
HiKoo Alpaca Lace Light (shown in 1006 Smoke, 100% Baby Alpaca, 1540 yards per 100 gram hank)
HiKoo CoBaSi Plus (55% Cotton, 16% Bamboo, 8% Silk, 21% Elastic Nylon; 220 yards per 50 gram hank)
Addi HeartStopper
Addi Click Crochet Hook Interchangeable Set
Createx Acrylics Fabric Paint

About Franklin

Designer, teacher, author and illustrator Franklin Habit is the author of It Itches: A Stash of Knitting Cartoons (Interweave Press, 2008). His newest book, I Dream of Yarn: A Knit and Crochet Coloring Book was brought out by Soho Publishing in May 2016 and is in its second printing.

He travels constantly to teach knitters at shops and guilds across the country and internationally; and has been a popular member of the faculties of such festivals as Vogue Knitting Live!, STITCHES Events, the Maryland Sheep and Wool Festival, Squam Arts Workshops, the Taos Wool Festival, Sock Summit, and the Madrona Fiber Arts Winter Retreat.

Franklin’s varied experience in the fiber world includes contributions of writing and design to Vogue KnittingYarn Market News, Interweave KnitsInterweave CrochetPieceWorkTwist Collective; and a regular columns and cartoons for Mason-Dixon Knitting, PLY Magazine, Lion Brand Yarns, and Skacel Collection/Makers’ Mercantile. Many of his independently published designs are available via Ravelry.com.

He is the longtime proprietor of The Panopticon, one of the most popular knitting blogs on the Internet (presently on hiatus).

Franklin lives in Chicago, Illinois, cohabiting shamelessly with 15,000 books, a Schacht spinning wheel, four looms, and a colony of yarn that multiplies whenever his back is turned.

Follow Franklin online via Twitter (@franklinhabit), Instagram (@franklin.habit), his Web site (franklinhabit.com) or his Facebook page.
It’s the most pom pom time of the year

Good tidings of great joy dear readers! It’s time for that last minute rush of making and wrapping and getting ready for Christmas! Cee Cee has some ideas for wrapping gifts and a top ten list to help you make the best pom poms ever. In an effort to help her find her own creative voice, I’m trying something new and just being quiet. :Whispers Merry Christmas and backs away slowly:

Cee Cee’s Top 10 Tips for Fabulous Pom Poms:

1. Use wool yarn (acrylic and cotton doesn’t stick to itself as well as wool)

2.Use lots of wraps!( I’m not sure you can wrap too much!)

3. Use good scissors. The pointier the better. Be careful and don’t stab yourself.

4. Have fun with color!!

5. Use thread to tie them off. ( I like quilting thread.)

6. Tie off as tight as you can. Mom and I often work together on this part to get the thread really tight.

7. Trim carefully and shape a little at a time.

8. PAY ATTENTION to what you are cutting!

9. Keep pom poms away from washing machines and small children.

10. Make more pom poms!!!!!!

And now for some cute package ideas!

Pom pom kitty playing in ribbon.

Cut the loops on a bow and put a pom pom in the middle.

Reindeer nose! (Deer is just cut out of paper and the antlers were a toliet paper roll.

Peppermint candy pom pom (wrapped in cellophane. Use packing tape to secure. Packing tape just blends in with the cellophane and doesn’t show up much.

Or just use a pom pom instead of a bow

I really like to use solid colored paper so I can just go crazy adding decorations. This paper is chalkboard paper from Nashville Wraps.

And now for a little needle felting…

I made needle felted peppermint candy from just a small amount of art felt. I used red and white, but you could make candy in lots of different colors.

First I lay out a small amount of red and white art felt. Be sure not to use too much red.

Twist it together and tie in a knot. Then lightly needle felt the ends on the back. I didn’t felt this into a hard ball. I just lightly felted it so it would stay soft and swirly.

And it’s just the sweetest decoration!

And now one more thing before I turn this over to Mom, if you need something to watch this holiday season…watch Victorian Farm Christmas . It’s my favorite. I love the part where Alex makes marbled paper. Merry Christmas! Come visit next month…I’m making a snowman and celebrating my 15th birthday!

Cee Cee made gift wrapping so easy this year that we are heading out to wrap gifts for a friend this afternoon….

And yesterday she got a big box from Makers’ Mercantile and she has a knitting machine! So I can’t wait to see what creative projects 2018 brings! See you next year!


-Cee Cee

ABOUT 

CeeCee1Cee Cee Creech is growing up in a home full of creativity. Mom BeLinda loves making things, and Cee Cee loves it too. In 2011, Cee Cee changed their lives when she wanted to knit elephants to comfort the residents of Joplin, MO after a tornado destroyed their town.

This mom/daughter team has raised thousands of dollars, and made/distributed toys for charities all over the world. Today, Cee Cee is a high school student, curious maker, and the teen craft ambassador for Makers’ Mercantile. Follow their adventures on the Craft Corner.


This Is Not Going to Be Pretty, Part II: The Warpening

fwf-logo-columnsizeFor an introduction to what goes on in this column, click here.

I don’t want for a moment to give the impression that the idea I started messing with last time–painting a pattern on a warp-dominant fabric–is original to me.

fwf-56-finishedlotus
The experiment begun. For full details, see the previous installment of “Fridays with Franklin.”

There are many forms of weaving that paint or dye the warp to create a pattern in the finished cloth.

My inspiration was a fabric, not terribly well known these days, called chiné. Now, chiné (shee-NAY) is not the same as crèpe de chine or China silk. The name means “Chinese” and it may well have originated in China; though the examples of it that inspired me are not, in fact, Chinese, but French. Are you with me so far?

Chiné probably hit its all-time peak of popularity in France in the latter part of the 18th century. There is a tradition (not terribly well founded) that Madame de Pompadour liked to wear it, so on occasion you’ll find it called “Pompadour Taffeta.”

It’s expensive to produce. Christian Dior used it in the heyday of the New Look; and more recently designer Raf Simons (the now-former Creative Director of Dior) put it into his first collection for the house.

The fundamental aspect of chiné is the pattern painted upon the stretched warp threads before weaving–just as I painted my lotuses. The pattern persists in the finished fabric.

Here is a spectacular example from the collection of the Metropolitan Museum of Art in New York: a silk and linen evening overdress from the tail end of the eighteenth century. (For full details, see the dossier on the Met’s Web site.)

Picture 029
Evening Overdress in Chiné Weave. British, 1797-99. Collection of the Metropolitan Museum of Art, 2009.300.2198a, b. Image courtesy of the Metropolitan Museum of Art.

That repeating sprig motif is woven right into the fabric. You can see it clearly in this view of the back.

Picture 008
Detail of Evening Overdress in Chiné Weave. British, 1797-99. Collection of the Metropolitan Museum of Art, 2009.300.2198a, b. Image courtesy of the Metropolitan Museum of Art.

The hallmark of chiné, which you either like or you don’t, is patterns that have lost their hard edges and become either dreamy as watercolor (if you like them); or blurry and out-of-focus (if you don’t).

I like them.

The softness is in part a result of painting upon those parallel strands of warp. During the painting process, they’re close together and held in place at both ends. They can support motifs with a fair amount of detail, like (or so I hoped) my lotus:

lotus-whole-orange

When the warp is wound onto the loom so weaving can begin, those painted parallel strands will inevitably shift a bit vertically in relation to one another. This result is a visual shimmer, sort of like this.

lotus-shiftedRe-Enter the Bunny of Better Judgment

You remember this fellow from last week? The Bunny of my Better Judgment?

bun-hitired

Direct-warping a rigid heddle loom like my Schacht Cricket isn’t difficult or terribly time-consuming. I can usually put a plain warp on in an hour or less.

But this warp, because it was going to be painted, couldn’t be done in the comfort of my dining room. No, I had to work in the unheated cellar of the Chicago Victorian in which I live–in November. It’s dark and chilly down there, and it kinda smells like the fall of the house of Usher.

The stretched, nine-foot warp had to be stenciled. I’d never done that before. It took ages to finish each motif, especially before I got a feel for the process about halfway through.

fwf-56-paintedwarp

By the time all the paint had dried to the touch, it was late and getting dark (or maybe my vision was going black). My feet hurt and my neck hurt and my knees hurt and my toes were numb and Rosamund needed to go for a walk and I was hungry and…

Project - Sketch 1_5

Yes. It would have been perfectly reasonable to call a halt, run around the neighborhood with Rosamund, and enjoy a celebratory fizzy water.

Instead, I decided to rush forward and wind on the warp. It would feel so good, I thought, to know I could start cranking out fabric the next morning.

Project - Sketch 1_8

How Not to Wind on Your Warp

I have never had trouble winding on a warp before. Not once. Not even though I am still a rank novice of a weaver.

I clipped the peg-end of the strands and started to crank, and immediately had issues at both ends of the process.

At the peg end, I had done nothing to keep the threads under tension. They began to shift, and continued to shift, and never stopped shifting until they were tied on. If you can’t guess that happened because of that, you’ll see in a moment.

At the loom end, I decided to use the roll of freezer paper (the paper I’d used to make my stencil) as a warp separator.

You can’t just crank your unwoven warp onto the naked back beam. You need to separate the layers, as they build up on the beam, with something sturdy–stout paper, slats of wood, slats from a window blind. Otherwise the yarns sink into one another and your tension is uneven. When your tension is uneven, your finished fabric is correspondingly uneven.

I had always used sliced-up brown paper bags to separate my warp, and I reuse the same paper repeatedly. But my brown paper stash was insufficient for this project–it wasn’t long enough and it wasn’t wide enough. The freezer paper was wider than the beam, but I figured I could just fold it up and stuff it in.

I should have measured it carefully and sliced precisely it to make a single layer of paper just wide enough. I didn’t.

I just rolled and folded. Usually my folding wasn’t very good. The paper shifted and bunched. I just kinda scrunched it down and kept winding.

Project - Sketch 1_6

Garbage In…

At length, the warp was wound, and so was my bobbin of quite gorgeous HiKoo Alpaca Lace Light.

filled-bobbin
HiKoo Alpaca Lace Light, ready to become weft. It’s so good that it has re-awakened my long-dormant fine lace mojo. That’s another column, though.

I don’t even have time this week to tell you about everything that went wrong with the weaving–I’m saving some of that for the next column.

I’ll tell you this. The devil-may-care folding and scrunching of the separating paper caused the tension of my warp threads to vary so widely that every shot of weft was an adventure. Would it pack in? Would it not? Heck, would the shed even open for me?

At great length, and only with much swearing and sweating and salty tears of frustration, I had woven a whopping five inches of fabric in the amount of time it would usually take to weave fifteen. This warp was, may I remind you, nine feet long.

Press Rewind

A sane person would have declared the warp a “dog” (weaving slang for a warp that just won’t work), cut it off, and thrown it out. I was tempted.

I was at least going to need to re-wind it with proper tension and a proper spacer. I decided to think it over, and meanwhile cut off the five woven inches and wet finish them.

This is what came out.

sample-02

I wish you could feel it. It’s dreamy. Weightless. Soft as Rosamund’s tummy. Drapes like mad.

sample-01
I have to admit that I even like the way the uneven weft (the result of the lousy winding job) wiggles back and forth, spreading in some places and bunching in others. Thanks in part to the sticky alpaca and llama fibers, no part of the fabric is unstable.

sample-03

Mind you there’s no pattern at all. Nothing but now-random scatters of paint. It’s pretty, but it’s not the lotus I drew. That part of the experiment is a complete flop–this time. I will try it again.

The fabric, though…I loved the sample fabric. I had to see how it would turn out. I had to keep going.

See you in two weeks.

Tools and Materials Appearing in This Issue

Schacht Cricket Rigid Heddle Loom (15-inch version shown)
Schacht Cricket 12-Dent Reed (for 15-inch loom)
Delilah Undyed DK Yarn (100% Baby Llama, De-Haired)
HiKoo Alpaca Lace Light (shown in 1006 Smoke, 100% Baby Alpaca, 1540 yards per 100 gram hank)
Createx Acrylics Fabric Paint

About Franklin

Designer, teacher, author and illustrator Franklin Habit is the author of It Itches: A Stash of Knitting Cartoons (Interweave Press, 2008). His newest book, I Dream of Yarn: A Knit and Crochet Coloring Book was brought out by Soho Publishing in May 2016 and is in its second printing.

He travels constantly to teach knitters at shops and guilds across the country and internationally; and has been a popular member of the faculties of such festivals as Vogue Knitting Live!, STITCHES Events, the Maryland Sheep and Wool Festival, Squam Arts Workshops, the Taos Wool Festival, Sock Summit, and the Madrona Fiber Arts Winter Retreat.

Franklin’s varied experience in the fiber world includes contributions of writing and design to Vogue KnittingYarn Market News, Interweave KnitsInterweave CrochetPieceWorkTwist Collective; and a regular columns and cartoons for Mason-Dixon Knitting, PLY Magazine, Lion Brand Yarns, and Skacel Collection/Makers’ Mercantile. Many of his independently published designs are available via Ravelry.com.

He is the longtime proprietor of The Panopticon, one of the most popular knitting blogs on the Internet (presently on hiatus).

Franklin lives in Chicago, Illinois, cohabiting shamelessly with 15,000 books, a Schacht spinning wheel, four looms, and a colony of yarn that multiplies whenever his back is turned.

Follow Franklin online via Twitter (@franklinhabit), Instagram (@franklin.habit), his Web site (franklinhabit.com) or his Facebook page.