
![]() For an introduction to what goes on in this column, click here.
For an introduction to what goes on in this column, click here.
“Fridays with Franklin” is all about experimentation, but this latest project–this is way out on the edge for me. I’m going to be playing with “artfelt” (the lowercase is official), a felting process that–so I have been told–allows even a novice to make interesting and possibly even beautiful felted fabrics with a minimum of fuss and botheration.
I have never felted anything before–not even, though I may be tempting fate by saying this–not even by accident. But I have a project in mind.
Ages ago, I found this little footstool at vintage shop near my apartment.

It needs some love. There are minor joinery issues to address, which I can handle. Then there is the upholstery, which is neither original nor attractive nor well done.
I’d like to make this a piece of furniture I can use, and in fact I need it–I’m so short that when I sit back in my favorite knitting chair, my feet don’t touch the floor. I want to reupholster it with handmade fabric.
Knitting and crochet don’t make the right sort of fabric for upholstery. I could weave, but I’ve only just done some weaving and I want to try something new. Karin Skacel (yup, THAT Skacel) has done an entire armchair and ottoman in artfelt…

…so I figure that even I, who have no clue about this stuff, should be able to do something about a tiny footstool.
We’ll see.
Testing, Testing
Now, I’m not going to give you a complete artfelt how-to tutorial here. First–have I mentioned this?–I’m a newbie. Second, Karin Skacel (yup, THAT Skacel) has a complete tutorial on video:
I am going to tell you, this week, what I did to test the process and begin to get a feel for it.
First, something about the tools. The artfelt process is all about wool, and I used Makers’ Mercantile’s own line of felter’s wool roving.

It’s lovely stuff–equal in quality to any decent roving I’ve bought to spin with. In fact I was tempted to spin with it. But no, one must focus. One must not flit off to another craft.

No. NO.
The other tools you need for artfelt are these freaky looking needles with barbs on the shaft…

I SAID THE OTHER TOOLS YOU NEED FOR ARTFELT ARE THESE FREAKY LOOKING NEEDLES WITH BARBS ON THE SHAFT…

…and artfelt paper. The paper is the key to whole thing–it holds your fibers in place before the actual felting begins. You can buy it many sizes, and in fact you can buy it by the yard. I cut out two small (four by six inch) sheets for my test.

It was important for me to know the starting size of my pieces, because even I knew that the felting process means shrinkage. To make enough felt to cover the stool, I had to know how much paper at the beginning would give me sufficient yardage in the end.
In addition to the wool, the needle, and the paper, you also need a surface to support the work. Ideally, this ought to be an artfelt Tackboard, but I didn’t have one. What I did have was a piece of upholstery foam that’s intended to become a cushion for the back porch next summer. I decided to try it while waiting for my Tackboard to arrive.
I put the paper on the foam. I pulled off a bit of roving…

…and put it on the paper…

…then I stabbed the roving into the paper with repeated jabs of the needle. Jab jab jab. Stab stab stab! STAB! This was, I must admit, both fun and therapeutic.
The needle pushes the fiber through the paper, and the paper holds it in place. Here’s what it looks like on the reverse.

I was surprised at how little stabbing it took to hold the wool in place. This wasn’t exhausting, nor did it take very long–a mere minute, maybe less.
I kept adding more wool. I was curious about things like blending colors, so I laid one over the other. I changed the direction of the fibers. I added a curlicue. In other words, I messed around.


Here’s the reverse side.

It’s nice to be able to mess around the first time you try something. In fact, I’d say it’s vital to be able to mess around. There were no stakes with this test fabric. It could be beautiful, it could be disgusting.
The point was to get a feel for the materials and the process. Until you know something about those–no matter what your craft–anything good you make will be a happy accident.
My first piece of paper ended up like this.

The layer of wool was on the thin side (about a sixteenth of an inch), and I wasn’t sure if it was enough to give a stable fabric. For the second piece…

…I deliberately added about twice as much wool. It was about an eighth of an inch deep where I piled it on most heavily.
To this point, you’ll note that artfelt is a completely dry process. I appreciated that. One thing I disliked about wet felting when I’d seen it done was the slopping around with wet wool. A purely personal reaction–just not my cup of tea.
artfelt, by contrast, let me work on a dry table with dry hands. It was all very tidy. Nice. Pleasant.
After you’ve got the wool in place, a piece of artfelt is soaked thoroughly and then rolled in plastic. In her tutorial, Karin says something thicker than plastic cling wrap is advisable, so I cut up two old sandwich bags (having first washed out the crumbs) and secured the ends with rubber bands.

I love Karin’s suggestion of using a nylon trouser sock to hold the rolled-up pieces; but in this house nylon stockings are not much in evidence. So for this test I popped them into a cotton project bag and tied it shut.
Then, into the dryer. I used a medium heat, and checked the progress every ten minutes. I haven’t got a shot of the first two checks because I got wildly overexcited and forgot to take pictures.
But here are the pieces after thirty minutes.

At thirty minutes, I felt (ha ha) the fabric looked ready. The loose fuzz was gone from the surface. The fibers felt thoroughly melded. The paper was nearly dissolved.
So I completely removed what remained of the paper with boiling water (again, see Karin’s video demonstration) and left the pieces to dry.
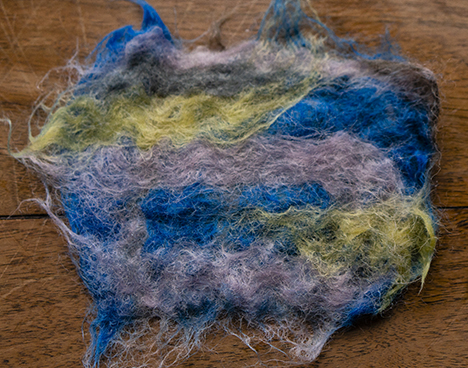
Here’s what I got.


Now, neither of these is going to win a beauty contest. To my eye, “blending” the fibers takes one rather in the direction of dryer lint. Not pretty. I’ll aim to keep colors separate in my next attempt to give a clearer, neater result.
The first piece, with the thinner layer of fiber, resulted in a fabric stout enough to be durable but flexible enough to be cut into a garment (it would make a decent scarf) or wrapped around a cushion.
The second, thicker piece would be better for something like a hat or felted bowl. Good to know.
As to shrinkage, both pieces ended up at about 3 inches by about 4 3/4 inches–a significant change from 4 inches by 6 inches. I’ll use that information in the future to estimate how much paper I need to cover in order to end up with a sufficiently large finished fabric.
Verdict so far: This artfelt stuff is fun. It’s (amazingly) quick. And it’s wonderfully easy to learn.
So…shall we try it for realsies?
See you in two weeks!
Tools and Materials Appearing in This Issue
Makers’ Mercantile Felter’s Wool Roving (50g hanks)
Bryson Felting Needle #38 gauge, 3 1/2 inch
artfelt Paper
artfelt Tackboard
About Franklin
Designer, teacher, author and illustrator Franklin Habit is the author of It Itches: A Stash of Knitting Cartoons (Interweave Press, 2008). His newest book, I Dream of Yarn: A Knit and Crochet Coloring Book was brought out by Soho Publishing in May 2016 and is in its second printing.
He travels constantly to teach knitters at shops and guilds across the country and internationally; and has been a popular member of the faculties of such festivals as Vogue Knitting Live!, STITCHES Events, the Maryland Sheep and Wool Festival, Squam Arts Workshops, the Taos Wool Festival, Sock Summit, and the Madrona Fiber Arts Winter Retreat.
Franklin’s varied experience in the fiber world includes contributions of writing and design to Vogue Knitting, Yarn Market News, Interweave Knits, Interweave Crochet, PieceWork, Twist Collective; and a regular columns and cartoons for Mason-Dixon Knitting, PLY Magazine, Lion Brand Yarns, and Skacel Collection/Makers’ Mercantile. Many of his independently published designs are available via Ravelry.com.
He is the longtime proprietor of The Panopticon, one of the most popular knitting blogs on the Internet (presently on hiatus).
Franklin lives in Chicago, Illinois, cohabiting shamelessly with 15,000 books, a Schacht spinning wheel, four looms, and a colony of yarn that multiplies whenever his back is turned.
Follow Franklin online via Twitter (@franklinhabit), Instagram (@franklin.habit), his Web site (franklinhabit.com) or his Facebook page.
2 thoughts on “Fridays with Franklin: Hot and Wet”
Comments are closed.