
![]()
I cannot tell you how many times I said to anyone who would listen that knitting was quite enough. I had no need or desire, I said, to learn to spin. Then I made friends with an accomplished spinner. Now I spin.
Then I said to anyone who would listen that knitting and spinning were plenty for one man, thank you, and I had no intention of learning to weave. Then I made friends with a master weaver. Want to guess what happened?
Our next adventure is weaving.
Disclaimers
Before we jump in, two things.
Thing One: Don’t stop reading this because you don’t have space for a loom. Neither do I. We’ll address that right off the bat.
Thing Two: I have only the barest idea what I am doing here. I weave, I have woven, I will weave. What I am not yet able to say with a straight face is I am a weaver. I’m a fledgling, fumbling along mostly on my own with help from books and the aforementioned master weaver, who lives several hundred miles away.
My mistakes (they are legion) will be on full display. Take everything I write for what it is–the hopeful fumbling of an enamored amateur. But also keep in mind that if I can do this, so can you.
These Fridays are supposed to be about setting out for new horizons–so off we go.
The Question of the Loom
I avoided weaving for years largely because I didn’t think I could accommodate the furniture. I live in a city apartment. It’s big enough for most practical purposes, but–a loom? Are you kidding me? You’ve seen looms, right? I had seen looms, in those gorgeous, grim paintings by Van Gogh.

That guy is sitting inside the loom. By my calculations, it has roughly the same footprint as a Toyota Camry.
I knew there were smaller looms, but assumed (with an ignorance of which I am now ashamed) that you couldn’t do anything interesting on them. Simple weaving? Bah. I’d been a Boy Scout, I’d gone to camp, I’d made potholders. I was not interested in doing that again.
Then, as sometimes happens, a rigid heddle loom–a Schacht Cricket–arrived in the mail.
Meet the Loom
This is a completely naked Schacht Cricket. It’s the big one, with fifteen inches of weaving width. There’s a ten-inch size, too. Both are smaller than a Toyota Camry.
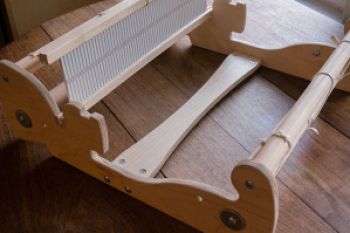
It doesn’t look like much, does it? What kind of weaving can you do on that?
A full-length introduction to rigid heddle weaving is beyond the scope of this column–and beyond the scope of my expertise. But for those who are not weavers (yet), here’s what you need to know to follow along.
The picket fence thing that’s sitting in the loom frame

is called the reed, and the little slats inside it are called heddles. Notice that you have slots between the heddles, and that each of the heddles has a little hole in the center. That’s going to be very important.

A rigid heddle loom like the Cricket has three notches that allow you to park the reed in three different places: up, down, and neutral.

How the Loom Works
Before we can weave, we have to put something on the loom to weave into. That something is an organized array of strings called the warp.
I’ll talk about the process of putting on the warp (more elegantly referred to as “dressing the loom”) later on. For now, I want to show you what happens with the warp once it’s in place.
Notice (you’ll have to look closely) that in this little sample warp, each of the holes in the reed has a strand of red running through it, and each of the slots has a strand of blue running through it.

That’s a shot of the warp with the reed in the “neutral” position. All the threads are roughly level with one another. That poses a question. If the warp is the thing we weave into, how exactly do we do that? What path does our weaving yarn–which is called the weft–take through the warp?
To find our path, we move the reed into the “up” position and–voilà–all the red threads move up, creating a neat little tunnel (called the shed) for our weft yarn to pass through.

After one pass of the weft through this shed (that’s called a pick), we move the reed to the “down” position, and look what happens.

The threads have changed places. The blue threads are up, the red are down. The change in the position of the reed has changed the shed. We send our weft through this shed.
Then we go back to the up shed. Then the down shed. Then the up shed. Then the down shed. On and on, until our fabric is complete.
If we do that and only that, we make plain weave–the most basic weave. It’s so basic, it’s what I’d used to make pot holders as a Boy Scout.
But the rigid heddle has another trick up its sleeve–the pick up stick.

All by itself, the pick up stick–which looks like an overly ambitious tongue depressor–expands the possibilities of the rigid heddle loom almost infinitely. Here is how it is most often used.
After putting the reed into the down position, you take the pick up stick and you pick up (get it?) certain threads in the top of the shed according to the pattern you wish to weave. In this photograph I’ve done a very simple pick up: one up, one down.

Now watch what happens. If I put the reed in neutral and stand the pick up stick on edge, I get a third shed with a different combination of threads raised and lowered. This is usually called the “pattern stick shed.”

That’s undeniably groovy, but there’s even more.
If we put the reed in the up position and slide the stick forward (keeping it flat) we can get a fourth shed (usually called the “up and stick shed”).
Four sheds–up, down, pattern stick, up and stick–all on one tiny loom with one stick. And that, friends, is where rigid heddle weaving and nice-potholders-for-mommy begin to part company. Four sheds means we need not limit ourselves to plain weave.
All that’s needed is a plan, a delicious yarn, and a warp.
The plan is ready.
The yarn is ready.

The warp–that’ll take some time.
The next part of this adventure will appear in two weeks. (No, it won’t take two weeks to warp the loom. But this installment is at over a thousand words already, and I think you deserve a break.)
Tools and Materials Appearing in This Issue
Schacht Cricket Fifteen Inch Rigid Heddle Loom and pick up stick by Schacht Spindle Company.
4 thoughts on “Fridays with Franklin – The Adventure of the Scarf That Ate the World, Part One”