
![]() Adventure on the Floor, Conclusion
Adventure on the Floor, Conclusion
For an introduction to this ongoing series, click here.
For the first part of this adventure, click here.
When last we met, I was considering giving up all fiber arts forever after four bloody rounds with a vintage pattern from this booklet…

…which purports to instruct one in the method for making rugs and mats from crochet-covered clothesline.
It did not, as you know, go well.
The technique, previously outlined in detail, is simple and easily mastered. The shaping of the oval, however, could most kindly be described as an exercise in surrealism.
After giving the pattern every opportunity to prove itself, I tossed it aside. That it landed in the fireplace on top of a burning log is no coincidence.
All I needed to do was crochet an oval. I suspected that possibly–just possibly–I was not the first person in history to have this in mind.
Let’s Make An Oval
Indeed. I’d only typed “C-R-O-C-H-E-T-O-V” when Google vomited a cascade of related articles, most offering close variations on the same formula.
In a nutshell:
- Determine the desired length of your straight sides. This length will remain constant.

2. Create a chain stitch “spine” of this length as a foundation
3. Work your increases at the ends of this spine.

4. The rate of increase is either three or six stitches per end, regularly spaced.

5. Increase in every round at these three (or six) points. Note that the number of stitches between the increases will increase by one each time.

That’s it.
Would it work for the rug?
It Worked for the Rug
Yep. I see no point in keeping you in suspense. You’ve suffered enough.
Experienced crochet types can probably sit down and wing it. Newbies might like to follow this rambling recipe.
You’ll need:
42 yards (38.5m) of clothesline (more, if you want a larger rug)
two skeins Hikoo Simpliworsted(more, if you want a larger rug)
locking-ring stitch markers (minimum of 4)
1 crochet hook, size 3.5mm
Do this:
Build the Foundation
- Work 67 chain stitches as the central spine of the rug. If, like me, you are a new crocheter who has trouble keeping count, shove a stitch marker into every tenth stitch.

Remove them after you’re sure you have the proper number in your chain.
NOTA BENE: From this point, absolutely all stitches will be worked over clothesline as described in Part One. You will be looking at the wrong side (bottom) of the rug as you work.
Work Round 1
- Beginning with second chain from hook, 1 single crochet into the left edge of each chain stitch to within 1 chain from end. (Review this installment for more information.)
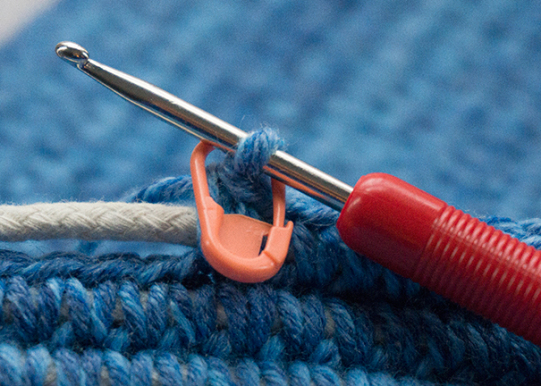
- Place marker by slipping it around the neck of the stitch you’ve just made. (That’s how you’ll place all markers in this piece.)
3. First increase! Woooo! Single crochet 6 into the last chain. Go on, shove ’em all in there. (Savor the moment. This is as exciting as it gets.)
4. Still with the wrong side facing you, single crochet 65 into the right edge of the foundation chain stitches, placing markers around the necks of the first and last of these.
5. Single crochet 6 into the last chain stitch.
Get Ready for Rounds 2 and Higher
As discussed in our last installment, from this point you’ll work stitches over the clothesline and into the hole under both threads of the stitch in the round below.

To increase, work 2 single crochet into the hole in question.
When beginning Round 2, place a marker around the neck of the first stitch immediately after you work it. This marker will indicate the beginning of your rounds, so I like to make sure it differs in appearance from the other three markers. On my rug, the beginning-of-round marker was green; the others were orange.
You’ll have four markers in place, and your increases will occur between these markers on every round.
Work Round 2
Single crochet 1 into every stitch up to and including next marker. This is your first straight side.
You’ll be at the first place where you increased six in the previous round.
(Increase 1, single crochet 1) up to next marker. You’ll have an increase of six stitches between the two markers at this end of your rug.
Beginning with the next marked stitch, single crochet 1 in every stitch up to and including next marker.
(Increase 1, single crochet 1) up to next marker–which you’ll find is the beginning-of-round marker. This end of your rug will have increased by six stitches.
You’re off to a fine start. The rest will be more of the same.
All Subsequent Rounds
Along your straight edges, 1 single crochet into every stitch. Your straight edges will not increase.
Between the markers at each rounded end, work 6 evenly-spaced single increases in every round. The distance between the increases will grow by 1 in every round.
For example:
Round Three: (Increase 1, single crochet 1) between the markers.
Round Four: (Increase 1, single crochet 2) between the markers.
Round Five: (Increase 1, single crochet 3) between the markers.
And so forth, until your rug has as many rounds as you require, or until you run out of either yarn or clothesline.
Finishing
Fasten off your yarn, and cut the loose ends of your clothesline near the crochet.

It seems like there should be more to it, but there isn’t.
The Finished Rug
I declare, I am quite pleased with it. Cheerful, but stout and heavy enough to be useful–like the braided rag rugs that inspired me to give this technique a try.

The semi-solid HiKoo Simpliworsted (this is colorway 665) shows off beautifully, making occasional shadowy rings of slightly lighter and darker blue.

The only thing I’m not thrilled with is the size. I used the entire length of my clothesline. Even so, the dimensions are a slightly stingy 23 inches (58.5cm) long by 10.5 inches (26.5cm) wide. To serve as a doormat, it could use another two inches of width–which would mean adding only another three rounds.
I’d need to join in more clothesline, and that’s not difficult. Just place the new length on the work where needed, with about inch of excess hanging on the wrong side. Work on. When you’re finished, trim the excess at the beginning and end.
The only other thing to keep in mind is that the larger your rug gets, the heavier it gets. This rapidly becomes a piece that’ll hurt your wrists and back if you try to lug it around like a doily. After about ten rounds, support it on a table.
Final Thoughts for Further Rugging
When I picked up the vintage booklet, this idea of crocheting a rug over clothesline was, to me, entirely unfamiliar. As this adventure began to unfurl, I was immensely pleased to hear from several “Fridays with Franklin” readers who knew it well, and kindly wrote to me about their own experiences.
The practice was apparently quite common in the days when most households hung laundry to dry, and most clotheslines were pure cotton that frayed, discolored, and weakened fairly quickly. When it could no longer support socks and underwear, was it thrown out? No! It became a rug. Wonderfully thrifty and sensible.
As our throwaway culture gradually, painfully begins to rediscover the necessity of making things last, I hope we’ll see more and more techniques like this creep back into the spotlight. I know I’ll be doing this again.
Just not with Kenny’s pattern. Kenny can go to hell.
(The next adventure begins in two weeks.)
Tools and Materials Appearing in This Issue
Hikoo Simpliworsted: 55% Merino Superwash, 28% Acrylic, 17% Nylon; 140 yd per 100g skein. Colors: 611 (gray/light blue) and 665 (blue).
AddiColours Crochet Hook (from set of nine color-coded, comfort grip hooks), size 3.5 mm.
Wellington Light Load Economy Clothesline: Nylon core, braided cotton exterior; 42 yards.
About Franklin Habit
Designer, teacher, author and illustrator Franklin Habit is the author of It Itches: A Stash of Knitting Cartoons (Interweave Press, 2008) and proprietor of The Panopticon, one of the most popular knitting blogs on the Internet. On an average day, upwards of 2,500 readers worldwide drop in for a mix of essays, cartoons, and the continuing adventures of Dolores the Sheep.
Franklin’s varied experience in the fiber world includes contributions of writing and design to Vogue Knitting, Yarn Market News, Interweave Knits, Interweave Crochet, PieceWork, Twist Collective; and a regular columns and cartoons for Knitty.com, PLY Magazine, Lion Brand Yarns, and Skacel Collection. Many of his independently published designs are available via Ravelry.com.
He travels constantly to teach knitters at shops and guilds across the country and internationally; and has been a popular member of the faculties of such festivals as Vogue Knitting Live!, STITCHES Events, Squam Arts Workshops, Sock Summit, and the Madrona Fiber Arts Winter Retreat.
Franklin lives in Chicago, Illinois, cohabiting shamelessly with 15,000 books, a Schacht spinning wheel, two looms, and a colony of yarn that multiplies whenever his back is turned.