
![]() For an introduction to what goes on in this column, click here.
For an introduction to what goes on in this column, click here.
For the first part of this project, click here.
The first shipment of yarns intended for the embroidery on my knitted crazy quilt square is still out there, somewhere, possibly at the bottom of Lake Michigan. The second shipment arrived intact. It’s a beauty.

The square was knit in HiKoo Sueño Worsted, so I chose its little (DK weight) sister, HiKoo Sueño, for the finishing touches.
A great deal of the beauty in traditional crazy quilting lies, of course, in the purely ornamental “seams” that run along the borders between patches. The earliest guides in my collection (from the 1880s) are wildly inventive in this regard. Seams were often made from combinations of two, three, or more stitches. The effect was dazzling and rich.

In later crazy quilts, especially those from the 1920s and 1930s, these decorations are usually far simpler, even crude.
On the one hand, this may well be because twentieth century women had more outlets for their creativity, and were less confined to the home. And that’s wonderful.
On the other hand, the quilts (in my opinion) became far less interesting and far less beautiful.
Fancy seams would be my choice for the knitted square, but as I contemplated the reality of the test piece a few things became clear.

I am very happy with the appearance of the garter stitch fabric. When I roll all these techniques into a class, we’ll be working garter stitch intarsia. But the bumps of garter fabric present a challenge to the embroiderer–they will tend to obscure very fine details. Embroidery floss, for example, is going to sink into the crevices and disappear.
To combat that, I chose a dk weight yarn. Heavy enough to show up on the fabric, light enough (I hoped) to allow a modest amount of intricacy.
The sizes of my “patches,” though, meant I’d given myself very little room to play with. For future experiments, I’m planning on larger patches–and fewer of them.
Meanwhile, I needed to work with the fabric I’d made.
For a bold effect I chose a favorite stitch that is so easily varied that its forms can (and do) fill entire chapters in embroidery guides: buttonhole/blanket stitch.
If you’re wondering about the slash, it’s because these two stitches–buttonhole and blanket–are worked almost identically. The chief difference is spacing and scale.
Blanket stitches are usually larger, and stand a bit apart from one another.

Buttonhole stitches are usually finer, and by definition are taken so close together that no fabric shows between them.
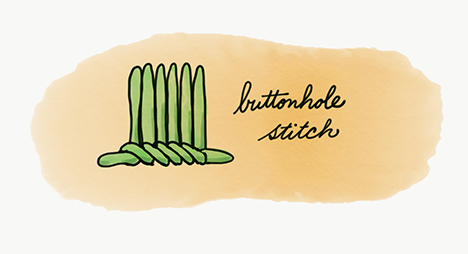
In embroidery, however–as opposed to plain sewing–the term “buttonhole stitch” often designates the stitch made as an embellishment, even if the uprights of the individual stitches do not touch.
Before I go any further, I will mention that an online debate has been raging over whether what I am about to describe is truly buttonhole stitch or whether that name is more properly applied to a similar stitch worked somewhat differently. And that’s all I’m going to say about the debate, because I think it’s uninteresting and I don’t care.
Anyway, here’s buttonhole/blanket stitch as taught to me by my late grandmother, Pauline. She began sewing buttonholes for money when she was seven years old, and continued to work as a professional tailor and seamstress until she was 93.

The plain vanilla version of the stitch asks you to imagine two parallel guidelines, like so.

If you are right-handed, you will work the seam from left to right. If you are left-handed, you will work right to left. These diagrams are drawn from the right-handed point of view, because the world is unfair and left-handed people know that.
Begin by bring the needle up through the lower guideline, at the spot marked START HERE.

From there, all stitches are made in the same way. Take the needle down through the upper guideline at Point A. Bring it up at Point B, on the lower guideline.
As you bring the needle up–this is IMPORTANT, so PAY ATTENTION–make sure the loop of working yarn on the right side of the fabric is under the needle, as shown. Pull through until the the loop gently but firmly catches on the working yarn.
Repeat for length of seam. To finish, take a final stitch downward at Point C, to the right on the lower guideline.
Buttonhole stitch looked nice on the knitted square. Not spectacular, but you gotta start somewhere.

Now, as I mentioned above, buttonhole’s variations are many and lovely. One of my favorites is closed buttonhole stitch, which makes tiny triangles along the seam.

In my embroidery classes, some students see these as a fleet of sailboats. Others see them as a school of shark fins. This probably says something about them, psychologically, but I’d rather not know what it is.

Closed buttonhole stitch takes two steps. The first step, simply enough, is to make a buttonhole stitch.

Now we close the buttonhole stitch. Take the needle down again at Point A (yes, the same hole), and bring it up at Point C, on the lower guideline, a little further along to the right.

Repeat as desired. Make a buttonhole stitch, close it. That’s all.
On the knitted square, closed buttonhole looked pretty darn cute.

My favorite crazy quilt seams combine multiple stitches to make the embroidery really sing, so the experimentation will continue. I need to play with all the colors, too. Never be satisfied with your first attempt at anything.
More about that next time.
Tools and Materials Appearing in This Issue
HiKoo Sueño Worsted (80% Merino Wool, 20% Viscose. 182 yards per 100 gram hank.)
HiKoo Sueño (80% Merino Wool 20% Viscose; 255 Yards per 100g hank.)
About Franklin
Designer, teacher, author and illustrator Franklin Habit is the author of It Itches: A Stash of Knitting Cartoons (Interweave Press, 2008). His newest book, I Dream of Yarn: A Knit and Crochet Coloring Book was brought out by Soho Publishing in May 2016 and is in its second printing.
He travels constantly to teach knitters at shops and guilds across the country and internationally; and has been a popular member of the faculties of such festivals as Vogue Knitting Live!, STITCHES Events, the Maryland Sheep and Wool Festival, Squam Arts Workshops, the Taos Wool Festival, Sock Summit, and the Madrona Fiber Arts Winter Retreat.
Franklin’s varied experience in the fiber world includes contributions of writing and design to Vogue Knitting, Yarn Market News, Interweave Knits, Interweave Crochet, PieceWork, Twist Collective; and a regular columns and cartoons for Mason-Dixon Knitting, PLY Magazine, Lion Brand Yarns, and Skacel Collection/Makers’ Mercantile. Many of his independently published designs are available via Ravelry.com.
He is the longtime proprietor of The Panopticon, one of the most popular knitting blogs on the Internet (presently on hiatus).
Franklin lives in Chicago, Illinois, cohabiting shamelessly with 15,000 books, a Schacht spinning wheel, four looms, and a colony of yarn that multiplies whenever his back is turned.
Follow Franklin online via Twitter (@franklinhabit), Instagram (@franklin.habit), his Web site (franklinhabit.com) or his Facebook page.
3 thoughts on “Fridays with Franklin: More Crazy”
Comments are closed.