Fridays with Franklin: Butthurt No More

fwf-logo-columnsizeFor an introduction to what goes on in this column, click here.

For the first part of this project, click here.

It’s been months since I used my Schacht Cricket rigid heddle loom and a pile of HiKoo Llamor to weave this…

yardage-folded

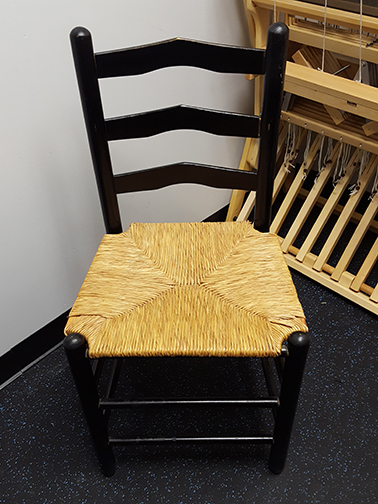
…which was intended to cover a cushion to sit on the chair that stands by the desk that Jack built. I mean that I built. I mean that is in my workroom.

The delay would have been far more inconvenient had I not spent most of this time away from home, teaching. A chair you cannot sit in cannot make your butt ache.

When my butt and I returned home for a spell, I readdressed myself to the task at hand. At butt?

Which Button?

I like cushion covers to be removable so that they can be laundered easily. Some like zipper closures, I like buttons, in part because buttons are cute.

Makers’ Mercantile offers every one of the hundreds of styles of Skacel buttons. I chose these square sweeties from the Corozo line.

fwf-77-newsletter-photo

The turquoise calls to one of the minor colors in the fabric, and the square silhouette and holes echo the spare structure of the chair.

chair
You might well say that I put too much thought into choosing a button. I say that asking questions like, “What is the perfect button for this cushion?” keeps me from asking less pleasant questions like, “Hey, was that mole on the back of my arm there yesterday?” and “What is my purpose in life?”

What Size?

The seat of the chair is about 13 inches by 12 inches, and the fabric was 13 1/2 inches by 37 inches. That made the layout for cutting straightforward, since all I wanted was a dead simple cushion. I snipped 10 inches off the length of the fabric, and sewed up the cushion like this.

fwf-77-howtosew
Three steps. No rigmarole. Fold, fold, sew. The proportions in the drawing are off, I know. That’s not the point. But thanks all the same for pointing it out, you pedantic busybody.

That’s it.

fwf-77-sewing-finished
Sometimes, that’s enough.

Buttonholes

What I want to focus on today is buttonholes. I have a sewing machine, and the sewing machine makes perfectly good buttonholes. With an attachment. An attachment that is kept in a drawer. A drawer Over There, not Over Here where I am sitting.

I have used the buttonhole attachment. It works well. When I have a lot of buttonholes to make, the sewing machine’s buttonhole attachment is a jolly convenience. Before I use it, I have to fetch it from the drawer (Over There) and then dig out the sewing machine manual (which is Elsewhere) and refresh my memory as to how the attachment fits on the machine and how it works.

When I have a measly five buttonholes to sew, and I don’t want to get out of my chair and unveil the sewing machine, then go get the attachment and the manual, I’d rather do the dang things by hand.

I don’t know why, but buttonholes give some folks the heebie-jeebies–like they’re wildly complicated, or frightening, or prone to attain sentience and challenge you to a duel.

They’re not even slightly tricky. Try two or three on a small scrap of fabric and you’ll never again think twice about making a buttonhole by hand.

Here’s how you do it.

First, you need to mark your buttonhole’s location and length. On more typical piece of fabric–say, a woven cotton I’m making into a shirt–I’d either a pencil or tailor’s chalk to do this. Or, if I need to carry the project around for a while, I might mark them with thread so there’s no worry about the marks rubbing off.

This fabric, though, is very thick and fuzzy and none of those would work. So I marked each buttonhole with a pair of pins each, like so.

fwf-77-pinmarks
Okay, so you’ve got your buttonhole-to-be marked.

fwf-77-step-01
The pins mark the left and right end of the buttonhole-to-be.

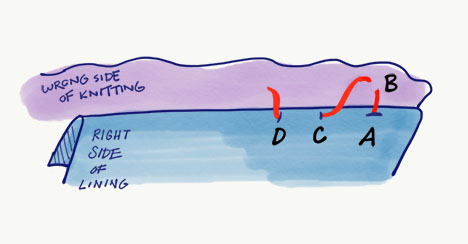
Next, you’re going to make some tack stitches (simple, straight stitches–don’t worry) around the boundaries of the buttonhole. Long ones at the top and bottom, short ones at the right and left.

Check this out:

fwf-77-step-02
The numbers give you the order of the stitches. Bring your threaded needle up from the wrong side of the fabric at Point 1, then down at Point 2. Then up at 3, and down at 4. Up at 5, down at 6. Up at 7, down at 8. Up again at 1. Your tacks are complete, and you’ll have matching rectangles on the right and wrong sides of the fabric. Don’t cut your thread–you’re going to use it to finish sewing the buttonhole.

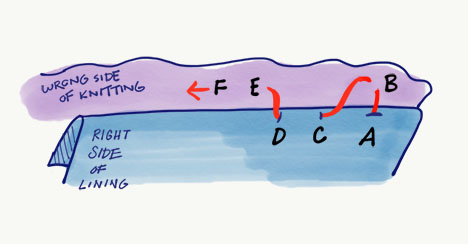
Stage two is working buttonhole stitch over the tacks, all the way around. You’ll be using the same thread, of course, but in the drawing I used purple so you can see how the buttonhole stitches sit over the tack stitches.

fwf-77-step-03

Don’t know how to work buttonhole stitch? Not a problem. It’s really easy. One step. I used it, decoratively, on the crazy quilt pillow. There’s a diagram with instructions here.

Now, a word on proportions. To make this drawing easy to understand, I’ve set the top and bottom lines pretty far apart. In a perfect buttonhole–the sort my grandmother expected me to make–inside edges of those lines of stitching would be about a thread apart.

fwf-77-buttonhole=closeup

Grandma was very particular about this. Grandma was very particular about most things. My buttonholes had to straddle one thread in the muslin (her practice fabric of choice) or they had to be ripped out and done over. Oh, what larks we had!

But you know what? The idea that a buttonhole must be made perfect, or not be made at all, keeps a lot of otherwise fine people from experiencing the joy of buttonholes.

So you know what? Forget perfect. Just try it. Make it the best you can, with those lines as close as you can comfortably get them. Then move on to this next step: cutting.

Get a sharp, small pair of scissors–embroidery scissors like these or these work well–cut in the space between the top and bottom lines of buttonhole stitches. Cut all the way across. Just don’t cut the buttonhole stitches.

fwf-77-step-04
That’s it. If you do that, you get a buttonhole. It’s a rush, let me tell you. So do it. Get a scrap of fabric and try a couple. Don’t worry about making them perfect. Never mind what my grandma said.

Because making a cruddy buttonhole teaches you more about making buttonholes than reading about making buttonholes. And the more you make, the better you’ll get.

So I had buttonholes. Here is one.

fwf-77-buttonhole
Imperfect, but probably good enough to keep grandma from haunting my dreams.

Then I sewed on the buttons.

fwf-77-buttons-sewn
I slid the form into the cover and buttoned it all up. Wow, that felt good.

fwf-77-cushiondone

I might put ties on it, using leftover fabric. Honestly, though, I’m quite pleased.

And then I had to leave home again before I could photograph the !$%*@ cushion on the !$%*@ chair.

See you, with a new project, in two weeks. Wherever my butt and I may happen to be.

Tools and Materials Appearing in This Issue

HiKoo Llamor Yarn (100% Baby Llama, 109 yards per 50g ball)
Square Corozo Buttons from Skacel Buttons
Schacht Cricket Rigid Heddle Loom, 15-Inch

About Franklin

Designer, teacher, author and illustrator Franklin Habit is the author of It Itches: A Stash of Knitting Cartoons (Interweave Press, 2008). His newest book, I Dream of Yarn: A Knit and Crochet Coloring Book was brought out by Soho Publishing in May 2016 and is in its second printing.

He travels constantly to teach knitters at shops and guilds across the country and internationally; and has been a popular member of the faculties of such festivals as Vogue Knitting Live!, STITCHES Events, the Maryland Sheep and Wool Festival, Squam Arts Workshops, the Taos Wool Festival, Sock Summit, and the Madrona Fiber Arts Winter Retreat.

Franklin’s varied experience in the fiber world includes contributions of writing and design to Vogue KnittingYarn Market News, Interweave KnitsInterweave CrochetPieceWorkTwist Collective; and a regular columns and cartoons for Mason-Dixon Knitting, PLY Magazine, Lion Brand Yarns, and Skacel Collection/Makers’ Mercantile. Many of his independently published designs are available via Ravelry.com.

He is the longtime proprietor of The Panopticon, one of the most popular knitting blogs on the Internet (presently on hiatus).

Franklin lives in Chicago, Illinois, cohabiting shamelessly with 15,000 books, a Schacht spinning wheel, four looms, and a colony of yarn that multiplies whenever his back is turned.

Follow Franklin online via Twitter (@franklinhabit), Instagram (@franklin.habit), his Web site (franklinhabit.com) or his Facebook page.

Cage Match, Concluded

fwf-logo-v11

For an introduction to what goes on in this column, click here.

For the first part of this adventure, click here.

I almost feel as though this week I should begin with an apology for the lack of drama in what follows.

I try to give you a good read, truly I do, with laughs and thrills and the occasional car chase; but you can’t, as my grandmother famously said while on a date with Mick Jagger, always get what you want.

To get the Makers’ Mercantile cage purse across the finish line, I had two things left to do:

  1. Attach the woven lining to the knitted liner.
  2. Attach the liner to the leather cage.

There are knitters who steer clear of making purses and bags on principle, just to avoid woven linings. This is a great pity. A knit or crochet bag with a woven lining will be stronger and more durable, less inclined to droop and pull out of shape, and less liable to catch and snag everything you put into it.

And sewing is not (or at least, need not be) the trauma some think it is. A simple bag lining is about as simple as sewing gets. More about that in a minute.

Make It Snappy

Now, the “official” pattern that comes with cage purse kits is available as a free download from Makers’ Mercantile. I used it as my guide for designing a lining of my own, and as usual I decided to make some adjustments. I don’t think I’ve ever followed anyone’s pattern exactly as written.

I decided to install the snaps, which are included with the cage,

fwf-50-snaps
before sewing in the lining, whereas the pattern suggests you do the reverse. On your purse, you choose.

If you’ve never put in a snap before, rest assured these are a breeze. Since my bag was quite freeform at the top, I put it into the cage to see exactly where the male* halves of my snaps (pictured above) needed to be in order to line up with the female* halves of the snaps on the cage (which come already installed). I marked these spots on the liner with locking ring stitch markers.

fwf-50-stitchmarkers

Then you make a little sandwich with each snap, one by one, like this…

fwf-50-snapsandwich

…with the post on the back of the snap stuck right through the knitted fabric.

Then you place the cylinder tool…

fwf-50-cylcircled

over the nubbin on the front of the snap, and tap the cylinder with a hammer. I do mean tap. Brute force is not required. It took me two modest taps to get each snap set firmly. Boom.

fwf-50-snapset
I’ve never felt more butch.

The knitted portion of my liner being thus completed, it was time to add the woven lining.

Line It Up

The official pattern for the cage purse gives full instructions for this part of the project, so I’ll confine myself to a few notes about linings generally.

First. Use the best woven (as opposed to commercial knit/jersey) fabric you can afford. It need not be expensive; but if you have the choice, buy from a reputable retailer who carries reputable lines.

If you buy in person, give the fabric a good fondle and a few firm tugs. If it looks flimsy and feels sleazy, if the printing is muddy, if it seems inclined stretch out of shape easily, if you can read a comic book through it, it probably won’t stand up well to the demands placed on a handbag. It may, in fact, fall apart as you sew with it. Fabrics whose standard retail prices are super cheap are usually super cheap for good reason.

I went with a print from Cotton + Steel called “Cat Lady,” …

500002_20170531160050

…because in my social circle, it’s inevitable that whoever gets this purse is going to stuff it with balls of yarn. She will probably also have at least one cat.

fwf-50-fabricshot
Note: The lighting in this shot tipped the blue quite a bit. It’s really far closer to the navy in the previous photograph.

Second. Don’t skimp on the preparatory steps.

Sewing has a different flow than either knitting or crochet. Both knitting and crochet consist, in the main, of knitting and crocheting. Other stuff–seaming, blocking, weaving in–comes in at the end. We front-load the fun. Sewing insists that you begin with planning, measuring, cutting, pinning. It takes time to get to the sewing part of sewing.

This feels ass-backwards somewhat odd to those of us who knit and crochet.

Listen. If you hate the preliminary steps, that’s okay. Acknowledge that. Embrace that. Then take a breath and do them anyway. It may help to have a good friend supervise you.

fwf-50-supervisor
“After you weave in all those ends and take your measurements, you may have a cookie.”

Since my liner pattern was something I cooked up myself, I measured the end product to be certain it would accommodate the lining described in the official pattern. Turns out my liner was a smidge taller and a smidge narrower. I adjusted my cut pieces accordingly.

fwf-tape-measure
Measure twice, cut once. Maybe measure three times.

Third. Don’t let unfamiliar techniques frighten you.

When I teach Introduction to Hand Sewing, we end our class project with slip stitch–the same stitch that joins the woven lining to the knitting liner. Students often approach slip stitch with trepidation because it looks like a magic trick. You sew and sew, and when you’re finished you can’t see the sewing. You just have two fabrics that are now joined, invisibly.

fwf-50-lining-closeup

Cool, right?

And you can do it. Yes, you can. Most of what used to be called plain sewing–the toolkit of handmade stitches necessary to turn out everyday items–was taught as a matter of course to little girls for centuries.

Are you going to let some little Dickensian imp in a dirty pinafore sew circles around you?

fwf-50-sewkid
Heck no.

Here is all there is behind the “magic” of slip stitch.

After the lining pieces have been sewn together, turn and press the lining fabric to the wrong side as directed in the pattern.


fwf-lining-prepped
Kindly note my new, adorable fire engine red Bohin embroidery scissors in background.


Place the liner inside the lining…


fwf-50-lining-in-liner
…and secure it with a generous number of straight pins so that you can focus on your stitching.

Step One.

Thread your sewing needle with a coordinating thread, and tie a stout knot at the end.

Bring the needle up through the fabric at point A, which you will notice is right on the fold of the lining. (Alternatively, especially if the ghost of my late grandmother is watching you, instead of using a knot you may secure the beginning with a series of tiny stitches at point A. This is called a “tack.”)

fwf-50-slip-01.jpg

Step Two.

Take a small stitch in the liner (knitted) fabric at Point B (directly above Point A, near the top edge of the woven lining). Note: My stitches into the liner all went around–rather than through–strands of yarn, as this felt more secure than splitting strands with the sewing needle.

fwf-50-slip-02

Step Three.

Take a horizontal stitch into the fold+ of the woven lining by putting the needle in at Point C and out at Point D.

fwf-50-slip-03

Step Four.

Take a horizontal stitch into the knitted liner from Point E to Point F, near to and parallel to the top edge of the woven lining.

fwf-50-slip-04.jpg

Repeat Steps Three and Four all the way around the liner. Every few stitches, gently pull the thread to even out the tension of the sewing stitches. You want the lining to lie smooth against the liner– don’t pull so hard that puckers begin to form. When the seam is complete, fasten off with a discreet, small tack in the woven lining.

That’s it.

+Some say just behind the fold. Your choice. In sewing, as in knitting and crochet, there are many paths to the same destination.

In the Bag

What else can I say? I’m really pleased with it. I wanted the sinuous lines of the short rows to wiggle and play against the straight edges of the cage, and they do.

fwf-50-finished-cage-purse-01
It could be about an inch bigger all around at the base, to really fill up the cage; but that’s about all I’d change.

fwf-50-finished-closeup
What’s more: as the liner is held to the cage with snaps, it can be removed and replaced with any number of other linings whenever inspiration strikes or your mood changes.

It didn’t even take long to knit–comparable to a hat. I’m already thinking of other liners–crocheted, embroidered, woven. And other yarns, too. These were all left over from previous Fridays with Franklin projects, but they could have been:

assorted lengths of handspun

souvenir yarns collected on a memorable trip…

the leftover yarn from a favorite sweater for a matching sweater/purse combo

bits of yarn (and blobs of knitting) contributed by a members of a group to make a special farewell or birthday gift

And the yarns you put into a cage liner are right there, with you, visible and useful. A souvenir afghan is lovely, but it usually has to stay at home. Not to mention that the usual everybody-knit-a-square afghan requires a lot of work and a mountain of yarn. A souvenir/commemorative cage purse is well within the grasp of knitters or knitting groups who are short on cash, pressed for time, or just plain lazy.

Coming Up

The next Fridays with Franklin will be the first in which I get to use a vise and power tools. That’s all I’m telling you right now. Nope, sorry. My lips are buttoned.

*I’m not trying to be cute. That’s what they’re called.

Tools and Materials Appearing in This Issue

Makers’ Mercantile Leather Cage Purse available separately or as a kit
Bohin Embroidery Scissors (shown in Red, available in six colors)
Makers’ Mercantile Tape Measure (shown in Orange, available in seven colors)
HiKoo Simpliworsted (55% Merino Wool, 25% Acrylic, 17% Nylon. 140 yards per 100 gram hank)
HiKoo Rylie (50% Baby Alpaca, 25% Mulberry Silk, 25% Linen. 274 yards per 50 gram hank)
HiKoo Kenzie (50% New Zealand Merino Wool, 25% Nylon, 10% Angora, 10% Alpaca, 5% Silk Noils. 160 yards per 50 gram ball)
HiKoo Kenzington (60% New Zealand Merino, 25% Nylon, 10% Alpaca, 5% Silk Noils. 208 yards per 100 gram hank)
Schoppel-Wolle Leinen Los (70% Wool, 30% Linen. 328 yards per 100 gram ball)

About Franklin

Designer, teacher, author and illustrator Franklin Habit is the author of It Itches: A Stash of Knitting Cartoons (Interweave Press, 2008). His new book, I Dream of Yarn: A Knit and Crochet Coloring Book was brought out by Soho Publishing in May 2016 and is in its second printing.

He travels constantly to teach knitters at shops and guilds across the country and internationally; and has been a popular member of the faculties of such festivals as Vogue Knitting Live!, STITCHES Events, the Maryland Sheep and Wool Festival, Squam Arts Workshops, the Taos Wool Festival, Sock Summit, and the Madrona Fiber Arts Winter Retreat.

Franklin’s varied experience in the fiber world includes contributions of writing and design to Vogue KnittingYarn Market News, Interweave KnitsInterweave CrochetPieceWorkTwist Collective; and a regular columns and cartoons for Mason-Dixon Knitting, PLY Magazine, Lion Brand Yarns, and Skacel Collection/Makers’ Mercantile. Many of his independently published designs are available via Ravelry.com.

He is the longtime proprietor of The Panopticon, one of the most popular knitting blogs on the Internet (presently on hiatus).

Franklin lives in Chicago, Illinois, cohabiting shamelessly with 15,000 books, a Schacht spinning wheel, four looms, and a colony of yarn that multiplies whenever his back is turned.

Follow Franklin online via Twitter (@franklinhabit), Instagram (@franklin.habit), his Web site (franklinhabit.com) or his Facebook page.