Those two weird little scraps of artfelt were encouraging, if less than beautiful.
One of the two test scraps. It’s a start.
You ought never to allow wobbly first attempts at anything discourage you from doing more. The first question to ask is, “Did I enjoy myself? Or, at least, do I think with practice I might enjoy myself?”
If the answer is yes, the next question is, “What shall I do now?”
I already had a goal, of course, which was to felt some yardage to reupholster this little footstool.
Taking it apart wasn’t difficult. The outer fabric was tacked down, and not very elegantly.
Beneath that was what may have been the original fabric–a funereal floral brocade in ratty shape, smelling distinctly of nicotine. It’s probably haunted.
Beneath that, happily, was the padding–in fine condition, and not smelling of anything nasty. I let it air outdoors for a few hours, which my grandmother always recommended for any textile that had been covered or boxed up for a long time.
While that was going on, I considered the new fabric. What should it look like? This stool will be next to my knitting chair in the living room. Here are some vignettes of the décor as it is.
As you can see, my tastes run to the slick, the radical, the avant garde.
Ha ha ha. No. My house looks like it was decorated by someone’s prissy-yet-mildly-adventurous Great-Great-Great-Aunt Tillie, who had the largest collection of doilies in the tri-county area.
Why not try to felt a design reminiscent of those arabesques and curlicues and fantastic flowers in the carpet?
So I sketched (roughly) something of the sort on the artfelt paper. Nobody told me a I couldn’t, so I did. If you had a light box, or even just window, you could trace designs on the paper.
The dimensions of the artfelt paper, by the way, were based on the dimensions of the original upholstery fabric–about 17 inches by 14 inches.
Based on the shrinkage I’d measured in my test swatches, I added an additional two inches either way so the finished fabric would be large enough for the stool.
I wasn’t sure exactly how to build the design, so I decided to start by outlining the motif with the background color. This is the way I was taught to hook rugs. Rug hooking and felting are not the same thing at all, but it seemed like a logical place to start.
I jabbed my fingertip once with that felting needle. I shall try very hard never to do it again.
That went fine, so I got down to filling in the flowers (?) and leaves (?) and buds (?). I used the sketch as a rough guide, while also allowing the wool to go where it wanted to.
Please don’t go nuts trying to figure out the botanical name of this plant, because it’s an utter fantasy.
In case you’re wondering, this didn’t take long at all. I allowed myself breaks, and left the house to do errands and walk Rosamund, and still it was finished in an easy afternoon.
At this point, I wobbled. I was pleased with bits of it. The curves came out better than I’d expected. I liked the colors. It even resembled, somewhat, a flower.
But it was so furry. Unpleasantly so. Like someone had done terrible things to a beloved pet with hair dye.
I soaked it, wrapped it, and popped it into the dryer for thirty minutes (see the previous installment for more detail on the artfelt process).
Then I forgot about it.
It would have been sensible to put it into one of the dryer’s timed settings, so that the dryer would buzz after, say, the first fifteen minutes. Then I could unroll it and check the progress.
No. No, I didn’t do that. For reasons I cannot begin to explain (that will be the title of both my autobiography and the miniseries based upon it) I put the dryer on a setting that just keeps on chugging until you tell it to stop.
That’s not a great idea when you have, as I do, the persistence of memory of a goldfish.
So, one hour and twenty minutes later…
I cannot say I was displeased. In fact, I was so pleased I did a dance. I am beginning to understand why so many people love felting.
I try like the dickens not to use the word “magic,” as we fibery types fling it around way too much. But this change in the material did feel–alchemical. The bizarre patch of wet fuzz had become rather a pretty piece of fabric, looking somewhat like watercolor. And all I had done was spin it in the tumble dryer.
It was also two inches two short in both directions to cover the frigging footstool.
On the one hand, this is immensely frustrating.
On the other hand, I get to do some more artfelt. I’ll show it to you next time we meet. See you in two weeks!
He travels constantly to teach knitters at shops and guilds across the country and internationally; and has been a popular member of the faculties of such festivals as Vogue Knitting Live!, STITCHES Events, the Maryland Sheep and Wool Festival, Squam Arts Workshops, the Taos Wool Festival, Sock Summit, and the Madrona Fiber Arts Winter Retreat.
Franklin’s varied experience in the fiber world includes contributions of writing and design to Vogue Knitting, Yarn Market News, Interweave Knits, Interweave Crochet, PieceWork, Twist Collective; and a regular columns and cartoons for Mason-Dixon Knitting, PLY Magazine, Lion Brand Yarns, and Skacel Collection/Makers’ Mercantile. Many of his independently published designs are available via Ravelry.com.
He is the longtime proprietor of The Panopticon, one of the most popular knitting blogs on the Internet (presently on hiatus).
Franklin lives in Chicago, Illinois, cohabiting shamelessly with 15,000 books, a Schacht spinning wheel, four looms, and a colony of yarn that multiplies whenever his back is turned.
…which was intended to cover a cushion to sit on the chair that stands by the desk that Jack built. I mean that I built. I mean that is in my workroom.
The delay would have been far more inconvenient had I not spent most of this time away from home, teaching. A chair you cannot sit in cannot make your butt ache.
When my butt and I returned home for a spell, I readdressed myself to the task at hand. At butt?
Which Button?
I like cushion covers to be removable so that they can be laundered easily. Some like zipper closures, I like buttons, in part because buttons are cute.
Makers’ Mercantile offers every one of the hundreds of styles of Skacel buttons. I chose these square sweeties from the Corozo line.
The turquoise calls to one of the minor colors in the fabric, and the square silhouette and holes echo the spare structure of the chair.
You might well say that I put too much thought into choosing a button. I say that asking questions like, “What is the perfect button for this cushion?” keeps me from asking less pleasant questions like, “Hey, was that mole on the back of my arm there yesterday?” and “What is my purpose in life?”
What Size?
The seat of the chair is about 13 inches by 12 inches, and the fabric was 13 1/2 inches by 37 inches. That made the layout for cutting straightforward, since all I wanted was a dead simple cushion. I snipped 10 inches off the length of the fabric, and sewed up the cushion like this.
Three steps. No rigmarole. Fold, fold, sew. The proportions in the drawing are off, I know. That’s not the point. But thanks all the same for pointing it out, you pedantic busybody.
That’s it.
Sometimes, that’s enough.
Buttonholes
What I want to focus on today is buttonholes. I have a sewing machine, and the sewing machine makes perfectly good buttonholes. With an attachment. An attachment that is kept in a drawer. A drawer Over There, not Over Here where I am sitting.
I have used the buttonhole attachment. It works well. When I have a lot of buttonholes to make, the sewing machine’s buttonhole attachment is a jolly convenience. Before I use it, I have to fetch it from the drawer (Over There) and then dig out the sewing machine manual (which is Elsewhere) and refresh my memory as to how the attachment fits on the machine and how it works.
When I have a measly five buttonholes to sew, and I don’t want to get out of my chair and unveil the sewing machine, then go get the attachment and the manual, I’d rather do the dang things by hand.
I don’t know why, but buttonholes give some folks the heebie-jeebies–like they’re wildly complicated, or frightening, or prone to attain sentience and challenge you to a duel.
They’re not even slightly tricky. Try two or three on a small scrap of fabric and you’ll never again think twice about making a buttonhole by hand.
Here’s how you do it.
First, you need to mark your buttonhole’s location and length. On more typical piece of fabric–say, a woven cotton I’m making into a shirt–I’d either a pencil or tailor’s chalk to do this. Or, if I need to carry the project around for a while, I might mark them with thread so there’s no worry about the marks rubbing off.
This fabric, though, is very thick and fuzzy and none of those would work. So I marked each buttonhole with a pair of pins each, like so.
Okay, so you’ve got your buttonhole-to-be marked.
The pins mark the left and right end of the buttonhole-to-be.
Next, you’re going to make some tack stitches (simple, straight stitches–don’t worry) around the boundaries of the buttonhole. Long ones at the top and bottom, short ones at the right and left.
Check this out:
The numbers give you the order of the stitches. Bring your threaded needle up from the wrong side of the fabric at Point 1, then down at Point 2. Then up at 3, and down at 4. Up at 5, down at 6. Up at 7, down at 8. Up again at 1. Your tacks are complete, and you’ll have matching rectangles on the right and wrong sides of the fabric. Don’t cut your thread–you’re going to use it to finish sewing the buttonhole.
Stage two is working buttonhole stitch over the tacks, all the way around. You’ll be using the same thread, of course, but in the drawing I used purple so you can see how the buttonhole stitches sit over the tack stitches.
Don’t know how to work buttonhole stitch? Not a problem. It’s really easy. One step. I used it, decoratively, on the crazy quilt pillow. There’s a diagram with instructions here.
Now, a word on proportions. To make this drawing easy to understand, I’ve set the top and bottom lines pretty far apart. In a perfect buttonhole–the sort my grandmother expected me to make–inside edges of those lines of stitching would be about a thread apart.
Grandma was very particular about this. Grandma was very particular about most things. My buttonholes had to straddle one thread in the muslin (her practice fabric of choice) or they had to be ripped out and done over. Oh, what larks we had!
But you know what? The idea that a buttonhole must be made perfect, or not be made at all, keeps a lot of otherwise fine people from experiencing the joy of buttonholes.
So you know what? Forget perfect. Just try it. Make it the best you can, with those lines as close as you can comfortably get them. Then move on to this next step: cutting.
Get a sharp, small pair of scissors–embroidery scissors like these or these work well–cut in the space between the top and bottom lines of buttonhole stitches. Cut all the way across. Just don’t cut the buttonhole stitches.
That’s it. If you do that, you get a buttonhole. It’s a rush, let me tell you. So do it. Get a scrap of fabric and try a couple. Don’t worry about making them perfect. Never mind what my grandma said.
Because making a cruddy buttonhole teaches you more about making buttonholes than reading about making buttonholes. And the more you make, the better you’ll get.
So I had buttonholes. Here is one.
Imperfect, but probably good enough to keep grandma from haunting my dreams.
Then I sewed on the buttons.
I slid the form into the cover and buttoned it all up. Wow, that felt good.
I might put ties on it, using leftover fabric. Honestly, though, I’m quite pleased.
And then I had to leave home again before I could photograph the !$%*@ cushion on the !$%*@ chair.
See you, with a new project, in two weeks. Wherever my butt and I may happen to be.
He travels constantly to teach knitters at shops and guilds across the country and internationally; and has been a popular member of the faculties of such festivals as Vogue Knitting Live!, STITCHES Events, the Maryland Sheep and Wool Festival, Squam Arts Workshops, the Taos Wool Festival, Sock Summit, and the Madrona Fiber Arts Winter Retreat.
Franklin’s varied experience in the fiber world includes contributions of writing and design to Vogue Knitting, Yarn Market News, Interweave Knits, Interweave Crochet, PieceWork, Twist Collective; and a regular columns and cartoons for Mason-Dixon Knitting, PLY Magazine, Lion Brand Yarns, and Skacel Collection/Makers’ Mercantile. Many of his independently published designs are available via Ravelry.com.
He is the longtime proprietor of The Panopticon, one of the most popular knitting blogs on the Internet (presently on hiatus).
Franklin lives in Chicago, Illinois, cohabiting shamelessly with 15,000 books, a Schacht spinning wheel, four looms, and a colony of yarn that multiplies whenever his back is turned.
It’s not often that I wish a project were larger. This one has been an exception. Every stage has been more fun than I anticipated–and the result makes me smile.
This is a small piece. I thought it would be a swatch.
I’ve carried it with me during the busiest teaching travel season I’ve ever had. It has been worked on in eleven states; in big cities and in the middle of nowhere; on land, on sea, and in the air; in view of both the Atlantic and Pacific Oceans; next to one Great Lake, two small lakes, and a medium-sized pond with a frog in it.
It’s seven inches wide and nine inches long.
When last we met, I was working on the decorative embroidery between the patches.
In addition to the buttonhole stitch (open and closed) and the feather stitch, I went cuckoo and added French knots with little tails in a few places where it seemed additional frivolity would be welcome.
It was fun.
At no point did this project require me to be serious or restrained. At no point did I have to ask myself whether more embellishment would be too much, or whether I ought to tread within the bounds of good taste. This project is crazy. It says so right there in the name.
When I had finished the lion’s share of the embroidery I didn’t want to stop. I didn’t want to leave the swatch a swatch. I didn’t have the time (or yarn) to do an entire blanket. But I had enough to make it up into a tiny, unserious cushion cover.
Since it was an unserious cushion cover, I kept dicking around with stuff I had been told never to do. For example, a very serious knitter once warned me that in cushion covers, one must always be sure the grain of the front fabric matched the grain of the fabric. In other words, you must always arrange the panels thus:
and never thus:
If one broke this rule, she insisted, one’s cushion would…I don’t know what. Explode? I mean, the horizontal grain (rows) and the vertical grain (columns) of any knitted fabric do stretch at different rates; but why would this be a catastrophe in a cover over a stable (if squishy) center?
Anyway, she’s dead now, and she was mean while she was alive. So I decided to stick my tongue out at her, posthumously, and mix the grains up like a madman with nothing left to lose:
I striped the back panel at random with every color from the front except the purple, because for about a week I couldn’t find it.
I put one-row buttonholes into the upper back panel.
Wait. That sort of looks like a superhero mask, doesn’t it?
Garter Woman! Na na NA nana na NAAAAA!
This was, of course, an excuse to play with more buttons from Skacel buttons; so I lost a pleasant hour wandering among the hundreds on offer and settled on the Fancy Iridescent Glass Buttons because I was feeling both fancy and iridescent.
Fancy Iridescent Glass Buttons from Skacel Buttons
I sewed the panels together with mattress stitch, and found that the joins were fine–clean, straight, unobtrusive–but altogether too sober. Insufficiently bonkers. So I pulled out my vintage needlework books in search of a mildly bonkers edging.
A pattern collection from 1905 turned up just the very thing, a picot edge, which looks like this:
and is worked like this (I quote the original verbatim–if I can make sense of it, so can you):
Make a chain of the length required, work Sg. C [single crochet] or DC [double crochet] on this, then fasten yarn with a Sg. C in the top of a stitch; chain 3, insert the hook through the top of the first chain stitch, throw yarn over the hook and draw through both loops; fasten with a Sg. C in top of next stitch, or skip one stitch and fasten whichever way makes the picot lie flat.
I wanted to crochet the edging directly to the cushion cover; so rather than make a chain, I worked slip stitches all the way around the seam line between the front and back panels and worked the rest of the edging stitches into that.
You may notice that I found the purple HiKoo Sueño Worsted that had gone missing. I used an addi Olive Wood crochet hook in size US D/3.25 mm because it seemed like it would do and it was near the chair I was sitting in.
The result was a very unserious ruffled edge–ruffled because instead of obeying the instructions about making the edge lie flat, I crammed the picots in. Jamming lots and lots of fabric into a smallish space gives you ruffles. Annoying when you don’t want them, delightful when you do.
It’s kinda like the edge of the petticoats on a cancan dancer. O, là-là! La plume da ma crayon! Défense de fumer!
Then on went the buttons, one-two-three-four. In four different colors. Because in crazy patchwork, more is more.
I have heard more than one knitter say that button placement makes him nervous. This is all I do–put the upper band over the lower and insert locking stitch markers through the buttonholes to mark the place each button needs to go. Boom.
Neat little buttons, all in a row. A pretty sight.
In case you’re wondering where I got a pillow form of the correct size (7 inches by 9 inches), I didn’t. I cut up an old cotton sheet that was in the rag bag and sewed one, stuffing it neatly with some clean, hand-dyed wool roving that I bought ages ago at a fiber fair, and have never been able to understand why I bought it, because the colors are hideous. No, I am not going to show it to you; and no, I’m not going to tell you who dyed it.
I’m not that crazy.
Now I have this hilarious little pillow…
…and I don’t know what it’s for, though I am absolutely going to use it as a sample for a new class on knitting and embroidering crazy quilt squares. If I can’t stop the madness, I might as well spread it around.
Epilogue in HiKoo Sueño
This is was my first encounter with HiKoo Sueño Worsted and I can’t say enough good things about it.
It’s so crisp and smooth, and the colors show off brilliantly. There’s been no sign of pilling, even though the balls of yarn and the knitting itself has been dragged around the country.
Even after the cushion cover was finished I didn’t want to stop knitting the stuff, so I whipped up an impromptu cowl for Rosamund without a pattern.
She likes it. She likes to have clothes on, especially as the weather in Chicago turns nippy. The only thing I think I might do is line it with woven fabric to keep the floats on the inside from catching on her collar. But that’s for another column.
He travels constantly to teach knitters at shops and guilds across the country and internationally; and has been a popular member of the faculties of such festivals as Vogue Knitting Live!, STITCHES Events, the Maryland Sheep and Wool Festival, Squam Arts Workshops, the Taos Wool Festival, Sock Summit, and the Madrona Fiber Arts Winter Retreat.
Franklin’s varied experience in the fiber world includes contributions of writing and design to Vogue Knitting, Yarn Market News, Interweave Knits, Interweave Crochet, PieceWork, Twist Collective; and a regular columns and cartoons for Mason-Dixon Knitting, PLY Magazine, Lion Brand Yarns, and Skacel Collection/Makers’ Mercantile. Many of his independently published designs are available via Ravelry.com.
He is the longtime proprietor of The Panopticon, one of the most popular knitting blogs on the Internet (presently on hiatus).
Franklin lives in Chicago, Illinois, cohabiting shamelessly with 15,000 books, a Schacht spinning wheel, four looms, and a colony of yarn that multiplies whenever his back is turned.
For an introduction to what goes on in this column, click here.
In my life there is (and always has been) a constant battle between the useful and the beautiful, the aesthetic and the ergonomic.
It’s no use going all Corbusier on me, either, and suggesting that I learn to appreciate household goods that are meant to be cogs in a machine for living.
I grew up in military houses decorated by a mother who used beige as an accent color, and once rejected a bedspread of pale gray striped with white as Too Busy. Carved details on furniture gave her headaches. Antiques gave her the heebie-jeebies. She was sure they were either haunted or harboring lice.
Naturally, I have grown up to become the sort of person who uses old bits of china and silver–the more floral, the better–to hold tools in my workroom. I love color. Lots of color, as you may have gathered from the beginnings of my excursion to crazy quilt knitting last time.
The piece with the fans and sunflowers is a British-made Aesthetic Movement toothbrush holder. Somewhere up there, my mother is gagging.
My intent this week was to show you the next stage of the crazy quilt project, but two things happened. First, the dear postman who was entrusted with the stage two yarns threw them, so far as we can tell, into Lake Michigan. I hope the fish enjoy them. Perhaps they can knit themselves little fish mittens.
Second, my workroom chair threw my butt out of whack.
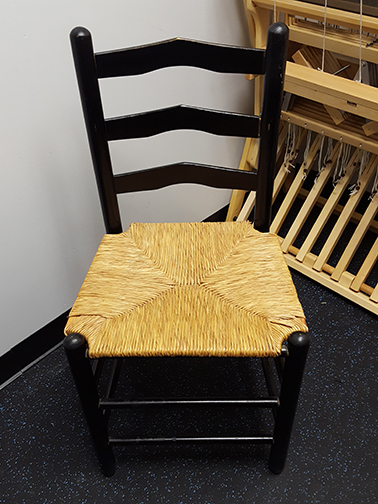
Here’s the chair. Cute, right? That’s why I chose it. It’s cute.
In the background is my trust Schacht Wolf Pup 8.10, nakedly awaiting our next adventure.
My workroom is in a building my mother probably would have admired. It was built as an automotive garage, and includes such charming features as cinderblock walls, rubber industrial flooring, and dropped ceilings.
That’s Chicago, baby. You get what you can get. If I want a skylit studio in a sweet vintage building, I’ll have to give up knitting for a living in order to afford it.
I figured I could warm up the space with furnishings and décor, sparse as they presently are. The chair is a key part of that. Not for me, some rolling plastic and rubber grotesquerie from an office supply chain. Heavens, no.
It was all fine until I spent a long day in the chair, pushing out work to meet a draconian deadline–then stood up and fell right down again.
Wouldn’t you know, wood slats and a rush seat don’t offer the last word in lumbar support; nor do they cradle my aging buttocks in a manner sufficiently ergonomic to keep them happy. The sweet little chair just about crippled me.
I appealed to a local friend who is an expert in these matters, and she told me to turn the chair into a plant stand and go buy something sensible. I got all quivery and weepy.
She sighed and said, fine– if I must insist upon using it, at least pad the damn thing. That might help.
So I warped my trusty Cricket Rigid Heddle Loom, because I wanted to weave the fabric for my new cushion. Because of course I did.
The yarn had been in my “Fridays with Franklin” stash since the last time I played with shadow knitting in these pages. I adore shadow knitting, in fact it’s a subject I teach with the zeal of an evangelist. But that project failed to make me happy–the theory of the mitered shadowing didn’t turn out as I’d hoped.
I kept all the leftover yarns, though, because the yarn did make me happy. It’s gorgeous stuff–HiKoo Llamor, 100% baby llama.
The sewing box isn’t an heirloom–it came from the Aumuller Korbwaren line carried by Makers’ Mercantile. There’s a link at the end of this entry.
Those colors would punch the industrial gloom of the workspace right in the nose. There are echoes of them in some of my painted china. That shocking pink may well set the drop ceiling on fire.
I couldn’t keep my butt waiting forever, so I made the warp (almost) as simple as I could: stripes, symmetrical, tied on without any real planning. I followed my nose, putting some of each color into the mix.
Except I forgot the purple, because it fell off the table.
A warp like this takes a newbie like me about two hours to finish. I love the look of a fresh warp. It’s so orderly. Full of potential.
For the weft pattern, I settled on more simplicity: eight shots of each color, forming broad stripes. To prepare, I wound a bobbin of each color (including, this time, the purple). Using a boat shuttle meant changing from one to the next was as easy as clicking out the old bobbin and clicking in the new.
Then, I wove.
It took about four hours–maybe it would have been three if I hadn’t been watching The Crown–to whip up this.
The fabric is off the loom, but not finished. I need to:
• stabilize the cut ends with two quick lines of machine sewing,
• repair three or four skips (places where the shuttle went over or under a wrong warp thread),
• wet finish the fabric so it will be ready to sew into a cushion.
I’ll show you the finishing next time, though I’m just about to get down to it. This project has a certain urgency. Happy butt, happy me.
He travels constantly to teach knitters at shops and guilds across the country and internationally; and has been a popular member of the faculties of such festivals as Vogue Knitting Live!, STITCHES Events, the Maryland Sheep and Wool Festival, Squam Arts Workshops, the Taos Wool Festival, Sock Summit, and the Madrona Fiber Arts Winter Retreat. He will lead his own knitting cruise to Bermuda in September, 2018.
Franklin’s varied experience in the fiber world includes contributions of writing and design to Vogue Knitting, Yarn Market News, Interweave Knits, Interweave Crochet, PieceWork, Twist Collective; and a regular columns and cartoons for Mason-Dixon Knitting, PLY Magazine, Lion Brand Yarns, and Skacel Collection/Makers’ Mercantile. Many of his independently published designs are available via Ravelry.com.
He is the longtime proprietor of The Panopticon, one of the most popular knitting blogs on the Internet (presently on hiatus).
Franklin lives in Chicago, Illinois, cohabiting shamelessly with 15,000 books, a Schacht spinning wheel, four looms, and a colony of yarn that multiplies whenever his back is turned.
Somebody call the Vatican, because we’ve had a miracle.
Before I set out to make this pillow cover I measured the pillow. Of course.
My trusty tape measure said (and still says) it is 16 inches square. Measure twice, crochet once.
I worked the Tunisian crochet bit of it to be a bit smaller than that, so I could add a contrasting border in single crochet. That made for a fun change, and was quite simple.
I’m very pleased with the effect. Crochet borders are, as the kids on my lawn say, da bomb.
The finished dimensions of the front panel after wet blocking were almost identical to finished dimensions of the pillow itself, because what I like in pillow cover is zero ease. I want the cover to fit snugly. A loose cover, to me, resembles a sagging diaper or ill-fitting skirt.
Then something extraordinary happened. The moment I began the next stage–cross stitch embroidery of the center panel–the work expanded to cover 400 square miles.
It’s all fun and games until your crochet blots out the sun.
Or so it has felt at times.
Cross Stitch Over Tunisian Crochet
There are so many excellent guides to cross stitch readily available that I will forbear for the moment to write one here. I do want to talk a bit about what I’ve encountered working cross stitch over a foundation Tunisian crochet.
What makes this crochet fabric so ideal for cross stitch are the nearly perfect little squares that are its hallmark.
If you have only worked cross stitch before on even-weave fabrics like Aida canvas, it can seem confusing at first as to where exactly you ought to take your stitches. There’s some wiggle room here; but you do want to make sure that once you establish your choice with the first stitches, you stick with it throughout
Here’s where I chose to make my stitches–in and out of the four orange dots. The orange cross to the right of them shows the size and shape of the typical resulting stitch.
Since this is a crocheted fabric, the grain of it is not perfectly square like a true even-weave. The individual cross stitches will show variation.
To keep them as consistent as possible, I’ve worked with the fabric always oriented in the same direction (that is, the same edge always at the bottom while I stitched).
The Importance of Guidelines
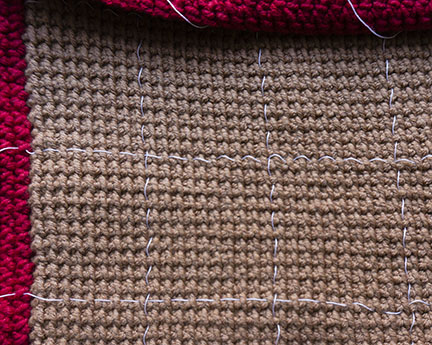
When I teach cross stitch, I hammer home the importance of first laying out your guidelines with running stitches in thread. Don’t skimp on your guidelines! The larger your design, the more guidelines you put in.
This is the chart I’m using. My guidelines are marked with dashed lines. You’ll note they’re every tenth stitch, in both directions.
Why so many? Why not just the customary two, to pinpoint the center?
Because in large designs–especially large abstract (non-representational) designs like this, it can be too easy to make a mistake and not realize you’ve done so. The design looks fine, at a glance. You move along, and count from a bit of finished work to establish your next row of stitching–and then, only after doing a bunch more work, you realize your error.
Nobody enjoys ripping out. Put in a bunch of guidelines; and when you count, count from them first. Use stitches you know to be correct as a secondary reference point.
To mark my guidelines, I used regular old sewing thread.
These guidelines also allowed me to look at the design as manageable blocks instead of a large and potentially confusing whole. So I could focus on working one 11×11 square, like this.
That’s harder to goof up and, frankly, less daunting psychologically.
Keeping Your Twist
I got a very alarmed e-mail from a reader who told me you cannot, simply cannot, embroider with yarns designed for knitting and crochet.
I beg to differ, seeing as I and many others have done so for years. In fact, the booklet I referenced last time, from the early 20th century, was quite gung-ho about it. If it were impossible, someone would have twigged it by now.
I will say that any yarn or thread you choose for embroidery must be strong enough to withstand the repeated abrasion that comes from being pulled through the fabric. Most lightly spun and all unspun yarns are unsuitable–they will fall apart as you work.
Yarns with lots of texture (like coils) won’t pull readily through the small hole made by your needle, nor will yarns with additives like sequins. Beaded yarns may work, if the beads are quite small, but beaded embroidery is a topic I’ll leave for another time.
HiKoo CoBaSi Plus
HiKoo CoBaSi Plus has worked very well, with one caveat. Like any embroidery strand made from fibers that do not stick together (this includes purpose-made embroidery cottons with multiple plies), the yarn will tend to untwist as you work.
Just pause every so often and twiddle the needle to put the twist back in. That’s all.
Some Now, Some Later
I began working the central motif as I’ve always worked cross stitch: row by row, laying in the first part of the cross from left to right, then completing the row by working back from right to left.
Then, after realizing how much of this piece would be done on the road while teaching or in company when I was liable to mis-read my chart, I decided to take a different tack.
When I’ve been in a situation that allowed me to focus–at home, in my workroom, or alone in a hotel room–I’ve worked only the first part of each cross stitch, filling out the design.
Then, when I’ve been in distracting situations like airplanes and airport lounges and cafés, I’ve worked over those established stitches–in other words, that’s when I’ve done the mindless work that requires no counting.
Where Am I?
It’s gone well, though I have not as I hoped finished all the embroidery yet. As I said at the beginning of this installment, what began as a cover for a tiny little pillow keeps growing larger, and larger and larger. Still–I’m pleased. The entire first layer is in, so now I merely fill in the second layer. (I may add borders in the blank areas to the right and left, but I’m not sure yet.)
We’re going to have to pause this project for a bit, anyhow–because a newborn baby in the apartment upstairs needs a warm sweater, quickly, and I have just the thing waiting to be knit up: Zitron Gesa & Flo, with a dash of Schoppel-Wolle Edition 6 Light Fingering.
He travels constantly to teach knitters at shops and guilds across the country and internationally; and has been a popular member of the faculties of such festivals as Vogue Knitting Live!, STITCHES Events, the Maryland Sheep and Wool Festival, Squam Arts Workshops, the Taos Wool Festival, Sock Summit, and the Madrona Fiber Arts Winter Retreat.
Franklin’s varied experience in the fiber world includes contributions of writing and design to Vogue Knitting, Yarn Market News, Interweave Knits, Interweave Crochet, PieceWork, Twist Collective; and a regular columns and cartoons for Mason-Dixon Knitting, PLY Magazine, Lion Brand Yarns, and Skacel Collection/Makers’ Mercantile. Many of his independently published designs are available via Ravelry.com.
He is the longtime proprietor of The Panopticon, one of the most popular knitting blogs on the Internet (presently on hiatus).
Franklin lives in Chicago, Illinois, cohabiting shamelessly with 15,000 books, a Schacht spinning wheel, four looms, and a colony of yarn that multiplies whenever his back is turned.
For an introduction to what goes on in this column, click here.
If you ask me, you can tell a civilization is in decline when it stops caring about good throw pillows.
Most of us, if we are lucky, spend quite a bit of time with our throw pillows, and they do so much for us. They hide that coffee stain on the sofa from visitors, they add a certain quelque chose to the bed on days when we make the bed, they support our backs as we knit in a favorite chair, they cradle our heads while we fall blissfully asleep during a weekend binge of The Crown or America’s Next Top Cake Hero.
Yet how much thought do we put into the selection of these small but essential elements of the well-appointed home? Judging from the pillows I’ve seen lately (including on my own sofa), shamefully little.
Rosamund doesn’t like it, either.
I’ve taken a hard look at the soft furnishings of our nest this winter, in part because for a couple of weeks I couldn’t leave the nest or the Chicago weather would have killed me. And I feel the need of an upgrade.
I don’t even know where that green sofa pillow and its twin came from. They mystify me, because I don’t like that depressing olive green and I don’t like that clammy fabric.
I suspect they came home because I was out at some discount store, remembered that we needed new pillows, and grabbed the least offensive pair off the shelf because they were a) cheap and b) meh, good enough.
Is that any way for a man who claims to be a fancier of fine textiles to act? No, it is not.
Out of the Past
A few years ago I was visiting a friend’s great-aunt, and the friend told her that I knit and crochet. The great-aunt said languidly that the afghan over the back of the couch upon which we were sitting was her own work, circa 1950; and it was the first and last thing she’d ever made because needlework was boring as all hell.
It was quite a showpiece, fashioned entirely from wool, weighing in at about three hundred and forty thousand pounds. Most fascinating to me were five square panels set into the center and corners, each embroidered with florals in cross stitch.
I asked if I could photograph it. She thought that was a weird request, and said no. She changed the subject to the voracious and seismic lovemaking of the newlywed couple in the apartment above. They, on cue, went into action at that very moment and we scrambled to keep the tea service from bouncing off the table. The afghan was forgotten.
Months and months later, I came into possession of a 1916 book of knitting and crochet patterns that included an afghan with cross-stitched panels.
I strained my rudimentary crochet skills to understand the method, which the book called “afghan stitch,” and realized it was what I had seen demonstrated at a couple of fiber shows as “Tunisian crochet,” and had read about in a few Victorian books as “tricot crochet” or “tricot stitch.” (And yes, “tricot” is French for “knitting.” Foreshadowing!)
Ever since, I’ve been looking around for a chance to play with the technique, and at last hit me–why not do up a pretty sofa pillow/cushion cover in Tunisian crochet, and embroider it to suit?
The Apparatus
Now, the world of Tunisian crochet is large and varied. This is not the only stitch, but it’s the one called for in all old manuals for cross-stitched panels.
First, a note about the tools for working it.
Tunisian crochet is usually not made with typical crochet hooks, but specialized hooks intended for the purpose. Maker’s Mercantile sells them, and they are usually either double-ended, like these, or have a hook at one end and a stop at the other, like these.
But they also sell a set-up that interested me particularly because of the size of the panel I wanted to make. It looks like this.
An Addi Click Interchangeable Hook at one end, a cute little Addi Heartstopper at the other.
That’s a hook from the Addi Click Crochet Hook Interchangeable Set, with an interchangeable cable and, to keep the work from sliding off the end, an Addi HeartStopper. A long panel can be heavy, and using a hook on a cable means the weight of the growing fabric slides down the cable to rest, and won’t wreak havoc on your wrists as it might with a traditional hook–one of the same reasons circular knitting needles have become so popular, even for flat knitting.
Also, I knew I’d be working on this project on a lot of airplanes–and a short hook with a short cable is less cumbersome in an airplane seat and less attention-getting at security than a long metal hook.
The Tunisian Crochet or Afghan Stitch, Part I: The Set-Up
You may have noticed that those Tunisian hooks with an end stop look like knitting needles. That’s no coincidence, because this odd form of crochet acts a whole lot like knitting. (Hence the nineteenth century moniker “tricot crochet.”)
In fact, if you are a knitter and think you can’t possibly do this, let me give you all the fundamentals of the basic Tunisian stitch in two steps:
*1. Pick up and knit stitches into your fabric. Don’t turn the work.
2. Now bind off all but one of the stitches you just picked up. Repeat from *.
I’m not kidding. You pick up stitches and you bind them off. You can do that, right?
Let me show you how.
I’ll demonstrate some of the gold HiKoo Simpliworsted left from Rosamund’s superhero sweater. (If you want to crochet a washable afghan that incorporates this sort of fabric, Simpliworsted is a great choice.)
We have to start somewhere, and that somewhere is with a crochet chain. It’s no different than the standard chain you’d use to start a regular piece of crochet.
The chain has two sides to it. The front shows you little Vs.
The back shows you little bumps.
We will work the next stage, the “forward” row of picked-up stitches, into the bumps.
Set-Up, Forward Row
Insert the hook into bump nearest the hook,
and pull through a loop of the working yarn. Now–and herein lies a great difference between Tunisian crochet and other sorts–we slip this new loop onto the shaft of the crochet hook. That’s right–just as we keep our knitting stitches on the shafts of our needles.
Continue to pick up a loop through every one of the bumps on the back of your chain, keeping all the newly-created stitches on the hook.
In the midst of the set-up forward row.
Do not turn the work. That’s right–don’t turn the work. In fact, never turn the work.
Instead, we will now work a “reverse” row and bind off all these new stitches.
Set-Up, Reverse Row
Yarn over the hook, and pull a new loop through the stitch at the left end of the row.
Yarn over hook, pull a loop through last stitch you made in your forward row.
Yarn over the hook, and pull a loop through the first two stitches on the hook.
Yarn over the hook, pull a loop through the first two stitches on the hook.
**Yarn over the hook, and pull a loop through the next two stitches on the hook.
Repeat from ** until you have only one stitch left on the hook.
The forward and reverse rows of the set-up are complete. One stitch remains on the hook. You’re ready to work the rest of the fabric.
Your set-up is now complete. The next section will tell you how to work the remainder of the fabric.
The Tunisian Crochet or Afghan Stitch, Part Two: All the Other Rows
You’ll continue to work your fabric in much the same way–with forward rows (right to left) in which you make new stitches; and backward rows (left to right) in which you bind off all but one of them.
Forward Row
Look at the fabric you’ve created in the set up. You will see a series of vertical “bars.” I’ve marked them here to make them obvious.
Each bar you see has a mate on the back side of the work. We will work only into the bars on the front until the last bar of the forward row.
Put the hook under the second bar in from the right selvedge of the work. Yarn over the hook and pull up a loop.
Slide the new loop onto the shaft of the hook.
Repeat into the next bar, and all remaining bars until you reach the final bar–the one at the left selvedge.
Working a forward row, making a stitch under each vertical bar at the front of the fabric.
Create the stitch at the left selvedge by sliding the hook under both the front and back bars, yarn over the hook, and pull up a loop.
The left selvedge stitch is picked up under both the front and back vertical bars (outlined in orange).
This little change gives you a neat left selvedge that matches the right selvedge.
DO NOT TURN THE WORK.
Reverse Row
Note: This is pretty much identical the reverse row in the set-up!
Yarn over the hook and pull a loop through the first stitch on the hook only.
***Yarn over the hook and pull up a loop through the first two stitches on the hook.
Repeat from *** until one stitch remains on hook.
DO NOT TURN WORK.
First complete row of fabric (made from one forward and one reverse row) completed.
Begin the next Forward Row, as above.
Bind off as you would any flat piece of crochet.
The fabric this stitch creates is intriguing: dense, cushy, and with a surface texture that reminds me of the little square cells in a waffle.
Destination: Throw Pillow
For my pillow cover, I settled on HiKoo CoBaSi Plus. It’s a worsted weight–unlike the original CoBaSi, which is a fingering weight, and fabulous for wool-free socks and summer shawls.
Yes, please.
CoBaSi Plus (a mix of cotton, bamboo, and silk–get it?) is strong, soft, durable, springy, lustrous, washable, and feels nice against your face–all important in a cushion you’d like to be beautiful and useful.
In setting about making my fabric, I learned a few things very quickly.
First, when guides to Tunisian crochet tell you to use a hook size that seems large for the weight of your yarn, they mean it. This fabric is tight. Use a hook that would be reasonable for, say, a granny square, you may find very that your fabric is impossible to work without damaging your fingers.
How do you figure out which hook to use? SWATCH. No way around it.
I tried three sizes of hook. The smallest (at the bottom of the photo above) made a fabric so dense that was nearly impenetrable on forward rows. The largest (at the top) made a fabric loose enough for the fabric of the pillow form to show through…tacky. The hook in between (in the middle), a 5mm, was just right. You can barely see the difference in the photograph–but it’s there.
Also, Tunisian crochet has a reputation for being tough on the hands and wrists. I won’t disagree with that–it can be. Using the loosest suitable tension (therefore, the largest suitable hook) will help, as will avoiding yarns (like pure cottons) that don’t like to stretch.
I also found it was far easier on my hands and wrists when I grasped my hook knife-style (in the palm of the hand, rather than resting pencil-style on the thumb), and held it nearer the lower end of the hook, where it joined the cable.
Coming Up…
The making of the fabric was quite pleasant, if occasionally monotonous. But what I was really looking forward to was turning it into a big, bold piece of cross stitch.
He travels constantly to teach knitters at shops and guilds across the country and internationally; and has been a popular member of the faculties of such festivals as Vogue Knitting Live!, STITCHES Events, the Maryland Sheep and Wool Festival, Squam Arts Workshops, the Taos Wool Festival, Sock Summit, and the Madrona Fiber Arts Winter Retreat.
Franklin’s varied experience in the fiber world includes contributions of writing and design to Vogue Knitting, Yarn Market News, Interweave Knits, Interweave Crochet, PieceWork, Twist Collective; and a regular columns and cartoons for Mason-Dixon Knitting, PLY Magazine, Lion Brand Yarns, and Skacel Collection/Makers’ Mercantile. Many of his independently published designs are available via Ravelry.com.
He is the longtime proprietor of The Panopticon, one of the most popular knitting blogs on the Internet (presently on hiatus).
Franklin lives in Chicago, Illinois, cohabiting shamelessly with 15,000 books, a Schacht spinning wheel, four looms, and a colony of yarn that multiplies whenever his back is turned.