Wonder Woofin III: Starry Starry Butt

fwf-logo-columnsizeFor an introduction to what goes on in this column, click here.

I thought at first that I’d use duplicate stitch for the stars on Rosamund’s costume, but duplicate stitch has one great weakness. You are limited to embroidered stitches the size and shape of your knit stitches.

That means her stars would have looked something like this.

fwf-55-starchart
Not even in my most wishful state of mind is that a five-pointed star. That looks like a Space Invader doing front squats. Unacceptable.

In the dim recesses of my memory lurked an image of my late grandmother, the tailor, embroidering perfect five- and six-pointed stars on a client’s fancy party outfit. I dug through every embroidery guide on my shelf–about two dozen books, from the eighteenth century to the present–and found nothing. The entries for “Stars, embroidered” led to this kind of thing…

fwf-55-starstitch

which is fine for folksy work, but not what I needed; or this kind of thing

fwf-55-lazydaisy

which is a Lazy Daisy, not a star. Don’t try to tell me otherwise.

I began to wonder if past-life regression therapy might get me where I needed to go. Or perhaps I ought to hire a medium? Would my grandmother be annoyed if I contacted her in the great beyond to ask how she put the stars on Mary Ellen Zemicki’s bicentennial hostess pajamas? Was there a good time to call? When do they air Lawrence Welk in heaven?

48c10e0fa5a7045215c008455723c21b
“Hush now,” said my grandmother’s ghost. “I’m trying to watch the Lawrence Welk program.”

Star Map

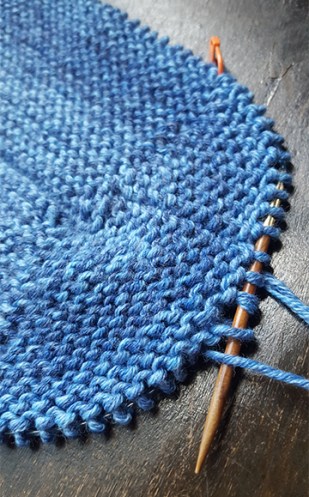
Meanwhile, I went ahead and mapped out the placement of the stars on the tail of the costume. I used contrasting yarn and basting to give myself a set of guidelines, just as I’d done for the eagle.

fwf-55-starfield
In the first and third rows, the stars are centered on the lines. In the second row, the stars are centered between the lines.

Oh Say Can You Sew

In the end, a séance was just too much work to throw together quickly and I had to rely on experimentation and blind luck. I could remember this: you began by embroidering something that looked just like a child’s drawing of a five-pointed star. And I half-remembered a chant that started, “One and three, and two and four…”.

I cracked it. Here it is.

This is not a complicated stitch. I’m going to break it down very, very carefully so you can do it on your own without getting lost.

Our star will be based on an underlying shape: a pentagon. The five points of the pentagon will become the five points of our star, and we number them like so for reference:

star-diagrams-01

We begin with a base layer, worked once, like this:

Needle up at 1, needle down at 3.

star-diagrams-02

Needle up at 2, needle down at 4.

star-diagrams-03

Needle up at 3, needle down at 5.

star-diagrams-04

Needle up at 4, needle down at 1.

star-diagrams-05

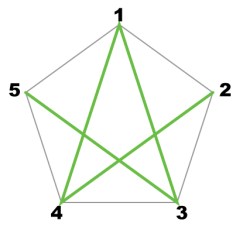
Needle up at 5, needle down at 2.

star-diagrams-06

The base layer is now complete.

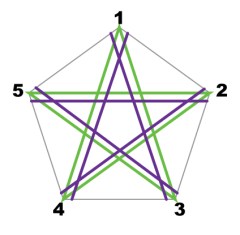
From here, we continue ’round and ’round the points of the star in rounds that grow smaller and smaller until the center of the star is filled in. All of these rounds follow the same rules, and here they are.

Needle up just below and to the left of  point 1.
Needle down just below and to the right of point 3.

star-diagrams-07

Needle up just below and to the left of point 2.
Needle down just below and to the right of point 4.

star-diagrams-08

Needle up just below and to the left of point 3.
Needle down just below and to the right of point 5.

star-diagrams-09
Needle up just below and to the left of point 4.
Needle down just below and to the right of point 1.

star-diagrams-10.jpg

Needle up just below and to the left of point 5.
Needle down just below and to the right of point 2.

star-diagrams-11

Round complete.

Continue in this manner, with the stitches of each round being taken a little closer to the center of the star. This diagram shows (in blue) what the next round will look like after it has been worked. The star is complete when the center is filled in, ending with a stitch from 5 to 2.

star-diagrams-12
The key is:

“Up at the left.
Skip a point.
Down at the right.
Back a point.”

If you remember that, you’ll remember the stitch.

Tips…

When you’re learning this stitch, rotate the work as you go so that the point you are dealing with is pointing UP. This will help you keep your “rights” and “lefts” clear.

Each round of stitching moves a little closer to the center of the star. How much closer? About the thickness of your embroidery yarn is a good bet.

Tip your needle so that you taking all stitches after the base layer from just under the threads laid down in the previous layer.

The number of round you’ll require to fill in the center of the star will depend upon the dimensions of the star and the size of your embroidery yarn.

Perfect and Uniform

One perfect star is a fine thing to achieve, but a field of many looks best if all are uniform in size and spacing. I’d laid out my guidelines, but I knew I couldn’t freehand twelve matching stars. Variation is fine for a folksy look, but not for this project.

So I printed out a plain pentagon of the proper size, and traced the points twelve times onto a sheet of medium weight water-soluble stabilizer with a fine-tipped permanent marker.

fwf-55-sharpietrace

fwf-55-penttraced
I cut out the pentagons as I needed them, one at a time, and pinned them to the sweater.

fwf-55-pinnedstabilizer
Using a sharp chenille needle with an eye large enough to accommodate my yarn (a size 18, in this case), I embroidered the stars over the stabilizer and the knitted fabric. A blunt tapestry needle won’t work well with stabilizer.

fwf-55-allembroidered
When they were all complete, I immersed the sweater in plain, cold water to remove the stabilizer. Voilà.

fwf-55-tryon
Rosamund, suited up and ready to fight injustice.

Do allow the piece to dry completely, of course, before trying it on.

Tricolor Muffin Hat Pattern Now Arriving on Runway Four

Meanwhile, we’ve put together the pattern for the Tricolor Muffin Hat. It’s free–just click HERE.

fwf-52-side-wideshot
The Tricolor Muffin Hat.

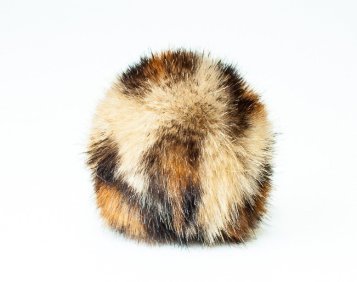
It may be, of course, that red, white, and blue is not your cuppa tea this winter; so here are some possible alternate color sets in HiKoo Simplicity (with coordinating LOVaFUR pompoms) for your consideration.

With Pompom: Fox–Scarlet 399032-0015

trio-01
Turkish Coffee, Really Red, Silver Hair

With Pompom: Raccoon–White 399028-0001

trio-02
Nile Blue, Still Waters Multi, Seattle Sky

With Pompom: Luxury Raccoon–Black 

trio-03.jpg
Black, Purple Reign Multi, Edgy Eggplant

With Pompom: Luxury Raccoon–Royal 

trio-04
Royal Blue, Indigo, Grape Soda

With Pompom: Kids Gold–Leopard

trio-05
Brown Bear, Make Me Blush, Edgy Eggplant


What’s up next?

Well, if you stop by in two weeks I’ll show you what I’m doing with these…

undyed-alpaca
…and a couple bottles of paint.

Tools and Materials Appearing in This Issue

HiKoo Simpliworsted (55% Merino Wool, 25% Acrylic, 17% Nylon. 140 yards per 100 gram hank)
HiKoo Simplicity (55% Merino Wool, 28% Acrylic, 17% Nylon. 117 yards per 50 gram hank)
Delilah Undyed DK Yarn (100% Baby Llama, De-Haired. 109 yards per 50 gram hank)
LOVaFUR Handmade Vegan Fur Pompoms
addi® Click Turbo Interchangeable Needle

About Franklin

Designer, teacher, author and illustrator Franklin Habit is the author of It Itches: A Stash of Knitting Cartoons (Interweave Press, 2008). His newest book, I Dream of Yarn: A Knit and Crochet Coloring Book was brought out by Soho Publishing in May 2016 and is in its second printing.

He travels constantly to teach knitters at shops and guilds across the country and internationally; and has been a popular member of the faculties of such festivals as Vogue Knitting Live!, STITCHES Events, the Maryland Sheep and Wool Festival, Squam Arts Workshops, the Taos Wool Festival, Sock Summit, and the Madrona Fiber Arts Winter Retreat.

Franklin’s varied experience in the fiber world includes contributions of writing and design to Vogue KnittingYarn Market News, Interweave KnitsInterweave CrochetPieceWorkTwist Collective; and a regular columns and cartoons for Mason-Dixon Knitting, PLY Magazine, Lion Brand Yarns, and Skacel Collection/Makers’ Mercantile. Many of his independently published designs are available via Ravelry.com.

He is the longtime proprietor of The Panopticon, one of the most popular knitting blogs on the Internet (presently on hiatus).

Franklin lives in Chicago, Illinois, cohabiting shamelessly with 15,000 books, a Schacht spinning wheel, four looms, and a colony of yarn that multiplies whenever his back is turned.

Follow Franklin online via Twitter (@franklinhabit), Instagram (@franklin.habit), his Web site (franklinhabit.com) or his Facebook page.


Wonder Woofin II: Ply Like an Eagle

fwf-logo-columnsizeFor an introduction to what goes on in this column, click here.

Another Halloween has come and gone.

I happily observed several of my own favorite seasonal customs, including re-reading The Turn of the Screw, watching “It’s the Great Pumpkin, Charlie Brown!” twice, and re-watching Sally Brown’s spectacular concluding tirade a dozen times.

greatpumpkin08
“YOU OWE ME RESTITUTION!” Image from “It’s the Great Pumpkin, Charlie Brown!”courtesy and © Warner Home Video.

Then I wandered over to Walgreens at midnight and waited for them to put all the leftover candy on sale for half price.

Since last Thursday’s sneak preview, Rosamund has made the rounds in her new costume, knit from HiKoo Simpliworsted.

fwf-53-roz-ww-sweater-front
Her heroic efforts to return the rabbits, squirrels, and pigeons of our Chicago neighborhood to the side of peace and justice earned her many cookies and pats on the head.

roz-patrol
“Come out here! It’s not too late–we can live in peace and harmony!”

She posed for souvenir photos with tourists visiting Wrigley Field. And she was quite the toast of our favorite hangout, Murphy’s Bleachers, when we paused for refreshment during a long patrol.


22829752_10214616193183126_3213446761524812307_o
Making the world safe is thirsty work.

We will call this a success.

I plan to raise the neckline about three inches to make it more suitable for long-term wear as part of Rosamund’s wardrobe of winter sweaters. She loves wearing clothes (except hats–therefore no tiara with the costume). And in our neck of the woods, no domesticated animal with a coat as fine as hers is safe outdoors in midwinter without extra warmth.

I’ve had many requests for the pattern, which is immensely flattering. Patterns for dog sweaters are notoriously problematic, though.

Dogs vary in shape and size to an extent that makes the grading system used to re-size human garments almost useless. A chihuahua, a dachshund, and a mastiff are the not same figure scaled upwards; you cannot just add stitches and rows to a chihuahua sweater to fit it on a mastiff. And that’s to say nothing at all of mixed breeds.

The best way to knit a sweater for a dog is to tailor the sweater to THAT dog. This is not particularly difficult, and in fact is a great way to dip your toe into the shallow end of the knit-to-fit pool.

Rosamund’s knit-to-fit Halloween sweater is the same basic shape I knit for her in this series and this series, with changes to color, ease, and detail.

If you wish to knit for your dog, the best thing to do is:

  • become familiar with the method of measuring and calculating I laid out in the first series and refined a bit in the second series,
  • sketch out some ideas for what shape, fit, and details you want,
  • take your dog’s measurements,
  • knit and measure an ample gauge swatch,
  • do a bit of math, and
  • cast on, knitting to fit as you go along.

That’s why I’m not going to take you through the whole process of making this sweater from start to finish. It’s ground we’ve covered before.

I was already familiar with the yarn–HiKoo Simpliworsted is fantastic for pet sweaters, being both tough and washable. I took a new set of measurements to see if Rosamund had changed shape appreciably. (She hadn’t.)

And I sketched, because sketching pushes me to think out those all-important transition points in a project. For example, should the costume’s waistband sit a Rosamund’s own natural waist, just behind her ribs? (Yes.) Should I attempt some sort of trompe l’oeil effect near the shoulders to suggest a strapless bustier? (No.) (NO.)

fwf-54-roz-hallow-sketch
After that, I knit to the measurements–simple. Well, simple except when my math was wrong and my rate of decrease at the neckline was so slow that by the time I sensed a problem, the neck of the sweater was long enough to accommodate a baby giraffe.

Big Yellow Birdie

A gold eagle across the chest was a must, as we were paying homage to the 1940s/50s vision of the superhero in question.

I thought I might do the eagle in intarsia, but ultimately settled on duplicate stitch–a form of embroidery also sometimes called Swiss darning. (I don’t know why it’s supposed to be Swiss. I couldn’t find a truly plausible explanation anywhere. Switzerland isn’t the only place it’s found, and in fact doesn’t seem to be any more proprietary about it than any other country full of knitters.)

Why duplicate stitch?

Partly for ease of working. I wanted to knit the upper part of the sweater in the round, with steeks for the legs. Intarsia can be done in the round, most happily with Anne Berk’s “Annetarsia” method–as we saw in this series. But intarsia is best for large, solid shapes; the eagle, as I first charted it out, had rather a lot of detail.

I thought of knitting the gold and afterwards using duplicate stitch to embroider the red details. That would have been silly, though–duplicate stitch will (especially at a worsted gauge) stand out a bit from the base fabric. We wouldn’t want the background overshadowing the foreground. So why not knit with red and duplicate stitch in gold?

The other advantage to duplicate stitch: I could look at the finished chest, count the available stitches and rows, and figure out exactly where to place the eagle.

Eagle Charting

If you’re going to work a motif in duplicate stitch, most likely you’ll want to follow a chart. If you make your own, on ready-made graph paper with a square grid, beware of the distortion this will cause. Your knit stitches are unlikely to be square, unless you achieve a plain stockinette gauge in which your stitch and row counts are identical.

So in plotting a duplicate stitch chart, take advantage of so-called “knitter’s” graph paper, in which the grid is made up of rectangles that mimic the proportions of your stitches. A little Web searching will uncover multiple sources of printable papers, some of which will allow you to type in numbers from your swatch and get a custom grid. (I hesitate to link to any, because the addresses of such sites change constantly.)

Knitter’s graph paper will allow you to create a design with the confidence that your finished motif will not be distorted. I began by sketching mine with a pencil, then moved over (in the interest of saving time) to a computer program. About an hour of messing around got me to this point.

chest-eagle-knit-v1
The working draft, jiggles and all.

The rough-and-ready cut-and-paste method I used in Adobe Illustrator to move the gold stitches around makes it rather jiggly, but it was enough to get a nod of approval from a friend whose comic book expertise I trust. I knew how many stitches and rows I had to work with because I was able to count them on the finished chest. (I counted three times, to make sure.)

With the chart ready and the sweater ready, I could start stitching.

Eagle Placement

Now, if you’ve never embroidered something like this before, you may well wonder how you know where to begin. The answer is that most embroidery (not all, most) will begin near the center of the design.

First, find the center of your chart and mark it with a line. Most often, you’ll mark the center horizontally and vertically. But you don’t have to do only that. You can mark whatever parts of the design you feel will help you keep track of where you are. On large designs like this, I often add guidelines either at regular intervals or (as with the eagle) along key points of the motif like the top and bottom of the body.

Here’s the chart with my guidelines added in white.

chest-eagle-knit-v2

Next, you mark those same guidelines on your fabric. There are many ways to do it, but on knitted or crochet fabrics I prefer thread tracing.

Grab a highly contrasting yarn or thread, one that does not appear anywhere in the embroidery. In this case I’m using some spare white Simpliworsted.  Thread it on your needle and sew a running/basting stitch lines in exactly the places your guidelines appear on the chart.

fwf-54-threadtrace
(I had to use my phone camera in the available lousy light on an airplane–therefore the lousy picture. I think it will, at least, show you the idea.)

Usually I’d prefer to use something finer to trace the lines, like a doubled strand of sewing thread. But as I was working away from home, on an airplane, without recourse to stash, I used what I had. That’s what you do. That’s life.

Once your fabric is marked, it’s merely a question of counting out from a guideline to your starting point of choice and beginning to embroider. As your thread-traced lines gradually grow superfluous, it’s okay to take them out.

fwf-54-eagle-progress
So let’s talk about how duplicate stitch is worked.

Eagle Stitching

Duplicate stitch is one of the simplest forms of embroidery, and is so called because the embroidery stitches mimic the shapes of the knit stitches underneath. Ideally, once duplicate stitch is complete it looks as though the embroidery is part of the knitting. Often, it’s used to add small details to intarsia projects when just a stitch or two of a certain color is needed.

It can be done on stockinette, ribbing, and garter stitch; but it’s easiest to learn on stockinette.

You’ll want to use a blunt needle–the sort you use for weaving in ends is fine–and a yarn the same weight as the yarn you used to knit the fabric.

The basic stitch is no more than this:

  1. Come up from the wrong side, at the base of the stitch to be duplicated–the point marked A in the diagram.
  2. Insert the needle beneath the “shoulders” of the stitch as shown in the diagram and pull the yarn through.
  3. Send the needle down to the wrong side again at point A, pulling the yarn through until the tension of the embroidered stitch matches the tension of the knitted stitch.
fwf-54-dup-step-01
Come up at A, behind the shoulders of the stitch, and go down at A.

To duplicate a block of stitches, you’ll generally want to work in rows from the bottom to the top, right to left. (Left-handed embroiderers may prefer to work bottom to top, left to right.) So, our next stitch in the row begun above would start at the asterisk (see diagram below), and proceed as directed above.


fwf-54-dup-step-02
Come up at the asterisk, which now serves as hole A, and repeat the directions above.

With every other row in a block of duplicate stitches, turn the work 180 degrees so that your first row is worked with the motif right-side up, the next with the motif upside-down. This isn’t strictly necessary, but may be less taxing on your fingers, and means you will always be working right-to-left or left-to-right. The stitching will be identical, though hole A will be above the stitch you’re duplicating rather than below it (see diagram below).

Basic RGB
The first row of three stitches having been completed, the work is rotated 180 degrees. The first stitch of the new row begins at A.

For single columns of duplicate stitches (there are lots of those in the eagle), work from the bottom to the top.

Tips:


If you want to work different parts of the design with the same length of yarn, take care not to carry the embroidery yarn more than a scant inch across the wrong side. It gets messy, causing lumps that distort the right side of the work.

Start and end each length of yarn by leaving 6-inch tails on the wrong side of the fabric. When that group is complete, weave the tails under the stitches on the wrong side to secure them and trim the tail short.

That’s all there is to it. Stop and examine your work-in-progress frequently. Not only will this help you catch and fix errors before you are very far gone; but it may also help you improve your design.

I found as I worked that a lot of the stitches I’d charted to shape the top of the wings were overkill–I only needed about two blocks across the top to get a perfectly fine effect. Since tons and tons of duplicate stitching can interfere with the stretch and drape of a piece of knitting, paring it down to just what’s essential is always advisable.

The finished eagle:

fwf-54-eaglefinished

Coming Up: Star Booty and Muffin Top

The costume also needed decoration at the other end: five-pointed stars across the tush. I could have used duplicate stitch for those, as well; but instead went with an embroidery stitch that gave me a far better result and was fun to work, too. In two weeks, I’ll give you the full details in glorious color.

fwf-54-starstush
The lasso is made from lucet cord–but that’s a topic for another day.

And speaking of glorious color, we’ll also be releasing a free pattern for the Tricolor Muffin hat, with suggestions for alternate color trios in HiKoo Simplicity and coordinating LOVaFur Pompoms. Red, white, and blue will be far from your only options. Both Simplicity yarns and the LOVaFur pompoms are presently on sale…

fwf-52-newsletter-teaser
The Tricolor Muffin:Free Pattern Arriving Soon

Tools and Materials Appearing in This Issue

HiKoo Simpliworsted (55% Merino Wool, 25% Acrylic, 17% Nylon. 140 yards per 100 gram hank)
HiKoo Simplicity (55% Merino Wool, 28% Acrylic, 17% Nylon. 117 yards per 50 gram hank)
LOVaFUR Handmade Vegan Fur Pompom (shown in red/white/blue)
addi® Click Turbo Interchangeable Needle

About Franklin

Designer, teacher, author and illustrator Franklin Habit is the author of It Itches: A Stash of Knitting Cartoons (Interweave Press, 2008). His newest book, I Dream of Yarn: A Knit and Crochet Coloring Book was brought out by Soho Publishing in May 2016 and is in its second printing.

He travels constantly to teach knitters at shops and guilds across the country and internationally; and has been a popular member of the faculties of such festivals as Vogue Knitting Live!, STITCHES Events, the Maryland Sheep and Wool Festival, Squam Arts Workshops, the Taos Wool Festival, Sock Summit, and the Madrona Fiber Arts Winter Retreat.

Franklin’s varied experience in the fiber world includes contributions of writing and design to Vogue KnittingYarn Market News, Interweave KnitsInterweave CrochetPieceWorkTwist Collective; and a regular columns and cartoons for Mason-Dixon Knitting, PLY Magazine, Lion Brand Yarns, and Skacel Collection/Makers’ Mercantile. Many of his independently published designs are available via Ravelry.com.

He is the longtime proprietor of The Panopticon, one of the most popular knitting blogs on the Internet (presently on hiatus).

Franklin lives in Chicago, Illinois, cohabiting shamelessly with 15,000 books, a Schacht spinning wheel, four looms, and a colony of yarn that multiplies whenever his back is turned.

Follow Franklin online via Twitter (@franklinhabit), Instagram (@franklin.habit), his Web site (franklinhabit.com) or his Facebook page.

Wonder Woofin: A Fridays with Franklin Preview of Coming Attractions

“Fridays with Franklin” is supposed to appear on Fridays. The clue is in the name. And today is Thursday.

But if I waited my turn, I wouldn’t have a chance to show you Rosamund’s Halloween costume before Halloween. So Makers’ Mercantile has graciously agreed to allow me to offer you this sneak peek.

In the pantheon of superheroes, there’s only one whose adventures I enjoyed as a child. The others bored me. Rosamund likes her, too; and is a princess, a protector, and a survivor in her own way.

fwf-53-roz-ww-sweater-front
She’s my little princess, anyhow.

fwf-53-roz-ww-sweater-back
The yarn is HiKoo Simpliworsted, and in these pictures it has already been once through the washer and dryer. Good stuff, for things that need to be washed and dried frequently.

In the next two installments of “Fridays with Franklin,” I’ll tell you more about how this was designed and worked–including an in-depth tutorials on the duplicate stitch eagle, and the embroidery of those stars. I’m rather proud of the stars. I’m also proud of the fit across the butt. Rosamund has such a curvaceous posterior. She gets it from my side.

(By the way, if you’re tuning in for the first time, you can jump back to the first “Fridays with Franklin” to learn what this column’s all about.)

See you next Friday!

About Franklin

Designer, teacher, author and illustrator Franklin Habit is the author of It Itches: A Stash of Knitting Cartoons (Interweave Press, 2008). His newest book, I Dream of Yarn: A Knit and Crochet Coloring Book was brought out by Soho Publishing in May 2016 and is in its second printing.

He travels constantly to teach knitters at shops and guilds across the country and internationally; and has been a popular member of the faculties of such festivals as Vogue Knitting Live!, STITCHES Events, the Maryland Sheep and Wool Festival, Squam Arts Workshops, the Taos Wool Festival, Sock Summit, and the Madrona Fiber Arts Winter Retreat.

Franklin’s varied experience in the fiber world includes contributions of writing and design to Vogue KnittingYarn Market News, Interweave KnitsInterweave CrochetPieceWorkTwist Collective; and a regular columns and cartoons for Mason-Dixon Knitting, PLY Magazine, Lion Brand Yarns, and Skacel Collection/Makers’ Mercantile. Many of his independently published designs are available via Ravelry.com.

He is the longtime proprietor of The Panopticon, one of the most popular knitting blogs on the Internet (presently on hiatus).

Franklin lives in Chicago, Illinois, cohabiting shamelessly with 15,000 books, a Schacht spinning wheel, four looms, and a colony of yarn that multiplies whenever his back is turned.

Follow Franklin online via Twitter (@franklinhabit), Instagram (@franklin.habit), his Web site (franklinhabit.com) or his Facebook page.

Cage Match, Part Three

fwf-logo-v11For an introduction to what goes on in this column, click here.

For the first part of this adventure, click here.

I was at a gathering once with a knitter who held up her shawl-in-progress and squealed, “This has been so much fun to knit! I’m actually slowing down because I don’t want it to end!”

I had no idea what she was talking about.

I am often sick to death of even a fun project weeks…months…years…before I bind off. This is nothing to boast of, and explains the shameful state of the dimmest corner of my workroom. There lie projects that it would be wrong to describe as “hibernating,” unless you would agree that the buried and fossilized remains of cretaceous reptiles are just having a nap down there.

You may therefore imagine my astonishment when the “leftovers” lining for the Makers’ Mercantile cage purse

fwf-47-cage-full
…was so much fun to work on that I had to force myself to stop and bind off.

There were no great departures from the plan I tested in the miniature version. I knit the oval(ish) bottom in HiKoo Simpliworsted 952 (Peacock Tonal), beginning at the center with Judy’s Magic Cast On…

fwf-49-ovalbottom
Please take a moment to admire my handsome bottom. Thank you.

…and was even more pleased with the results this time, since I used stitch markers right from the start and therefore didn’t misplace my increases quite so often.

When the bottom was big enough, I took stock of how many live stitches I had (answer: 108). This divides obligingly into four, which settled the question of how many stitches I’d use as the basis for each short-rowed blob of color (answer: 27). Since the bag would have no further shaping, it would always take me about four blobs* to go around once.

Given that I’d be using four different yarn bases in eight different colorways, I felt sure I could use a consistent base number without the blobs looking too much alike. I really wanted to avoid uniformity, to give this bag an organic feel, like layers of sediment** that had built up naturally atop one another.

fwf-48-sr-10

Here is the recipe for a blob:

Row 1 (RS): Join the new color, knit 27 stitches. Wrap and turn a stitch in the adjacent blob (see part two).

Row 2 (WS): Knit all stitches in the new color. Wrap and turn a stitch in the adjacent blob.

Row 3 (RS): Knit to penultimate stitch of blob (1 stitch less than previous row). Wrap and turn.

Row 4 (WS): As Row 3.

Repeat Rows 3 and 4 until blob reaches desired blobbiness, ending with a WS row. Break working yarn, leaving a tail of 5-6 inches to weave in later.

Turn work. Slip the live stitches of the just-completed blob from left needle to right needle as if to purl until your right needle tip is wherever you’d like the next blob to begin. Begin again from Row 1 for next blob.

For added verve, vary the length and/or starting point of some blobs by a stitch or two. Pretty much anything you do is going to look interesting and quite possibly beautiful.

Tiny tip: when joining in each new color, leave the tail hanging on the right side of the fabric like this:

fwf-49-tails
When you join a new yarn, let the tail hang on the right side of the work.

As you work, the tail gets pinched between the stitches on either side; and your first stitch won’t pull loose quite so readily as when you leave the tail hanging on the wrong side. (When it’s time to weave in ends, just bring the tail through to the wrong side and proceed as usual.)

From blob to blob, as the yarns changed so did the gauge. Blobs knit in HiKoo Kenzington and HiKoo Simpliworsted were quite firm…

fwf-49-kenzandsimpli
HiKoo Kenzington above, HiKoo Simpliworsted below.

…whereas HiKoo Rylie was so fine in comparison to Kenzington and the various forms of Simpliworsted that I decided to knit it with a strand of each colorway (086 Periwinkle and 087 Freesia) held double.

fwf-49-doublerylie

I was thrilled with the blend.

fwf-49-rylieblob

Good blobs, on the whole; but as they all came from the bright-blue-into-purple camp I was afraid the bag might tip over into something too sweetly candy-colored for my taste.

That’s where the Schoppel-Wolle Leinen Los

fwf-49-leinenlos.jpg

came in.

I decided to run a occasional stripe of this through the fabric to break things up. Since the two colors of Rylie had worked so well together, I decided to try a strand each of colorways 980 and 7653 together….

fwf-49-whiteleinen

…and you could see it from fifteen feet away. It screamed. So I ripped back and tried again with two strands of 7653 together.

fwf-49-ryliedarkbreak

Better. Rather than short-rowed blobs, these occasional bits of Leinen Los were short-rowed stripes. In other words, work all the way from the first stitch of the round to the last, wrap and turn, and knit back in the other direction. I could have knit a round and then purled a round–but I was having so much fun with the short rows I didn’t want to stop.

fwf-49-liningandbasket
In fact, my enthusiasm never flagged. When at length it struck me that I ought to take a measurement and see if I’d made the bag tall enough, I was an inch over the target.

You know what? I really like it.

fwf-49-bag-aerial

fwf-49-bag-closeup

Once the ends have been woven in, I’ll give it a wet block to settle it into to its final proportions.

Then, the final step before it goes into the cage: a woven fabric lining. I love a woven lining in a knit or crocheted bag. I plan to plunder with pleasure the Makers’ Mercantile lines of lovely cotton prints. Did you know Makers’ Mercantile carries deluxe cotton prints, among other fabrics and trims?

fwf-49-franklinswatches
Oh, but they do. They do! Cotton + Steel, Liberty of London, Seven Islands

See you in two weeks.

*I hope this isn’t getting too technical for you.
**Yeah, the sedimentary layers in this case are mainly purple. But still.

Tools and Materials Appearing in This Issue

Makers’ Mercantile Leather Cage Purse available separately or as a kit
addi® Olive Wood Circular Needle available in fixed and interchangeable varieties
Schacht Cricket 15-inch Rigid Heddle Loom
HiKoo Simpliworsted (55% Merino Wool, 25% Acrylic, 17% Nylon. 140 yards per 100 gram hank)
HiKoo Rylie (50% Baby Alpaca, 25% Mulberry Silk, 25% Linen. 274 yards per 50 gram hank)
HiKoo Kenzie (50% New Zealand Merino Wool, 25% Nylon, 10% Angora, 10% Alpaca, 5% Silk Noils. 160 yards per 50 gram ball)
HiKoo Kenzington (60% New Zealand Merino, 25% Nylon, 10% Alpaca, 5% Silk Noils. 208 yards per 100 gram hank)
Schoppel-Wolle Leinen Los (70% Wool, 30% Linen. 328 yards per 100 gram ball)

About Franklin

Designer, teacher, author and illustrator Franklin Habit is the author of It Itches: A Stash of Knitting Cartoons (Interweave Press, 2008). His new book, I Dream of Yarn: A Knit and Crochet Coloring Book was brought out by Soho Publishing in May 2016 and is in its second printing.

He travels constantly to teach knitters at shops and guilds across the country and internationally; and has been a popular member of the faculties of such festivals as Vogue Knitting Live!, STITCHES Events, the Maryland Sheep and Wool Festival, Squam Arts Workshops, the Taos Wool Festival, Sock Summit, and the Madrona Fiber Arts Winter Retreat.

Franklin’s varied experience in the fiber world includes contributions of writing and design to Vogue KnittingYarn Market News, Interweave KnitsInterweave CrochetPieceWorkTwist Collective; and a regular columns and cartoons for Mason-Dixon Knitting, PLY Magazine, Lion Brand Yarns, and Skacel Collection/Makers’ Mercantile. Many of his independently published designs are available via Ravelry.com.

He is the longtime proprietor of The Panopticon, one of the most popular knitting blogs on the Internet (presently on hiatus).

Franklin lives in Chicago, Illinois, cohabiting shamelessly with 15,000 books, a Schacht spinning wheel, four looms, and a colony of yarn that multiplies whenever his back is turned.

Follow Franklin online via Twitter (@franklinhabit), Instagram (@franklin.habit), his Web site (franklinhabit.com) or his Facebook page.

Cage Match, Part Two

fwf-logo-v11

For an introduction to what goes on in this column, click here.

For the first part of this adventure, click here.

Before I sat down to do up today’s column, I flipped back to Part One and found I’d written this about insert for my Makers’ Mercantile Cage Purse:

“I felt this piece ought to be as simple as possible.”

And I’d written this:

“This piece will be nothing but garter stripes.”

Ha. Haha. Hahahahahahahahahahahahaha.

Nice Bottom

After I’d posted Options 1 and 2…

fwf-47-option-01

fwf-47-option-02

…of course Options 3, 4, 5, 6, 7, 8, and 9 presented themselves at the darnedest moments. Walking Rosamund, waiting for the subway, showering, listening to upstairs neighbor’s kid practice her tap dancing at 4 a.m.

The more I turned over the ideas, the more I felt I’d like work the liner all in one piece. What about a bottom worked circularly? Could I do that?

It seemed to me I could.

This was my sketch.

fwf-48-sr-12

The cast on you see referenced there is, of course, Judy’s Magic Cast on by the (let us now praise famous knitters) Judy Becker. She describes how to do better than I ever could, here at Knitty.com.

Judy invented it as a gorgeous and fuss-free beginning for toe-up socks, but I’ve never used it for toe-up socks. I’ve used it countless times, though, as either the circular beginning of a piece I want to grow outwards from the center; or whenever I want a cast on to work first in one direction (from the bottom row of stitches), and then in the other (from the top row).

So I cast on, magically, with HiKoo Simpliworsted in 952 Peacock Tonal and begin to knit. You can imagine my delight when it worked.

fwf-48-sr-11

(You may have noticed that the swatch, when it would no longer lie flat on one circular needle, got moved to two circular needles. A very slick designer would have put it on two identical addi® Olive Wood circulars so it would look pretty for the photograph. I, on the other hand, often make design decisions based on what’s closest to the couch. And this is a column about the realities of creativity. So here it is on one olive needle and one needle (of the same size, at least) from my set of addi® Click Interchangeables. Sue me.)

The above is what I think of as a proof-of-concept swatch–concrete evidence that the basic idea has merit. Even though I messed up the placement of my increases now and again (until I broke down and added the stitch markers), and even though I got an oval instead of a rectangle, the bottom is handsome and lies down as required.

I’m pretty sure I could move towards a rectangle by diddling the increase points, but I’m starting to groove on the idea of a curvy bag in a square cage.

Bonus: I don’t have to do a darn thing to get the sides going–just continue to work around on the live stitches, without further increases.

When I had swatched enough to convince myself this would be a suitable foundation, I decided to nail down a strategy for the sides.

Short Cut

Just garter stripes, right? That’s what I said. Just garter stripes.

Since these theoretical garter stripes would continue in the round, I’d have to purl every other row. I don’t mind purling. The bottom of the bag was purled on every other round.

But I’ve sometimes worked a “circular” piece of garter stitch with short rows. Usually I do it because my purl stitches and knit stitches are slightly different sizes. In some yarns, especially those with little stretch, that leads to “rowing out”–clearly visible differences in gauge from round to round. If I’m never purling, I’m never rowing out.

Short rows aren’t complicated. A short row is just a row you cease to knit before you reach the end. Instead, you turn the work and head back in the other direction. That’s all. Where you turn, you may form a gap in the fabric–but that, too is easily dealt with. More on that in a minute.

So, okay. I thought about using short rows in the bag to avoid rowing out. I hadn’t done it in multiple colors before. Feeling a little timid, I joined a new color to the bottom. Before I knew it, I was a bored with the idea of stripes.

I mean, stripes. Come on.

fwf-48-sr-09

Even in all these different yarns and colors, stripes are just stripes.

What if I really pushed the short row idea, building up areas of each color before moving on to the next? Could I do something like this?

fwf-48-sr-10

Only one way to find out.

Short ‘n’ Curvy

I decided to try this process for each new section of color/yarn.

1. On the right side, join in the new color (here, it’s HiKoo Simpliworsted in 033 Red Hat Purple) and knit some number of stitches. My first thought was to make it a pretty random number, since this a random jumble of leftover yarns I’m working with.

fwf-48-sr-01

2. At the end of this first row, perform a wrap-and-turn to help prevent a gap at the turning point. A wrap and turn isn’t difficult. Just knit to the turning point, and slip the next (unworked) stitch from the left needle to the right needle as if to purl.

fwf-48-sr-02

…then bring the working yarn between the needle tips to the near side of the work…

fwf-48-sr-03

…then return the slipped stitch to the left needle….

fwf-48-sr-04

Turn the work. Carry on knitting. Since we’re making garter stitch, the working yarn will already be where you need it to be, on what is now the far side of the work. That’s it. (Note: In most stockinette stitch short row techniques, there’s a maneuver for for picking up a wrap the next time you encounter it. In garter stitch, we don’t need to do that. Yay.)

3. Make each row one stitch shorter than the previous row. Wrap and turn at the end of every row. After you’ve done this for a little while, you’ll have built up a sweet little blob of color.

fwf-48-sr-05

4. When you feel that the blob is just about the right size, or when you can’t get any shorter with your rows, finish a wrong side row and then knit part of the way across a right side row.

5. At this point, join in a new color for the next blob, on this same right side row. You’ll be back at Step 1.

Working in this fashion will gradually take you all the way around the live stitches at the edge of the bottom–and when you’re back to the beginning, just carry on with more short row blobs in different colors until the bag is as tall as it needs to be.

Such is my theory, anyhow. How did the swatch look?

After doing this with three different colors (and two different yarns) on my swatch…

fwf-48-sr-06

…I decided to take the piece off the needles and see what I was getting.

fwf-48-sr-07

I’m excited. I think the curvy top selvedge is something we might want to accentuate.

fwf-48-sr-08

With a little more swatching to refine the details, I feel confident we’ll be on the way to a fun to knit (and fun to look at) liner for the purse.

So much for keeping it simple.

See you in two weeks

Tools and Materials Appearing in This Issue

Makers’ Mercantile Leather Cage Purse available separately or as a kit
addi® Olive Wood Circular Needle available in fixed and interchangeable varieties
Schacht Cricket 15-inch Rigid Heddle Loom
HiKoo Simpliworsted (55% Merino Wool, 25% Acrylic, 17% Nylon. 140 yards per 100 gram hank)
HiKoo Rylie (50% Baby Alpaca, 25% Mulberry Silk, 25% Linen. 274 yards per 50 gram hank)
HiKoo Kenzie (50% New Zealand Merino Wool, 25% Nylon, 10% Angora, 10% Alpaca, 5% Silk Noils. 160 yards per 50 gram ball)
HiKoo Kenzington (60% New Zealand Merino, 25% Nylon, 10% Alpaca, 5% Silk Noils. 208 yards per 100 gram hank)
Schoppel-Wolle Leinen Los (70% Wool, 30% Linen. 328 yards per 100 gram ball)

About Franklin

Designer, teacher, author and illustrator Franklin Habit is the author of It Itches: A Stash of Knitting Cartoons (Interweave Press, 2008). His new book, I Dream of Yarn: A Knit and Crochet Coloring Book was brought out by Soho Publishing in May 2016 and is in its second printing.

He travels constantly to teach knitters at shops and guilds across the country and internationally; and has been a popular member of the faculties of such festivals as Vogue Knitting Live!, STITCHES Events, the Maryland Sheep and Wool Festival, Squam Arts Workshops, the Taos Wool Festival, Sock Summit, and the Madrona Fiber Arts Winter Retreat.

Franklin’s varied experience in the fiber world includes contributions of writing and design to Vogue KnittingYarn Market News, Interweave KnitsInterweave CrochetPieceWorkTwist Collective; and a regular columns and cartoons for Mason-Dixon Knitting, PLY Magazine, Lion Brand Yarns, and Skacel Collection/Makers’ Mercantile. Many of his independently published designs are available via Ravelry.com.

He is the longtime proprietor of The Panopticon, one of the most popular knitting blogs on the Internet (presently on hiatus).

Franklin lives in Chicago, Illinois, cohabiting shamelessly with 15,000 books, a Schacht spinning wheel, four looms, and a colony of yarn that multiplies whenever his back is turned.

Follow Franklin online via Twitter (@franklinhabit), Instagram (@franklin.habit), his Web site (franklinhabit.com) or his Facebook page.

Cage Match, Part One

fwf-logo-v11It scarcely seems possible, but by the close of this series we will have reached the fiftieth installment of Fridays with Franklin. Fifty! Can you imagine?

I was flipping through my binder of shade cards from Makers’ Mercantile looking for the next yarn to play with when my elbow knocked over a little basket of yarn that was sitting on the work table. Odd balls of yarn spilled all over the floor. Or they would have, if they’d hit the floor. Instead they spilled all over the four open boxes on the floor that were already full of other odd balls of yarn. You couldn’t actually see the floor.

It appears that nearly fifty columns full of knitting, crochet, and weaving have landed me with quite the buffet of leftovers.

That’s not something to cry about, I know; but please keep in mind that I live in a large city and do my work in a very small room. How small? Not much larger than the footprint of a king-sized bed. It is crammed, absolutely crammed, with things I need. Here, I’ve drawn you a little plan:

fwf-47-workroom

Of course, what you don’t see in the plan are the things I have hanging from the walls and ceiling, including my Schacht Cricket Rigid Heddle Loom, my card weaving loom from John Mullarkey, my swift, my project bags full of things in progress, and other hanging bags full of weaving, spinning, and embroidery tools. Every inch is spoken for.

I try to keep leftover yarns organized and sorted into the bins under the bed in the next room. That’s the place where, by mutual agreement, my stash lives. If it won’t fit under the bed it has to leave the apartment. Fortunately, it’s a big bed. Good intentions don’t sort skeins, though; so I have a perpetual backlog on the workroom floor. The prettiest little tripping hazard you ever saw.

Seeing as we’re celebrating a milestone of sorts with this adventure, I think it’d be fun (and prudent) to hold back from ordering new stuff and make use of what’s already to hand.

fwf-47-yarnbowl

Talk about memory lane.

There’s HiKoo Simpliworsted here from The Adventure on the Floor (the crocheted mat) and The Adventure of the Warm Puppy and The Adventure of the Transparent Excuse to Show You More Pictures of My Adorable Dog (sweaters for Rosamund).

There’s HiKoo Rylie from The Adventure of the Scarf That Ate the World (and the Into the Hoods interlude that followed).

There’s HiKoo Kenzie and also HiKoo Kenzington from The Adventure of the Stealth Blanket (the Ohio Star quilt-inspired afghan and pillow).

There’s Schoppel-Wolle Leinen Los from The Adventure of the Little Poser.

And that’s just the top layer.

These are wildly different yarns, in wildly different fiber blends, constructed in all manner of methods from chainette (Kenzington) to felted singles (Leinen Los).

Pushing the pile around didn’t give me fun ideas for using them all together. An obvious choice would have been some sort of scrap blanket, but one of the yarns (Leinen Los) isn’t really well suited to that. A scrappy shawl might be fun–but a shawl made with a significant quantity of hefty Kenzington might suffocate you.   

Then I got a note from one of my friends at Makers’ Mercantile in which she mentioned one of their most popular kits–the Cage Purse. You may well have seen a friend with one of these, or you may well have one yourself.

The cage bit…

fwf-47-cage-full

…comes ready to use. The fun is knitting (or crocheting) a liner for it. The open cage supports your work, which means you don’t have to resort to felting in order to get a bag that won’t droop and sag when you fill it. And because it’s a cage–well made from good leather and handsome, sturdy rivets…

fwf-47-cage-detail

…whatever sort of liner you create is beautifully shown off.

Makers’ Mercantile sells the cages as part of several kits (like this Brown Kit, or the Red Kit shown below) – each with yarn, pattern, and fabric for a lining…

399041_20170531154848
…or you can buy just the cage (in a choice of colors such as Basil) and use your imagination. That’s what I decided to do.

The Amazon Arrows cowl in our last adventure

fwf-46-a-after-button-detail

…had so much going on (miters! shadow knitting! duplicate stitch! I-cord!) that I felt this piece ought to be as simple as possible. When you have four very different, eye-catching yarns in eight or ten colorways all smooshed together, I think it’s unwise to make the structure of the fabric complicated as well.

So, what’s the least complicated knit fabric? Probably garter stitch: when working flat, knit all stitches and all rows. I cast on for a small swatch…

fwf-47-aerialswatch

…and within a few inches I got that tingle in my chest that either means I’m onto something I like, or that I shouldn’t eat half a pan of brownies right before bed. I hadn’t been eating brownies.

This is nothing but garter stripes with changes from yarn to yarn at will. Most of the colors are fairly closely related (clearly I have a thing for purples and blues), but as we noted the yarns themselves are strange bedfellows. And I like that. The fabric was looking good, and the swatch was (brace yourself) fun to knit. Truly fun.

When you find yourself smiling at a swatch, that’s a good sign.

I sketched out what I needed to make. Pretty simple, really.

fwf-47-bagsketch

All that remained before calculating my cast-on numbers was a plan for how to make that happen. There were two obvious options.

Option 1…

fwf-47-option-01

…was flat construction. Knit panels and sew them together. That would make sense, as garter stitch is a natural result of flat knitting. I don’t mind sewing–it’s quite fun, really, once you know a little bit about what you are doing–and the side seams would give the bag some structure.

On the other hand, a seam sewn in a fabric with this many yarns would never be invisible. Not a deal-breaker, but a point to consider. It also might be tricky to sew a good seam when joining panels where two very different yarns are meant to align at the selvedges. In fact, just getting all four sides to be exactly the same length might be a challenge.

Option 2…

fwf-47-option-02

…was primarily circular construction. Knit the bottom as a flat panel, then pick up and knit around the edges and work the body of the bag in the round. Without doing anything special at the corners, this bag would have softly contoured sides. It might be possible to give those corners a touch more definition using Elizabeth Zimmermann’s “phoney [sic] seams” technique–slipping the corner stitches every other round.  There would be no sewing. But every other round, in order to make garter stitch, would have to be purled.

Either way, we’re talking about a ton of ends to weave in. Happily, I like weaving in ends.

So, what to do?

See you in two weeks!

Tools and Materials Appearing in This Issue

Makers’ Mercantile Leather Cage Purse available separately or as a kit
addi® Olive Wood Circular Needle available in fixed and interchangeable varieties
Schacht Cricket 15-inch Rigid Heddle Loom
HiKoo Simpliworsted (55% Merino Wool, 25% Acrylic, 17% Nylon. 140 yards per 100 gram hank)
HiKoo Rylie (50% Baby Alpaca, 25% Mulberry Silk, 25% Linen. 274 yards per 50 gram hank)
HiKoo Kenzie (50% New Zealand Merino Wool, 25% Nylon, 10% Angora, 10% Alpaca, 5% Silk Noils. 160 yards per 50 gram ball)
HiKoo Kenzington (60% New Zealand Merino, 25% Nylon, 10% Alpaca, 5% Silk Noils. 208 yards per 100 gram hank)
Schoppel-Wolle Leinen Los (70% Wool, 30% Linen. 328 yards per 100 gram ball)

About Franklin

Designer, teacher, author and illustrator Franklin Habit is the author of It Itches: A Stash of Knitting Cartoons (Interweave Press, 2008). His new book, I Dream of Yarn: A Knit and Crochet Coloring Book was brought out by Soho Publishing in May 2016 and is in its second printing.

He travels constantly to teach knitters at shops and guilds across the country and internationally; and has been a popular member of the faculties of such festivals as Vogue Knitting Live!, STITCHES Events, the Maryland Sheep and Wool Festival, Squam Arts Workshops, the Taos Wool Festival, Sock Summit, and the Madrona Fiber Arts Winter Retreat.

Franklin’s varied experience in the fiber world includes contributions of writing and design to Vogue KnittingYarn Market News, Interweave KnitsInterweave CrochetPieceWorkTwist Collective; and a regular columns and cartoons for Mason-Dixon Knitting, PLY Magazine, Lion Brand Yarns, and Skacel Collection/Makers’ Mercantile. Many of his independently published designs are available via Ravelry.com.

He is the longtime proprietor of The Panopticon, one of the most popular knitting blogs on the Internet (presently on hiatus).

Franklin lives in Chicago, Illinois, cohabiting shamelessly with 15,000 books, a Schacht spinning wheel, four looms, and a colony of yarn that multiplies whenever his back is turned.

Follow Franklin online via Twitter (@franklinhabit), Instagram (@franklin.habit), his Web site (franklinhabit.com) or his Facebook page.

Fridays with Franklin: The Adventure of the Warm Puppy, Part Three

fwf-logo-v11The Adventure of the Warm Puppy: Part Three


For an introduction to what goes on in this column, click here.

For the the first part of this adventure, click here.


In the two weeks since the last installment, I’ve had more than a few inquiries about one aspect of Rosamund’s sweater-in-progress…

Warm 3.1

…namely, the leg openings and how they were made.

I knew from the first that I wanted to work this piece in the round, with steeks cut for the forelegs. That aroused comment, because there is a widespread sentiment in the knitting community about steeks.

Warm 3.2

This is silly.

Steeks are not frightening in the least, nor are they difficult. They’re like everything else in knitting: bewildering, when you don’t know how they’re done; and exciting, once you do.

Since so many of you asked for more information about steeks, we’re going to devote the next two parts of this adventure to those in Rosamund’s sweater.

Steek?

A steek, if you are unfamiliar with the term, is an opening cut into a piece of knit fabric that follows the vertical* grain–the columns of stitches, as opposed to the rows or rounds. The word comes to us (thanks to the inimitable Alice Starmore) from the Shetland word for “gate” or “opening.” Steeks are traditionally much used on Fair Isle sweaters.

Warm 3.3

You will sometimes find “steek” definied as a “slashed vertical opening” because “slashed” sounds more dramatic than “cut,” as though you went at your sweater with a kitchen knife or meat cleaver. Indeed, who among us has not felt the impulse?

But steeks are almost never impulsive. You plan for them.

Planning the Opening(s)

Rosamund has two front legs. Therefore, two steeks. Therefore, double the fun. Where to place them?

Let’s take another look at the measurements.

Warm 3.4

Measurement F, the distance from the collar to the shoulder, tells us how long our top-down sweater must be when the openings begin: 5 inches.

The sweater reached 5 inches after a series of increase rounds–described in detail in the previous installment. At this point, the number of stitches per round had risen to 124 stitches.

To figure out where in that round to start the openings, this is what we do.

1. Take note of our gauge, which is 4.5 stitches and 6.5 rounds per inch.

2. We look at measurement E, the space between the legs: 4 inches. At our gauge, that means we must preserve 18 stitches at the bottom center between the openings.

3. Next we look at measurement H, the leg circumference, to figure out how many stitches are required in this first round for each opening. The total measurement is 9 inches, and we will make use of roughly one half** of that number: 4.5 inches, which at our gauge is roughly 20 stitches.

And so that first round–the foundation round of our steeks–will look something like this:

Warm 3.5

Knitting the Openings

With calculations complete, we start knitting.

It would have been kind of messy to show this on the actual sweater, so instead I cooked up a simple swatch to demonstrate how one steek opening is made. The swatch is small–only 26 stitches wide–and knit flat; but the process was the same on the circular sweater.

Here I’ve knit a few rows of stockinette to stand in for the sweater from the collar down to the foundation round of the leg holes–the round we planned above.

Warm 3.6

In that foundation round, when we reach the stitches needed to begin the opening, we slip them onto a piece of scrap yarn

Warm 3.7

and then we cast on*** a certain number of brand new stitches to serve as the foundation of what is often called the “bridge.” This is the fabric that’ll be cut. The number of stitches in the bridge can vary. For the steek technique I have in mind, we need an odd number and a minimum of five. I used five in Rosamund’s sweater, but to make this demonstration very clear I cast on seven.

Warm 3.8

Now, if you are accustomed to reading your knitting, you won’t necessarily need stitch markers on either side of your bridge stitches. But if you are new to steeks and/or not confident in reading your knitting, they can be helpful.

Warm 3.9

With the bridge stitches cast on we simply continue knitting.

The main fabric, as before, is in stockinette. To distinguish the bridge fabric, we work it in reverse stockinette.

Warm 3.10

If we want to shape the opening, and we often do, it’s easy and frankly rather magical. Let’s say we want to expand the width of this opening at both sides. First, we knit up to the last two stitches before the first marker, and we knit two together.

Warm 3.11

We slip the marker and work the bridge stitches as usual. THIS IS IMPORTANT: All shaping happens outside the bridge. The bridge stitches do not decrease or increase; if we start with seven, we end with seven.

Once past the bridge and second marker, we slip, slip, knit to decrease in the first two stitches.

Warm 3.12

In the following row, we do not decrease.

If we repeat these two rows–one with decreases, one without–five times, we begin to see that our opening is changing shape**** and the knitting looks extremely odd. People who have never worked steeks will begin to think you are some kind of mad genius. There is no reason to tell them otherwise.

Warm 3.13

Once the steek has reached its full height, we bind off only (only!) the bridge stitches. Be sure not to bind off any stitches that are part of the main fabric. If you’ve been using markers, you can discard them now.

Warm 3.14

When, in the following row or round, we come to the place where the bridge used to be, we cast on whatever number of stitches the pattern calls for. This number will vary. In the photograph above, you’ll see that I cast on ten stitches–the total number I had decreased–so the swatch will lie nice and flat while I demonstrate the cutting process…in two weeks.

Warm 3.15

See you then!

*There is a method for cutting an opening that follows the horizontal grain, and we will certainly play with it another time because it’s super fun.

**This was a guess on my part, and gave a very wide leg hole. Next time, I will probably go with a smaller fraction of the total measurement–something closer to about a quarter.

***Working with a single color, I typically use a simple backward loop cast on.

****Please don’t get the impression that you must mirror your shaping. You may shape in any way that suits you. Rosamund’s leg openings were shaped only along the upper edge, rather like a racer-back tank top, because I didn’t want to remove any of the fabric covering her delicate pink undercarriage.

Tools and Materials Appearing in This Issue

Simpliworsted by HiKoo® (55% Merino Superwash, 28% Acrylic, 17% Nylon; 140 yds per 100g skein). Color: 611, Earth and Sky.

addi® Olive Wood circular needles size US 4, 16 inch (40 cm)

About Franklin

Designer, teacher, author and illustrator Franklin Habit is the author of It Itches: A Stash of Knitting Cartoons (Interweave Press, 2008). His newest book, I Dream of Yarn: A Knit and Crochet Coloring Book was brought out by Soho Publishing in May 2016 and is in its second printing.

He travels constantly to teach knitters at shops and guilds across the country and internationally; and has been a popular member of the faculties of such festivals as Vogue Knitting Live!, STITCHES Events, the Maryland Sheep and Wool Festival, Squam Arts Workshops, the Taos Wool Festival, Sock Summit, and the Madrona Fiber Arts Winter Retreat.

Franklin’s varied experience in the fiber world includes contributions of writing and design to Vogue KnittingYarn Market News, Interweave KnitsInterweave CrochetPieceWorkTwist Collective; and a regular columns and cartoons for Mason-Dixon Knitting, PLY Magazine, Lion Brand Yarns, and Skacel Collection/Makers’ Mercantile. Many of his independently published designs are available via Ravelry.com.

He is the longtime proprietor of The Panopticon, one of the most popular knitting blogs on the Internet (presently on hiatus).

Franklin lives in Chicago, Illinois, cohabiting shamelessly with 15,000 books, a Schacht spinning wheel, four looms, and a colony of yarn that multiplies whenever his back is turned.

Follow Franklin online via Twitter (@franklinhabit), Instagram (@franklin.habit), his Web site (franklinhabit.com) or his Facebook page.

Fridays with Franklin: The Adventure of the Warm Puppy, Part Two

fwf-logo-v11The Adventure of the Warm Puppy: Part Two

For an introduction to what goes on in this column, click here.

For the the first part of this adventure, click here.


With my HiKoo Simpliworsted and measurements at the ready,

Warm 2.1

it was time begin to cooking up a sweater for Rosamund.

Warm 2.2

It would be a very simple sweater, likely quite imperfect, meant to serve as a fitting guide for other, more complex designs. Rosamund is going to need a whole wardrobe, you see. This is no ordinary dog. This is a dog so clever, good-tempered, and beautiful that she might well have a lucrative career ahead of her as a therapy dog, or even a Tumblr meme.

Warm 2.3

Warm 2.4

Warm 2.5

Warm 2.6

You can’t have a dog of such quality walking around in just any old thing.

Sketching It Out

Even when I’m planning a project this plain, it helps to do up a simple sketch that maps the key features.

Warm 2.7

Then I like to mark up the sketch with thoughts about what techniques might work best.

Warm 2.8

I reserve the right to change my mind at any time, of course. I usually do. But this gives me a place to start.

Down the Slope

In Part One, I wrote about a knitter I met who got her jollies by knitting fitted rock cozies. We didn’t get to know each other well, but she once showed me the fundamental principle for figuring where and how much to increase and decrease. I’ve used it ever since, in countless and varied projects.

Here’s an example of how I put it to work in shaping Rosamund’s new sweater, literally right at the start.

First, note two places in which you have a noticeable difference in circumference. In this case, the first was the neckline–where the sweater would begin–and the shoulders, where Roz’s legs join her body.

Warm 2.9

That’s a difference of seven inches.

And we note how long the distance is between these two measurements, along the shoulder slope.

Warm 2.10

Now we take into account what this means in terms of our gauge, which is 4.5 stitches and 6.5 rounds per inch.

Warm 2.11


A Brief Diversion on Fudging

The mathy among you will have noticed some funny business is going in the photograph above. For one thing, the neck measurement is 21 inches, and at 4.5 stitches to the inch, that means the neck should be 94.5 stitches around. Instead, it’s given as approximately 92 stitches.

What gives?

Well, first of all–we can’t cast on half a stitch.

Second, our original sketch indicates that we want to begin this circular sweater with a collar of knit 2, purl 2 (k2p2) ribbing. That requires a number of stitches evenly divisible by 4, and neither 94 nor 94.5 will work.

So what do we do? We fudge. We find the nearest number to 94.5 that is divisible by 4. We could go higher, but I chose to go slightly lower, to 92 stitches.

It’s a tiny difference. It’s not going to throw the piece out of whack.

By the same token, we don’t worry that the shoulder measurement of 28 inches “should” require 126 stitches, not 124. We also want to end the sweater with k2p2 ribbing, and so it will be convenient if we maintain numbers evenly divisible by 4 throughout. Therefore, 124.

I could have chosen to use 128 as my fudged number, rather than 124. Why didn’t I? It just felt like the right thing to do at the time. If I had been worried that two stitches less would make the piece too small, I could have gone up. Instead, I decided that with a limited yarn supply (only two skeins to hand) it would be a good idea to eliminate stitches where possible, and went down.

A big part of becoming a confident, adventurous knitter is learning not to sweat the small stuff. Two stitches in a worsted weight dog sweater is small stuff.

Fudge it.

Now, Back to the Math

So this is our problem (and it’s a math problem, but the sort of math problem even I can do).

We need to increase from 92 stitches to 124 stitches, a total of 32 stitches.

Warm 2.12

And we have, potentially, 32.5 (we’ll call it an even 32–more fudging) rounds over which to increase this number of stitches.

This is where things get slightly fuzzy, if you will pardon the expression. You have a choice to make based on your own judgement. Is the shaping gentle (like, for example, most sweater waist shaping) or sharp (like the explosion of stitches that shape a knitted tam)?

Warm 2.13
Roz’s shoulder slope looks to me gradual, which means we want to space the increases out over many rounds, rather than do them all at once. The nice thing about working with knitted fabric is that it is obligingly stretchy and drapey–it almost wants to fit whatever you put inside it. That means there’s not one correct answer, but a range of possible correct answers. So, we can take a guess and try it out.

Here’s my guess. To calculate 32 increases over 32 rows, we divide the number of rounds by the number of stitches. And we get…drum roll, please:

1

Which means 1 increase in every round.*

For gentle shaping, it’s usually best to put at least one plain round between increase rounds. (The more plain rounds between increases, the gentler the shaping will be.) So here, at Rosamund’s shoulders, I prefer to increase two stitches every other round. Spreading decreases out also gives the shaped area of the fabric a smoother line, though of course the change will still be noticeable.

A reasonable plan, right? Right. The only remaining question was where in each round to place the increases. It seemed logical to stick them opposite each other another along the lines of the shoulder. Where the body grows, so does the fabric.

To sum up:

  1. Figure the difference in stitches between Point A and Point B.
  2. Figure the number of rows/rounds between Point A and Point B.
  3. Divide the number of rows/rounds by the number of stitches to increase.** This will give you the number of increases per row/round. If you end up with fractions, choose a nearby whole number using your best judgment.
  4. Decide exactly where in your rows/rounds you want your shaping stitches to occur.

Decreases work the same way.

Many Rounds Later…

We’re going to jump ahead now to the first fitting. I had decided early on to work the entire body in one piece, in the round, with steeks for the leg holes. Perhaps you shudder at the mention of steeks–because there is a widespread misconception that steeks are frightening. They aren’t, but I want to set aside steek talk for our next installment.

Today, let’s look at where all the calculating and knitting and calculating and knitting got us.

Warm 2.14

These are catch-as-catch-can photos, because Rosamund was not as interested in showing off her sweater as she was in the squirrels making whoopee in the porch rafters.

Verdict: Not bad.

Warm 2.15

I could have given this another inch or two of length from neck to shoulder. And it might be cute to knit her a turtleneck. I think she could carry that off. (In case you’re wondering, the orange scrap yarn is holding live stitches conveniently created during the formation of the steeks.)

Warm 2.16

I used short rows to make the sweater longer on the back than the belly, so she’d be nice and warm at the rear but wouldn’t pee on my knitting. I could have done more short rows for additional back length. In fact, I could use an additional two to three inches all around here. So that’s duly noted for next time.

Warm 2.17

Clearly–meaning, you can see it from down the block–the biggest flaw is the size of the leg*** holes. After I opened the steeks I realized that my own biceps fit easily through them. I’m small, but I’m not as small as Roz–whose legs measure about nine inches around where they join her body.

This is what happens when you don’t trust your own numbers. I kept looking at pictures of her (as opposed to actual her, since my travel schedule meant much of the knitting had to be away from home) and thinking, “That’s not big enough. She’s so muscular. Thighs like a shot put champion. Man, I’d love to have those thigh muscles. Let’s make this just a bit wider. And she’ll need ease, so she can run around. Lots of ease.”

So I wound up with 14-inch leg holes.

Still, now I know what not to do. That’s the point of this exercise, after all–to figure out what basic measurements and shaping Rosamund’s sweaters should (and shouldn’t) have.

I believe I can do something about the legs and make this into a wearable sweater, good for early fall if not the coldest parts of winter. Let’s talk more about the legs, and about steeks, in two weeks. By which time it may well be winter in Chicago.

*Have you any idea how relieved I was that the math worked out so nicely? Pure chance, but I’ll take it.

**If the number of stitches to increase is greater than the number of rows/rounds across which you will increase, flip this around. Divide the number of stitches by the number of rounds.

***I keep typing “arm holes.” Knitting for an animal is kinda weird.

Tools and Materials Appearing in This Issue

Simpliworsted by HiKoo® (55% Merino Superwash, 28% Acrylic, 17% Nylon; 140 yds per 100g skein). Color: 611, Earth and Sky.

addi® Olive Wood circular needles size US 4, 16 inch (40 cm)

About Franklin

Designer, teacher, author and illustrator Franklin Habit is the author of It Itches: A Stash of Knitting Cartoons (Interweave Press, 2008). His newest book, I Dream of Yarn: A Knit and Crochet Coloring Book was brought out by Soho Publishing in May 2016 and is in its second printing.

He travels constantly to teach knitters at shops and guilds across the country and internationally; and has been a popular member of the faculties of such festivals as Vogue Knitting Live!, STITCHES Events, the Maryland Sheep and Wool Festival, Squam Arts Workshops, the Taos Wool Festival, Sock Summit, and the Madrona Fiber Arts Winter Retreat.

Franklin’s varied experience in the fiber world includes contributions of writing and design to Vogue KnittingYarn Market News, Interweave KnitsInterweave CrochetPieceWorkTwist Collective; and a regular columns and cartoons for Mason-Dixon Knitting, PLY Magazine, Lion Brand Yarns, and Skacel Collection/Makers’ Mercantile. Many of his independently published designs are available via Ravelry.com.

He is the longtime proprietor of The Panopticon, one of the most popular knitting blogs on the Internet (presently on hiatus).

Franklin lives in Chicago, Illinois, cohabiting shamelessly with 15,000 books, a Schacht spinning wheel, four looms, and a colony of yarn that multiplies whenever his back is turned.

Follow Franklin online via Twitter (@franklinhabit), Instagram (@franklin.habit), his Web site (franklinhabit.com) or his Facebook page.


Fridays with Franklin- Adventure On the Floor, Part One

fwf-logo-v1For an introduction to this ongoing series, click here.

Hey, kids–remember when I promised that I’d show you what happens in these adventures even if they end with a crash, an explosion, and tears? Buckle up, because this one may well be heading that way. I truly have no idea if it will work.

More than a year ago, a very kind person who knows I have a weakness for vintage needlework books passed along a sheaf of patterns from the 1930s and 1940s. Among them was a curious specimen from a now-defunct yarn company. The subject? Making rugs.

1

I had never made a rug before, but the concept wasn’t entirely foreign. My early childhood in rural Pennsylvania overlapped by a whisker with the end of the rag-rug era. In one or two kitchens you could still find grandmothers or great-aunts sorting, braiding, weaving, and stitching the remains of old clothes into immense coils that protected bare feet from bare linoleum, and bare linoleum from wet boots.

They were products of poverty and necessity, made from textiles too exhausted for any other use. They lacked the romantic appeal of patchwork quilts. I liked them, though.

I’d thought about learning the skill myself, if I could find a teacher. The notion of making something as large, tough, and useful as a rug holds a certain exotic appeal for a guy who knits a lot of little lace shawls. Knitting needles are not much use in rug making. Sure, I’ve seen patterns for knitted rugs. I’ve walked upon knitted rugs. They all–at best–seemed like misplaced afghans or very, very large washcloths that had landed on the floor.

I don’t like knitted rugs. Sorry. No craft is good at everything.

This little booklet from 1939 pictured, what appeared at first glance, to be the rag rug of my childhood. Closer inspection, however, revealed it to be a new-to-me combination of crochet and clothesline.

You heard me. Clothesline. This:

2

According to the author, the combination allows one to create attractive rugs “in a jiffy.” It says so right on the cover. Jiffy, it says.

These rugs were clearly intended to compliment a certain widely popular take on American Colonial style; without the fuss of collecting, cutting, sorting, sewing, and braiding rags.

And it wasn’t only rugs you could make, wrote the author. You could also make lamp mats

3

and place mats

4

and pot holders

5

which look to me like extremely small rugs that are not on the floor.

I had doubts about all this, which meant I had to drop everything and try it out.

The Materials

I’ve already mentioned clothesline

2

as the foundation for these projects. I went to the hardware store around the corner and spent about fifteen minutes casing the different brands and varieties. This is far more time than most folks spend looking at clothesline, so the store owner came over to check on me.

He (cordially, if cautiously): Can I help you with something?

Me: No, thank you. Just looking at clothesline.

He (jovially): Gonna do your wash the old-fashioned way, eh?

Me: No, I’m going to make a rug.

He: I’m sorry, what?

Me: It’s…I’m going…there’s this old technique for making crocheted rugs with clothesline. And yarn.

He: Crochet?

Me: Yes.

He: Well, I’m afraid I don’t know anything about that.

Me: Oh. Well, that’s okay. Neither do I, really.

He (leaving, quickly): Huh. Okay then. Good luck.

I can never go back there, of course.

The booklet called for pure cotton yarn, because that’s what the now-defunct yarn company made. I wondered if I might substitute something else. For instance, Simpliworsted from HiKoo.

7

Judging by the size of the crochet hook the booklet calls for (equivalent, roughly, to a 3.5 mm or US size E) I had it in two variegated colorways, either of which would work as a rug in the apartment.  It’s a good mix of fibers too–wool for warmth and softness, acrylic and nylon for durability; and all of it washable.

The Technique

Some vintage pattern books do a remarkable job of illuminating obscure techniques within the confines of the format. Others do not. This booklet is one of the others.

The method for covering the clothesline in yarn is relegated to the end of the booklet, after the patterns but before the advertisement for Lux soap flakes. (“Precious heirlooms are the handsome crochets clever women are making. Protect their beauty with Lux!”).

As to how the method works, you get a set of diagrams

8

which tell you absolutely nothing. That’s all she wrote.

I figured out what I think you’re supposed to do by reading the patterns (more on that in the next installment); squinting furiously at the diagrams, messing around with the hook, yarn, and rope; and swearing at all of the above.

The basic idea is that you take a piece of clothesline and you use single crochet to entirely cover it with yarn. As the rug grows, you join successive rounds to one another as part of the crochet process.

Here we go.

Oval rugs begin with a central spine that’s merely a foundation chain.

9

Of course a foundation chain has a bumpy side and a smooth side (shown). We will address ourselves to the smooth side.

Each stitch in the chain has a right leg and a left leg.

10

We begin the rug proper by laying the clothesline along the top of the chain, adjacent to the left legs, leaving about an inch hanging free to the right. The working yarn should be behind the clothesline.

11

Make your first single crochet thus:

  1. Insert your crochet hook through the left leg of the second chain from the hook, then under the clothesline. Grab the working yarn with the hook.

12

  1. Pull the working yarn under the clothesline and back through the chain. You’ll have two loops on your hook.

13

  1. Reach over the clothesline with the hook and grab the working yarn. Pull it through both loops on the hook. You’ll have one loop on your hook, and the single crochet is complete.

14

To progress, put the hook into the left leg of the next chain and follow the steps exactly as before.

Your single crochets will begin to form a covering for the clothesline; but note that you’re looking at the wrong side of the rug as you work. Flip it over and you’ll see this on the right side.

15

That’s it–that’s the way the clothesline is covered. The rest of the pattern is nothing but small variations on those three steps to increase, turn corners, and join rounds together. Simplicity itself.

But will it all end in a useful, attractive rug?

I confess that I remain unconvinced. We’ll see what happens…in two weeks.

Tools and Materials Appearing in This Issue

HiKoo Simpliworsted: 55% Merino Superwash, 28% Acrylic, 17% Nylon; 140 yd per 100g skein.

AddiColours Crochet Hook (from set of nine color-coded, comfort grip hooks), size 3.5 mm.

Wellington Light Load Economy Clothesline: Nylon core, braided cotton exterior.

About Franklin Habit

Designer, teacher, author and illustrator Franklin Habit is the author of It Itches: A Stash of Knitting Cartoons (Interweave Press, 2008) and proprietor of The Panopticon, one of the most popular knitting blogs on the Internet. On an average day, upwards of 2,500 readers worldwide drop in for a mix of essays, cartoons, and the continuing adventures of Dolores the Sheep.

Franklin’s varied experience in the fiber world includes contributions of writing and design to Vogue Knitting, Yarn Market News, Interweave Knits, Interweave Crochet, PieceWork, Twist Collective; and a regular columns and cartoons for Knitty.com, PLY Magazine, Lion Brand Yarns, and Skacel Collection. Many of his independently published designs are available via Ravelry.com.

He travels constantly to teach knitters at shops and guilds across the country and internationally; and has been a popular member of the faculties of such festivals as Vogue Knitting Live!, STITCHES Events, Squam Arts Workshops, Sock Summit, and the Madrona Fiber Arts Winter Retreat.

Franklin lives in Chicago, Illinois, cohabiting shamelessly with 15,000 books, a Schacht spinning wheel, two looms, and a colony of yarn that multiplies whenever his back is turned.