This yarn is a huge sigh of relief for fans of HiKoo® Simplicity who like larger projects! One 200 gram cake contains the equivalent of 4 hanks of Simplicity! That means many accessory-sized items can be made with one cake, while larger projects may only need 2-5 cakes.
Featured as Michelle Hunter’s final KAL before her hiatus, the Audition shawl (pictured above) takes one hank of Simplicity Spray, and 2 hanks of your favorite Simplicity solid 50 gram hanks!
Featured in a fun array of ‘spray-dyed’ colors, this mix of spray-tonal and spray-multi colors all match well together, making for fun multi-color and fade projects.
Tell us what you’d make with this yarn!
55% Merino Superwash, 28% Acrylic, 17% Nylon
456 yards per 200 gram cake
Approximately 5 stitches per inch on US 4 - 6 (3.50 - 4.00 mm) needles
Concentric Cotton was created after the success of it’s worsted weight, baby alpaca counterpart: Concentric.
This 100% Peruvian Pima Cotton, fingering weight alternative is truly a bundle of joy. With a generous 929 yards in each 200 gram cake, just one or two is enough to create nearly any project!
Best of all, this yarn is alluring for multiple crafts as crocheters, weavers and machine knitters will also appreciate the reasonable price point, lack of ends to weave in, and cake put-up for easily usability.
100% Pima Cotton
929 yards per 200 gram cake
Approximately 5.5-6 stitches per inch on US 4-6 (3.50 - 4.00 mm) needles
The key to what, you ask? Success? Change? Happiness? Love?
Choose your goal and move forward stitch by stitch as you create the repeating large-scale skeleton key motif in the Unlocked cowl.
In this KAL sponsored by skacel, Kyle Kunnecke guides you with helpful video instruction that clearly demonstrates two-handed knitting, working with two colors at once, and his favorite technique, locking floats.
HiKoo® Concentric is used in this project because not only does it shift in color, but it is also made of luxurious 100% Baby Alpaca. The resulting fabric is soft, lightweight, and cozy.
Project
We will venture into the world of large expanses of negative space within the motif of this cowl. This provides an excellent opportunity to learn (and master!) locked floats in the round.
The Unlocked cowl is worked from the bottom up and requires knitting knowledge including: cast-on/bind-off, knit/purl, reading charts, securing/locking floats; all on circular needles.
Join the Knit-Along and spend time with other makers in the forum. Kyle also designed a very limited edition project bag for this KAL. Want one? The first customers to purchase two cakes of HiKoo® Concentric will receive the bag and a custom stitch marker in addition to a download code for the pattern as a thank you for signing up early.
Now through March 31, 2020, any customer who purchases two cakes of HiKoo® Concentric will receive the pattern as a free gift.
In the forum, Kyle will check in and offer information and support as you craft your way to completing this beautiful cowl.
In 2007, skacel collection, inc. , the wholesale distributor of addi, Schoppel Wolle, and Zitron Yarns in the USA, found that despite representing over 150 yarns, there were still products that customers wanted that were not available on the market. With this in mind, they decided to create their own line – and the Hikoo® brand was born.
One of the first goals for this new brand was to create a wool-free sock yarn. The design team got together (they are all avid knitters and crocheters) and began to build a prototype on paper on what would be the perfect sock yarn – without any animal fibers. Of course the biggest concern was what is referred to in the industry as "memory". Sheep’s wool, as well as most other animal fibers, have good memory, meaning after being stretched out the fibers will return to their original shape. Other natural fibers, such as plant based fibers, do not do this. Making a pair of socks out of plant based fibers usually leaves one disappointed, as the socks continuously fall down the leg and stretch out.
UNLESS, of course, you add in elastic.
So there was a start – a plant based fiber mixed with elastic. Hemp, Flax and Linen were all considered, and although these fibers are strong, none of them are really soft on the skin. The team wanted durable and comfortable. That left cotton, as a synthetic was out of the question. So, cotton was specified, and a sample of a 90% cotton and 10% elastic yarn was requested. One would think this would be perfect, as most socks purchased at the store are a cotton and elastic mix, usually around 95% cotton and 5% elastic, but it was not. Socks were knit from the sample, and unfortunately, the blend ended up not only being a bit rough on the foot, but the 10% elastic did not keep the sock up on the calf for very long!
Back to the drawing board.
The next go around, the elastic percentage was raised to 15%, and bamboo was added for softness. Once more, when the sample arrived, socks were knitted – and they were better – but not good enough. They still pooled around the ankle after a few hours. So it was back to the drawing board.
Again.
The next sample had 20% elastic in it, 60% cotton, and 20% bamboo. When it was delivered, socks were knit. And, they actually stayed up on the leg! They were not stretching out! But, the socks lacked luster, and seemed rather dull. Shine was needed. Where do you find shine? The team already felt they had too much synthetic in the blend with the 20% elastic, so it had to be a natural fiber.
Enter Silk!
Silk is strong and has a glossy sheen, so the cotton content was reduced to 50%, the bamboo and elastic remained at 20%, and 10% silk was added.
When the yarn got to Skacel, the team got to knitting socks. And this time they felt great on the foot, they didn’t slouch at the ankle, and they had just enough sheen to reflect a little light. The team thought they had it.
But no. The silk was making the yarn too expensive. So they lowered the silk content to 8%, lowered the bamboo to 16%, and raised the percentages of the cotton and elastic, to 55% and 21% respectively.
The samples arrived, socks were knit, and they were perfect! A new yarn had been developed.
Now – came the tough part – what to name it. After a few weeks of deliberation, it was decided to that since the yarn has so many different components in it, to shorten them all, sort of like abbreviations used on a chemistry chart – and call it Cobasi – Cotton (co), Bamboo (ba) and Silk (si). The elastic part was not mentioned in the name, but no one seemed to miss it... although if it wasn't there, we'd be back to square one.
55% Cotton, 16% Viscose from Bamboo, 8% Silk, 21% Elastic
220 yards (201 meters) per 50 gram hank
Available in Sock, DK and Plus weights
Made in Taiwan
So there you have it. The story of CoBaSi and how it came to be. Who knew that developing yarns took that much effort and research! And now that it has been a while since CoBaSi first came out, there are DK and Plus weights as well.
The weather here is cold and snowy, so we decided to share this fun photo from the Socks Appeal Boxers pattern. Want to make some amazingly comfy boxers? We know the perfect yarn.
It’s not often that I wish a project were larger. This one has been an exception. Every stage has been more fun than I anticipated–and the result makes me smile.
This is a small piece. I thought it would be a swatch.
I’ve carried it with me during the busiest teaching travel season I’ve ever had. It has been worked on in eleven states; in big cities and in the middle of nowhere; on land, on sea, and in the air; in view of both the Atlantic and Pacific Oceans; next to one Great Lake, two small lakes, and a medium-sized pond with a frog in it.
It’s seven inches wide and nine inches long.
When last we met, I was working on the decorative embroidery between the patches.
In addition to the buttonhole stitch (open and closed) and the feather stitch, I went cuckoo and added French knots with little tails in a few places where it seemed additional frivolity would be welcome.
It was fun.
At no point did this project require me to be serious or restrained. At no point did I have to ask myself whether more embellishment would be too much, or whether I ought to tread within the bounds of good taste. This project is crazy. It says so right there in the name.
When I had finished the lion’s share of the embroidery I didn’t want to stop. I didn’t want to leave the swatch a swatch. I didn’t have the time (or yarn) to do an entire blanket. But I had enough to make it up into a tiny, unserious cushion cover.
Since it was an unserious cushion cover, I kept dicking around with stuff I had been told never to do. For example, a very serious knitter once warned me that in cushion covers, one must always be sure the grain of the front fabric matched the grain of the fabric. In other words, you must always arrange the panels thus:
and never thus:
If one broke this rule, she insisted, one’s cushion would…I don’t know what. Explode? I mean, the horizontal grain (rows) and the vertical grain (columns) of any knitted fabric do stretch at different rates; but why would this be a catastrophe in a cover over a stable (if squishy) center?
Anyway, she’s dead now, and she was mean while she was alive. So I decided to stick my tongue out at her, posthumously, and mix the grains up like a madman with nothing left to lose:
I striped the back panel at random with every color from the front except the purple, because for about a week I couldn’t find it.
I put one-row buttonholes into the upper back panel.
Wait. That sort of looks like a superhero mask, doesn’t it?
Garter Woman! Na na NA nana na NAAAAA!
This was, of course, an excuse to play with more buttons from Skacel buttons; so I lost a pleasant hour wandering among the hundreds on offer and settled on the Fancy Iridescent Glass Buttons because I was feeling both fancy and iridescent.
Fancy Iridescent Glass Buttons from Skacel Buttons
I sewed the panels together with mattress stitch, and found that the joins were fine–clean, straight, unobtrusive–but altogether too sober. Insufficiently bonkers. So I pulled out my vintage needlework books in search of a mildly bonkers edging.
A pattern collection from 1905 turned up just the very thing, a picot edge, which looks like this:
and is worked like this (I quote the original verbatim–if I can make sense of it, so can you):
Make a chain of the length required, work Sg. C [single crochet] or DC [double crochet] on this, then fasten yarn with a Sg. C in the top of a stitch; chain 3, insert the hook through the top of the first chain stitch, throw yarn over the hook and draw through both loops; fasten with a Sg. C in top of next stitch, or skip one stitch and fasten whichever way makes the picot lie flat.
I wanted to crochet the edging directly to the cushion cover; so rather than make a chain, I worked slip stitches all the way around the seam line between the front and back panels and worked the rest of the edging stitches into that.
You may notice that I found the purple HiKoo Sueño Worsted that had gone missing. I used an addi Olive Wood crochet hook in size US D/3.25 mm because it seemed like it would do and it was near the chair I was sitting in.
The result was a very unserious ruffled edge–ruffled because instead of obeying the instructions about making the edge lie flat, I crammed the picots in. Jamming lots and lots of fabric into a smallish space gives you ruffles. Annoying when you don’t want them, delightful when you do.
It’s kinda like the edge of the petticoats on a cancan dancer. O, là-là! La plume da ma crayon! Défense de fumer!
Then on went the buttons, one-two-three-four. In four different colors. Because in crazy patchwork, more is more.
I have heard more than one knitter say that button placement makes him nervous. This is all I do–put the upper band over the lower and insert locking stitch markers through the buttonholes to mark the place each button needs to go. Boom.
Neat little buttons, all in a row. A pretty sight.
In case you’re wondering where I got a pillow form of the correct size (7 inches by 9 inches), I didn’t. I cut up an old cotton sheet that was in the rag bag and sewed one, stuffing it neatly with some clean, hand-dyed wool roving that I bought ages ago at a fiber fair, and have never been able to understand why I bought it, because the colors are hideous. No, I am not going to show it to you; and no, I’m not going to tell you who dyed it.
I’m not that crazy.
Now I have this hilarious little pillow…
…and I don’t know what it’s for, though I am absolutely going to use it as a sample for a new class on knitting and embroidering crazy quilt squares. If I can’t stop the madness, I might as well spread it around.
Epilogue in HiKoo Sueño
This is was my first encounter with HiKoo Sueño Worsted and I can’t say enough good things about it.
It’s so crisp and smooth, and the colors show off brilliantly. There’s been no sign of pilling, even though the balls of yarn and the knitting itself has been dragged around the country.
Even after the cushion cover was finished I didn’t want to stop knitting the stuff, so I whipped up an impromptu cowl for Rosamund without a pattern.
She likes it. She likes to have clothes on, especially as the weather in Chicago turns nippy. The only thing I think I might do is line it with woven fabric to keep the floats on the inside from catching on her collar. But that’s for another column.
He travels constantly to teach knitters at shops and guilds across the country and internationally; and has been a popular member of the faculties of such festivals as Vogue Knitting Live!, STITCHES Events, the Maryland Sheep and Wool Festival, Squam Arts Workshops, the Taos Wool Festival, Sock Summit, and the Madrona Fiber Arts Winter Retreat.
Franklin’s varied experience in the fiber world includes contributions of writing and design to Vogue Knitting, Yarn Market News, Interweave Knits, Interweave Crochet, PieceWork, Twist Collective; and a regular columns and cartoons for Mason-Dixon Knitting, PLY Magazine, Lion Brand Yarns, and Skacel Collection/Makers’ Mercantile. Many of his independently published designs are available via Ravelry.com.
He is the longtime proprietor of The Panopticon, one of the most popular knitting blogs on the Internet (presently on hiatus).
Franklin lives in Chicago, Illinois, cohabiting shamelessly with 15,000 books, a Schacht spinning wheel, four looms, and a colony of yarn that multiplies whenever his back is turned.
For an introduction to what goes on in this column, click here.
The last time I wrote about granny squares in this column it was to exult over having finally figured out how to do them.
Those who learned to crochet at mama’s knee are welcome to snicker, but they were a tough nut for me to crack. I was brand new to crochet. I knew nothing. And so often, the answers I got from crocheters to whom I appealed for help were, shall we say, opaque.
One authority’s response was, “Granny squares? Oh, they’re easy. Just a ring and then double crochet and make sure to work four corners. You can do more corners or fewer if you want a different shape. Okay? Bye.”
I was reminded of a Victorian knitting pattern in my collection that instructs you to make a baby’s jacket by first casting on “stitches sufficient to reach around the baby.”
In any case, after poring over a pile of crochet books, and going so far as to draw maps for myself,
I did finish six granny squares and assemble them into a multi-purpose accessory for the bath. You can see it here.
But I still hadn’t made myself the sine qua non of granny-based fabrics: a blanket.
Concentric Buns
Since this space is supposed to be the place where I try new stuff while people watch, it made sense to ask Makers’ Mercantile if I could use one of the newer HiKoo yarns, Concentric, for my blanket.
HiKoo Concentric is interesting stuff. It’s spun from 100% Baby Alpaca, so it’s soft and drapey–two qualities highly desirable in a blanket.
The construction is wild. Check this out.
The strand is made up of what are, essentially, four strands of two-ply lace weight. These four strands aren’t twisted together–they just lie next to one another.
There’s more. Every so often, one of the plies in one of the strands changes color.
A bit further along, a second ply changes color.
Then another, then another, and so forth until they have all changed.
The result is a slow gradient yarn, but the shifts from one color to the next are attractively speckled or flecked.
The yarn is put up into a bullseye bun from which you can work without prior winding.
I picked this colorway, Trixie, and planned a simple experiment.
KISS My Buns
Emphasis on simple. I had a boss once who was entirely useless except as a dispenser of clichéd workplace acronyms, of which his favorite was KISS, or Keep It Simple, Stupid. He used to write it all over my project proposals.
I was still feeling a little scarred from my bout with the stenciled warp, and at the top of my notes for this project I scrawled KISS.
So, what do we do with gradients? Well, one of the things we do with gradients is play them off against one another like so:
I thought I’d like to do that, too, but rather than work in stripes, I’d do this:
To join the squares, I considered join-as-you-go (JAYGO); but as is so often is the case, I had to consider portability. A JAYGO blanket very quickly becomes too large to haul around in a carry-on bag, and January through May is the time of year when my teaching schedule keeps me almost constantly away from home.
In Edie Eckman’s excellent book, Connect the Shapes Crochet Motifs, she lays out a method for joining granny squares that gives every square an additional round of double crochet, so the finished effect is side-by-side squares with minimal interruption from the join.
I decided to try it, since I imagined it would allow me to use a new bun of Concentric and run the gradient in the direction opposite the gradient used in the squares.
So Many Squares
How big would this blanket be? I decided that through the highly scientific process of choosing a size of square that seemed reasonable to work while sitting in an airplane seat (three rounds), then working an entire bun to see how many I got.
With a US Size 4 (3.5 mm) hook, I got fifty. I kept them in strict gradient order by slipping them onto a stitch holder as they were finished.
Then I did another bun’s worth, and got fifty-one. Great. I’d do a 100-square blanket. I like easy math.
In another mood, or in another month with less travel, I might have devoted a few hours to figuring out whether to keep the squares in the order they were made, or shuffle them together to make a longer gradient. Perhaps I might thrown them into the air to make them random. But sometimes you just need to make a choice. I decided to keep them in order.
To make the next step as portable as possible, I tied each strip of squares into a separate bundle.
Because I have a brain like a sieve, I also added numbered tags so I’d know in what order I should attach the bundles.
It’s never a waste of time to protect your future self from the silly things it is prone to do.
E Pluribus Unum
Edie’s book is a model of clarity. Still, I was nervous. Even with a couple projects under my belt, I find crochet charts daunting. I asked some of the crochet authorities in my address book for tips, and the replies ranged from “Oh, I never use charts. Just ignore them.” to “You don’t follow them like you do knitting charts. Just sort of look at the chart, and get an idea of what you should do, then go.”
I often wonder if I lack the moxie to crochet.
Happily, Edie offers crystal-clear written instructions. As I compared them to the chart, for the first time the fog began to clear. And the little squares began to become a big square.
After the second strip had been joined, I picked up speed and the process became–dare I say it?–fun.
And then there was one.
Now, I know people who say they don’t block crochet. I do. And I always wet block, because when I think about all the places where these squares were made, the idea of not washing the fabric thoroughly makes me green in the gills.
After blocking, I was almost perfectly happy with the project. There’s a patch where the joining rows and the squares are both the darkest grey, and thats reads to me as a black hole in the work. I’m not sure I like it.
But the fabric is cuddly beyond words.
Aside from that, three buns gave me a lap blanket (the finished dimensions are 33 inches x 33 inches) that is handsome and comforting.
Yet I do have a fourth bun sitting here. A border, perhaps?
Or something to dress up the black hole? I’m gonna go cuddle up under this and think about it.
See you in two weeks…
Tools and Materials Appearing in This Issue
HiKoo Concentric (100% Baby Alpaca; 437 yards per 200 gram cake). Shown in Color 1027 (Trixie).
He travels constantly to teach knitters at shops and guilds across the country and internationally; and has been a popular member of the faculties of such festivals as Vogue Knitting Live!, STITCHES Events, the Maryland Sheep and Wool Festival, Squam Arts Workshops, the Taos Wool Festival, Sock Summit, and the Madrona Fiber Arts Winter Retreat.
Franklin’s varied experience in the fiber world includes contributions of writing and design to Vogue Knitting, Yarn Market News, Interweave Knits, Interweave Crochet, PieceWork, Twist Collective; and a regular columns and cartoons for Mason-Dixon Knitting, PLY Magazine, Lion Brand Yarns, and Skacel Collection/Makers’ Mercantile. Many of his independently published designs are available via Ravelry.com.
He is the longtime proprietor of The Panopticon, one of the most popular knitting blogs on the Internet (presently on hiatus).
Franklin lives in Chicago, Illinois, cohabiting shamelessly with 15,000 books, a Schacht spinning wheel, four looms, and a colony of yarn that multiplies whenever his back is turned.
With Upstairs Baby nicely clad in his Five Hour Baby Jacket, I returned to the crochet cushion cover.
I’d hoped this edition would show it to you completed, but I’ve been very much on the run for weeks and weeks. February and March are busy months for those of us who teach at shows and shops and festivals, and the cushion had to be fit in between flights and classes and banquets and chatting with students and readers at the Madrona Fiber Arts Winter Retreat and Stitches West, not to mention a lovely dinner with fellow makers at Makers’ Mercantile itself.
That being said, I’ve made considerable progress and I’m excited about how the project is shaping up.
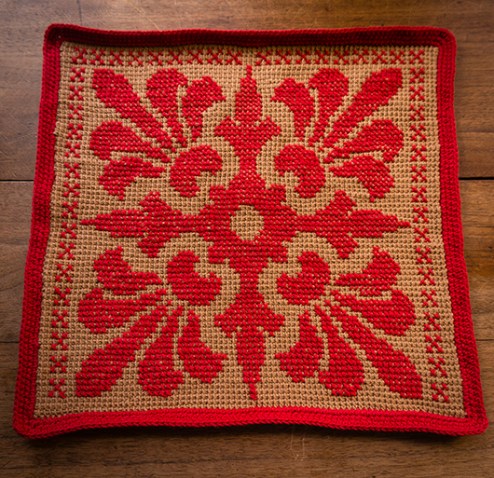
I finished the cross stitching over the Tunisian crochet front panel on my flight home from Stitches West.
Cross stitch at 35,000 feet.
There was more cross stitching than I had intended, because I failed to follow my own advice. I told you to take the time to carefully baste in your thread guidelines before starting the embroidery, right? And told you I’d done it every ten squares, right?
I did. But what I couldn’t admit to you until now is that I’d begun with only the horizontal and vertical center guidelines basted–the bare minimum. My excuse, my feeble excuse, is that I did it in a rush just before leaving for a trip to London; and I persuaded myself that just those two lines would be fine.
I was wrong. I miscounted, you see, and ended up placing the horizontal guideline several squares off the true center. Only after ripping out a major mistake, and putting it my proper grid of guidelines to avoid more such mistakes, did I discover this monumental goof. Well more than half of the center motif had been stitched.
If I’d put in the proper number of guidelines, I’d have found the error right away. Rushing never saves time in the end, does it?
I had a choice. Rip out all the cross stitch, and start over. Or keep going, and hope for a way to fudge things later on.
No matter how virtuous a needleworker you are, this is going to happen from time to time.
So the completed motif had gaps–significant gaps–on three sides. On four sides, it would have been a border. On three sides, it just looked weird.
I decided to go for broke and fill in the gaps with a simple motif, and move on with my life.
Testing the border motif on the chart, to make sure it not only looked well, but also fit into the space available.The border was inspired by a filling motif from the same Edwardian filet crochet book that gave me the main motif.
Those of you who must have absolute symmetry at all times will grind your teeth. But I like it–I often enjoy asymmetry–and I’m keeping it.
With the stitching on the front complete, I subjected the fabric to a wet block. As usual, I’m happy that I did.
Crochet soup.
A wet block truly settles the stitches and gives the work a more professional, finished appearance–quite aside from cleaning the yarns, which will have acquired a shocking amount of grime during the transformation from fiber to skein to fabric.
On the Flip Side
I thought I’d use double crochet, but even at a firm gauge it just didn’t work for me–too loose, too likely to allow the pillow form (which is white) to show through the gaps.
So I swatched a bit of single crochet
and felt better about that. It’s strikingly handsome, especially when worked in the stripes with some of the leftover Color 063 (Amber Waves) that was used for the front.
Both sides look nice, but I decided this side
was preferable to this side
because it’s slightly neater–no color blips at all where the yarns change. I also like the jazzy zigzag effect.
The fabric curls at the left and right selvedges, but as those will be sewn down in the finished cover that’s not an issue.
You can do an envelope back on a cushion cover without buttons, but I think they give you a neater closure. Plus it’s an excuse to play with buttons. I chose these Skacel buttons from their enamel line.
I think the style carries some of the florid beauty of the front over to the back.
This means I that I’ll be able to try crochet buttonholes for the first time when I work the top flap. Quite exciting, really. Who could ever be bored, when there’s yarn in the world?
See you in two weeks.
Tools and Materials Appearing in This Issue HiKoo CoBaSi Plus(55% Cotton, 16% Bamboo, 8% Silk, 21% Elastic Nylon; 220 yards per 50 gram hank). Shown in Color 063 (Amber Waves) and Color 047 (Really Red).
He travels constantly to teach knitters at shops and guilds across the country and internationally; and has been a popular member of the faculties of such festivals as Vogue Knitting Live!, STITCHES Events, the Maryland Sheep and Wool Festival, Squam Arts Workshops, the Taos Wool Festival, Sock Summit, and the Madrona Fiber Arts Winter Retreat.
Franklin’s varied experience in the fiber world includes contributions of writing and design to Vogue Knitting, Yarn Market News, Interweave Knits, Interweave Crochet, PieceWork, Twist Collective; and a regular columns and cartoons for Mason-Dixon Knitting, PLY Magazine, Lion Brand Yarns, and Skacel Collection/Makers’ Mercantile. Many of his independently published designs are available via Ravelry.com.
He is the longtime proprietor of The Panopticon, one of the most popular knitting blogs on the Internet (presently on hiatus).
Franklin lives in Chicago, Illinois, cohabiting shamelessly with 15,000 books, a Schacht spinning wheel, four looms, and a colony of yarn that multiplies whenever his back is turned.
My Schacht Cricket rigid heddle loom was reasonably priced and is sturdy, portable, reliable, and easy to use. I love what I make with it. I love the way it helps me to burn through stash and see new possibilities in old yarns.
I have crowed so much about it that shops and guilds have begun asking me to come over and teach rigid heddle weaving. I’d love to, but have said over and over that I don’t feel I’m quite ready yet to do that.
I’ve said over and over that I won’t feel qualified to teach it until I’ve done enough to have made lots more mistakes.
But this project, the project I will be writing about today, has moved me miles closer to be ready to teach rigid heddle weaving. Yeah. Let’s look at it that way.
Before we begin, I’d like to introduce the little bunny who will be playing the part of my Better Judgment.
We’ll be hearing a lot from him.
The Idea
This past summer I was privileged to attend a weaving conference for the first time. I took a bunch of excellent classes from some legendary teachers. I saw techniques in the fashion show and the gallery that set my brain on fire, including methods for decorating the fibers before weaving (i.e., painted warps) and after weaving (i.e., felted decorations, embroidery, shibori).
The painted warps especially grabbed my attention because of the possibility adding pattern to plain-woven fabric. Most of the painted warps were utterly abstract–bold splashes of color running into one another. Pretty, but it seemed to me that many yarns (like our own, dear HiKoo Concentric) could give much the same effect right off the ball.
What I wondered was whether I could paint a repeating pattern on a warp, then weave a warp-dominant (see next section) fabric with it. The finished piece would be boldly patterned and full of curves–large-repeat patterns and curves being the preserve, generally, of multi-shaft looms–but also be made simply on my Schacht Cricket.
I asked a pack of the experienced weavers I know if they had any advice about this, and they all said no, in their collective 600 years of weaving they hadn’t seen it done before quite as I proposed to do it.
Yes, perhaps.
The Canvas
A warp-dominant fabric is one in which the warp threads enjoy greater visual prominence than the weft threads that cross them. This may be a result of a difference in warp and weft yarn weights; or the result of packing of the warp yarns closer together than would be called for in a balanced weave.* Or it may be a combination of the two.
I wanted a big thick warp to paint on, and a delicate little weft to hold the warp together but not grab the spotlight.
My weaving friends said those fibers would be prone to stick together, so I might want to think twice. But they’re almost always weaving slippery stuff–tencel, silk, cotton, rayon. Whereas I have almost always worked in wool, and that is practically alpaca which is practically llama, if you squint. So what did they know?
Pegging It Out
One of the reasons I wanted to use the Schacht Cricket for this is that I’d always seen warp painting done (“always” being, you know–twice, from a distance) with the parallel strands of the warp stretched out on a framework. And of course if you use the direct-warp method on a rigid heddle loom, before winding on that’s exactly what you get.
The only change I needed to make, it seemed to me, was the orientation of the warping peg. The warping peg is usually vertical, and this causes the yarns to tilt as they approach it.
Standard vertical warping peg.
To keep my yarns horizontal all the way from loom to peg, I did this–which I’ll draw, since a drawing will be easier to understand than a photograph.
You want to use a sturdy dowel, of course, or a length of smooth metal pipe or a metal rod. Your peg shouldn’t bend under the tension of all those wrapped yarns. If it bends, your yarn ends will be different lengths, and there your troubles will begin.
I hoped this theory would work in practice. You can imagine my delight when I stood looking at this.
The heddle is at the far end, to keep the it out of the way of the painting. This seemed like a good idea at the time.
The Motif
I knew perfectly well that no matter how much I care I took to preserve the lengths and alignments of my warp threads, they were going to wiggle and slip some during the process. So I told myself:
1) Do something large and abstract, rather than figural or representational.
2) Don’t put any fine, or even medium, detail into it. It’ll just get lost.
Then I started sketching. Within ten minutes I had forgot both 1 and 2. Ultimately I devised an Art Nouveau(ish) lotus with lots of detail.
The little bunny, in case you’re wondering, was out having a smoke at the time.
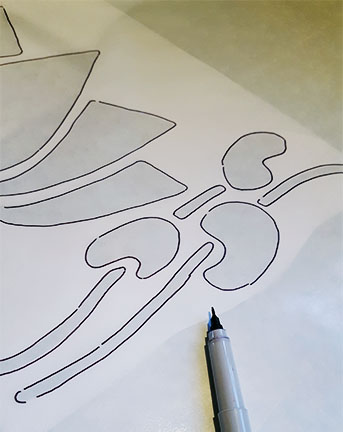
The Stencil
I hadn’t done any stenciling in years, and never on yarn. In “Fridays with Franklin” I always use supplies from Makers’ Mercantile, so I asked them to send me two colors of their Createx Fabric Paint. This is a paint, not a dye. You apply it to the fiber and it sticks, and can be set permanently by putting the fabric in a hot dryer for 40 minutes after the paint is dry to the touch, or by ironing it. Nice.
I cut my stencil out of freezer paper, bought at the grocery store. It was inexpensive, a good size, and I was able to trace the design through it onto the shiny side of the paper.
Yeah, I added leaves. The flower looked so lonely without them.
and cut it out neatly with an X-Acto Knife.
Like buttah.
The Painting
I smugly made certain my warp was long enough to allow me some space to experiment. That was good thing, because my first lotus was a mushy mess.
I soon realized that I needed to support the warp on a smooth, flat surface while I stenciled. In my case, a couple of box lids stacked on the table underneath worked fine.
Dabbing from the top with little vertical jabs worked well to apply the paint only where I wanted it, disturbing the threads as little as possible.
But the wet stencil was pain to handle, even when I held it with one hand while dabbing with the other. (You can see it buckling in the photo above.) So I taped it (with strong packing tape) into an improvised, stiff frame made of cardboard strips. It worked!
With each repeat, my pace picked up and soon the lotuses were looking good, but ghostly.
The paint was dark in the bottle, but the yarn sucked it up and diluted it to a pale pearl. I was happy to have the gold to hand for reinforcements. With the silver dry to the touch, I offset the stencil and dabbed on the gold to turn the silver into a pretty, smoky shadow.
Not half bad, if you ask me.
It wasn’t a quick process, but so what? This was starting look, dare I say it, I amazing.
Dang, I’m good.
The rest was just weaving. And I know how to weave. What could possibly go wrong?
He travels constantly to teach knitters at shops and guilds across the country and internationally; and has been a popular member of the faculties of such festivals as Vogue Knitting Live!, STITCHES Events, the Maryland Sheep and Wool Festival, Squam Arts Workshops, the Taos Wool Festival, Sock Summit, and the Madrona Fiber Arts Winter Retreat.
Franklin’s varied experience in the fiber world includes contributions of writing and design to Vogue Knitting, Yarn Market News, Interweave Knits, Interweave Crochet, PieceWork, Twist Collective; and a regular columns and cartoons for Mason-Dixon Knitting, PLY Magazine, Lion Brand Yarns, and Skacel Collection/Makers’ Mercantile. Many of his independently published designs are available via Ravelry.com.
He is the longtime proprietor of The Panopticon, one of the most popular knitting blogs on the Internet (presently on hiatus).
Franklin lives in Chicago, Illinois, cohabiting shamelessly with 15,000 books, a Schacht spinning wheel, four looms, and a colony of yarn that multiplies whenever his back is turned.
For an introduction to what goes on in this column, click here.
I thought at first that I’d use duplicate stitch for the stars on Rosamund’s costume, but duplicate stitch has one great weakness. You are limited to embroidered stitches the size and shape of your knit stitches.
That means her stars would have looked something like this.
Not even in my most wishful state of mind is that a five-pointed star. That looks like a Space Invader doing front squats. Unacceptable.
In the dim recesses of my memory lurked an image of my late grandmother, the tailor, embroidering perfect five- and six-pointed stars on a client’s fancy party outfit. I dug through every embroidery guide on my shelf–about two dozen books, from the eighteenth century to the present–and found nothing. The entries for “Stars, embroidered” led to this kind of thing…
which is fine for folksy work, but not what I needed; or this kind of thing
which is a Lazy Daisy, not a star. Don’t try to tell me otherwise.
I began to wonder if past-life regression therapy might get me where I needed to go. Or perhaps I ought to hire a medium? Would my grandmother be annoyed if I contacted her in the great beyond to ask how she put the stars on Mary Ellen Zemicki’s bicentennial hostess pajamas? Was there a good time to call? When do they air Lawrence Welk in heaven?
“Hush now,” said my grandmother’s ghost. “I’m trying to watch the Lawrence Welk program.”
Star Map
Meanwhile, I went ahead and mapped out the placement of the stars on the tail of the costume. I used contrasting yarn and basting to give myself a set of guidelines, just as I’d done for the eagle.
In the first and third rows, the stars are centered on the lines. In the second row, the stars are centered between the lines.
Oh Say Can You Sew
In the end, a séance was just too much work to throw together quickly and I had to rely on experimentation and blind luck. I could remember this: you began by embroidering something that looked just like a child’s drawing of a five-pointed star. And I half-remembered a chant that started, “One and three, and two and four…”.
I cracked it. Here it is.
This is not a complicated stitch. I’m going to break it down very, very carefully so you can do it on your own without getting lost.
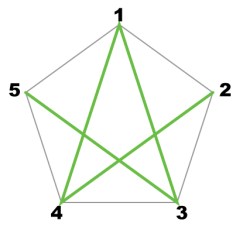
Our star will be based on an underlying shape: a pentagon. The five points of the pentagon will become the five points of our star, and we number them like so for reference:
We begin with a base layer, worked once, like this:
Needle up at 1, needle down at 3.
Needle up at 2, needle down at 4.
Needle up at 3, needle down at 5.
Needle up at 4, needle down at 1.
Needle up at 5, needle down at 2.
The base layer is now complete.
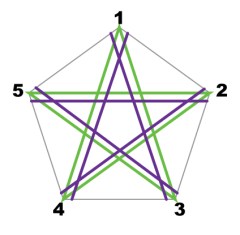
From here, we continue ’round and ’round the points of the star in rounds that grow smaller and smaller until the center of the star is filled in. All of these rounds follow the same rules, and here they are.
Needle upjust below and to the left of point 1.
Needle downjust below and to the right of point 3.
Needle upjust below and to the left of point 2.
Needle downjust below and to the right of point 4.
Needle upjust below and to the left of point 3.
Needle downjust below and to the right of point 5.
Needle upjust below and to the left of point 4.
Needle downjust below and to the right of point 1.
Needle upjust below and to the left of point 5.
Needle downjust below and to the right of point 2.
Round complete.
Continue in this manner, with the stitches of each round being taken a little closer to the center of the star. This diagram shows (in blue) what the next round will look like after it has been worked. The star is complete when the center is filled in, ending with a stitch from 5 to 2.
The key is:
“Up at the left. Skip a point. Down at the right. Back a point.”
If you remember that, you’ll remember the stitch.
Tips…
When you’re learning this stitch, rotate the work as you go so that the point you are dealing with is pointing UP. This will help you keep your “rights” and “lefts” clear.
Each round of stitching moves a little closer to the center of the star. How much closer? About the thickness of your embroidery yarn is a good bet.
Tip your needle so that you taking all stitches after the base layer from just under the threads laid down in the previous layer.
The number of round you’ll require to fill in the center of the star will depend upon the dimensions of the star and the size of your embroidery yarn.
Perfect and Uniform
One perfect star is a fine thing to achieve, but a field of many looks best if all are uniform in size and spacing. I’d laid out my guidelines, but I knew I couldn’t freehand twelve matching stars. Variation is fine for a folksy look, but not for this project.
So I printed out a plain pentagon of the proper size, and traced the points twelve times onto a sheet of medium weight water-soluble stabilizer with a fine-tipped permanent marker.
I cut out the pentagons as I needed them, one at a time, and pinned them to the sweater.
Using a sharp chenille needle with an eye large enough to accommodate my yarn (a size 18, in this case), I embroidered the stars over the stabilizer and the knitted fabric. A blunt tapestry needle won’t work well with stabilizer.
When they were all complete, I immersed the sweater in plain, cold water to remove the stabilizer. Voilà.
Rosamund, suited up and ready to fight injustice.
Do allow the piece to dry completely, of course, before trying it on.
Tricolor Muffin Hat Pattern Now Arriving on Runway Four
Meanwhile, we’ve put together the pattern for the Tricolor Muffin Hat. It’s free–just click HERE.
The Tricolor Muffin Hat.
It may be, of course, that red, white, and blue is not your cuppa tea this winter; so here are some possible alternate color sets in HiKoo Simplicity (with coordinating LOVaFUR pompoms) for your consideration.
With Pompom: Fox–Scarlet 399032-0015
Turkish Coffee, Really Red, Silver Hair
With Pompom: Raccoon–White 399028-0001
Nile Blue, Still Waters Multi, Seattle Sky
With Pompom: Luxury Raccoon–Black
Black, Purple Reign Multi, Edgy Eggplant
With Pompom: Luxury Raccoon–Royal
Royal Blue, Indigo, Grape Soda
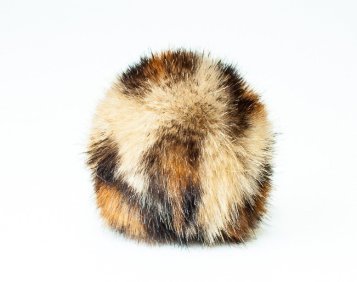
With Pompom: Kids Gold–Leopard
Brown Bear, Make Me Blush, Edgy Eggplant
What’s up next?
Well, if you stop by in two weeks I’ll show you what I’m doing with these…
He travels constantly to teach knitters at shops and guilds across the country and internationally; and has been a popular member of the faculties of such festivals as Vogue Knitting Live!, STITCHES Events, the Maryland Sheep and Wool Festival, Squam Arts Workshops, the Taos Wool Festival, Sock Summit, and the Madrona Fiber Arts Winter Retreat.
Franklin’s varied experience in the fiber world includes contributions of writing and design to Vogue Knitting, Yarn Market News, Interweave Knits, Interweave Crochet, PieceWork, Twist Collective; and a regular columns and cartoons for Mason-Dixon Knitting, PLY Magazine, Lion Brand Yarns, and Skacel Collection/Makers’ Mercantile. Many of his independently published designs are available via Ravelry.com.
He is the longtime proprietor of The Panopticon, one of the most popular knitting blogs on the Internet (presently on hiatus).
Franklin lives in Chicago, Illinois, cohabiting shamelessly with 15,000 books, a Schacht spinning wheel, four looms, and a colony of yarn that multiplies whenever his back is turned.
“Fridays with Franklin” is supposed to appear on Fridays. The clue is in the name. And today is Thursday.
But if I waited my turn, I wouldn’t have a chance to show you Rosamund’s Halloween costume before Halloween. So Makers’ Mercantile has graciously agreed to allow me to offer you this sneak peek.
In the pantheon of superheroes, there’s only one whose adventures I enjoyed as a child. The others bored me. Rosamund likes her, too; and is a princess, a protector, and a survivor in her own way.
She’s my little princess, anyhow.
The yarn is HiKoo Simpliworsted, and in these pictures it has already been once through the washer and dryer. Good stuff, for things that need to be washed and dried frequently.
In the next two installments of “Fridays with Franklin,” I’ll tell you more about how this was designed and worked–including an in-depth tutorials on the duplicate stitch eagle, and the embroidery of those stars. I’m rather proud of the stars. I’m also proud of the fit across the butt. Rosamund has such a curvaceous posterior. She gets it from my side.
(By the way, if you’re tuning in for the first time, you can jump back to the first “Fridays with Franklin” to learn what this column’s all about.)
He travels constantly to teach knitters at shops and guilds across the country and internationally; and has been a popular member of the faculties of such festivals as Vogue Knitting Live!, STITCHES Events, the Maryland Sheep and Wool Festival, Squam Arts Workshops, the Taos Wool Festival, Sock Summit, and the Madrona Fiber Arts Winter Retreat.
Franklin’s varied experience in the fiber world includes contributions of writing and design to Vogue Knitting, Yarn Market News, Interweave Knits, Interweave Crochet, PieceWork, Twist Collective; and a regular columns and cartoons for Mason-Dixon Knitting, PLY Magazine, Lion Brand Yarns, and Skacel Collection/Makers’ Mercantile. Many of his independently published designs are available via Ravelry.com.
He is the longtime proprietor of The Panopticon, one of the most popular knitting blogs on the Internet (presently on hiatus).
Franklin lives in Chicago, Illinois, cohabiting shamelessly with 15,000 books, a Schacht spinning wheel, four looms, and a colony of yarn that multiplies whenever his back is turned.