Fridays with Franklin: Fluff My Cushions, Part Two

fwf-logo-columnsizeFor an introduction to what goes on in this column, click here.

For the first part of this series, click here.

Somebody call the Vatican, because we’ve had a miracle.

Before I set out to make this pillow cover I measured the pillow. Of course.

My trusty tape measure said (and still says) it is 16 inches square. Measure twice, crochet once.

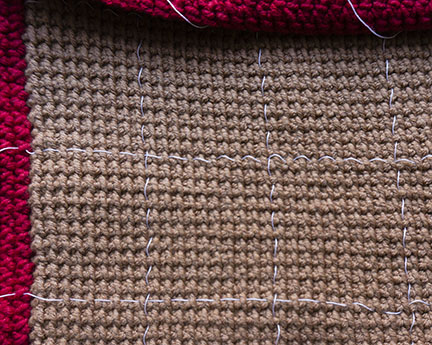
I worked the Tunisian crochet bit of it to be a bit smaller than that, so I could add a contrasting border in single crochet. That made for a fun change, and was quite simple.

fwf-59-edging-chart

I’m very pleased with the effect. Crochet borders are, as the kids on my lawn say, da bomb.

fwf-59-edge-corner
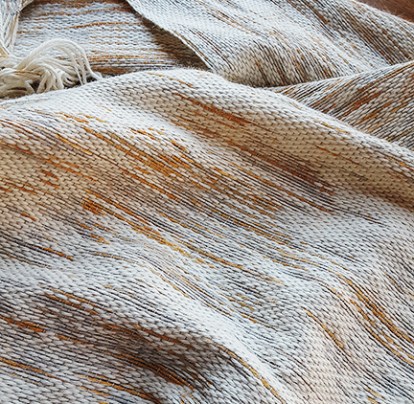
The finished dimensions of the front panel after wet blocking were almost identical to finished dimensions of the pillow itself, because what I like in pillow cover is zero ease. I want the cover to fit snugly. A loose cover, to me, resembles a sagging diaper or ill-fitting skirt.

Then something extraordinary happened. The moment I began the next stage–cross stitch embroidery of the center panel–the work expanded to cover 400 square miles.

fwf-59-relative-sizes
It’s all fun and games until your crochet blots out the sun.

Or so it has felt at times.

Cross Stitch Over Tunisian Crochet

There are so many excellent guides to cross stitch readily available that I will forbear for the moment to write one here. I do want to talk a bit about what I’ve encountered working cross stitch over a foundation Tunisian crochet.

What makes this crochet fabric so ideal for cross stitch are the nearly perfect little squares that are its hallmark.

If you have only worked cross stitch before on even-weave fabrics like Aida canvas, it can seem confusing at first as to where exactly you ought to take your stitches. There’s some wiggle room here; but you do want to make sure that once you establish your choice with the first stitches, you stick with it throughout

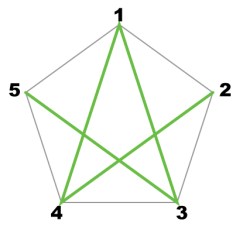
Here’s where I chose to make my stitches–in and out of the four orange dots. The orange cross to the right of them shows the size and shape of the typical resulting stitch.
fwf-59-stitching-holes

Since this is a crocheted fabric, the grain of it is not perfectly square like a true even-weave. The individual cross stitches will show variation.

To keep them as consistent as possible, I’ve worked with the fabric always oriented in the same direction (that is, the same edge always at the bottom while I stitched).

The Importance of Guidelines

When I teach cross stitch, I hammer home the importance of first laying out your guidelines with running stitches in thread. Don’t skimp on your guidelines! The larger your design, the more guidelines you put in.

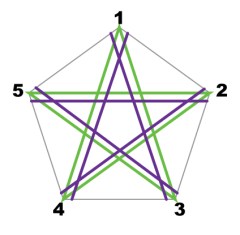
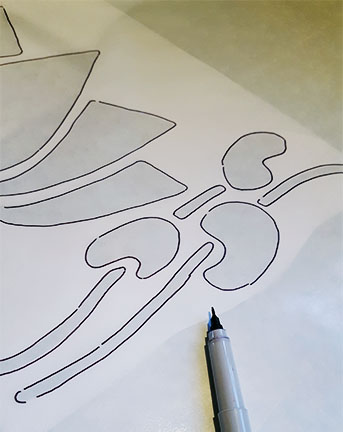
This is the chart I’m using. My guidelines are marked with dashed lines. You’ll note they’re every tenth stitch, in both directions.
fwf-59-cushion-cover-chart

Why so many? Why not just the customary two, to pinpoint the center?

Because in large designs–especially large abstract (non-representational) designs like this, it can be too easy to make a mistake and not realize you’ve done so. The design looks fine, at a glance. You move along, and count from a bit of finished work to establish your next row of stitching–and then, only after doing a bunch more work, you realize your error.

Nobody enjoys ripping out. Put in a bunch of guidelines; and when you count, count from them first. Use stitches you know to be correct as a secondary reference point.

fwf-59-fabric-guidelines
To mark my guidelines, I used regular old sewing thread.

These guidelines also allowed me to look at the design as manageable blocks instead of a large and potentially confusing whole. So I could focus on working one 11×11 square, like this.

fwf-59-cushion-chart-excerpt
That’s  harder to goof up and, frankly, less daunting psychologically.

Keeping Your Twist

I got a very alarmed e-mail from a reader who told me you cannot, simply cannot, embroider with yarns designed for knitting and crochet.

I beg to differ, seeing as I and many others have done so for years. In fact, the booklet I referenced last time, from the early 20th century, was quite gung-ho about it. If it were impossible, someone would have twigged it by now.

I will say that any yarn or thread you choose for embroidery must be strong enough to withstand the repeated abrasion that comes from being pulled through the fabric. Most lightly spun and all unspun yarns are unsuitable–they will fall apart as you work.

Yarns with lots of texture (like coils) won’t pull readily through the small hole made by your needle, nor will yarns with additives like sequins. Beaded yarns may work, if the beads are quite small, but beaded embroidery is a topic I’ll leave for another time.

fwf-58-hikoo-cobasi-plus
HiKoo CoBaSi Plus

HiKoo CoBaSi Plus has worked very well, with one caveat. Like any embroidery strand made from fibers that do not stick together (this includes purpose-made embroidery cottons with multiple plies), the yarn will tend to untwist as you work.

Just pause every so often and twiddle the needle to put the twist back in. That’s all.

Some Now, Some Later

I began working the central motif as I’ve always worked cross stitch: row by row, laying in the first part of the cross from left to right, then completing the row by working back from right to left.

Then, after realizing how much of this piece would be done on the road while teaching or in company when I was liable to mis-read my chart, I decided to take a different tack.

When I’ve been in a situation that allowed me to focus–at home, in my workroom, or alone in a hotel room–I’ve worked only the first part of each cross stitch, filling out the design.

fwf-59-embroidery-progress-shot

Then, when I’ve been in distracting situations like airplanes and airport lounges and cafés, I’ve worked over those established stitches–in other words, that’s when I’ve done the mindless work that requires no counting.

Where Am I?

It’s gone well, though I have not as I hoped finished all the embroidery yet. As I said at the beginning of this installment, what began as a cover for a tiny little pillow keeps growing larger, and larger and larger. Still–I’m pleased. The entire first layer is in, so now I merely fill in the second layer. (I may add borders in the blank areas to the right and left, but I’m not sure yet.)

fwf-59-firstlayer

We’re going to have to pause this project for a bit, anyhow–because a newborn baby in the apartment upstairs needs a warm sweater, quickly, and I have just the thing waiting to be knit up: Zitron Gesa & Flo, with a dash of Schoppel-Wolle Edition 6 Light Fingering.

fwf-59-newballs

I’ll show you in two weeks.

Tools and Materials Appearing in This Issue
HiKoo CoBaSi Plus (55% Cotton, 16% Bamboo, 8% Silk, 21% Elastic Nylon; 220 yards per 50 gram hank)
Zitron Gesa & Flo (100% Ultra Fine Merino. 98 yards per 25 gram ball; shown in Color 8: Lavender)
Schoppel-Wolle Edition 6 (100% Merino Extrafine Superwash Wool. 328 yards per 50 gram ball; shown in Color 2296: English Garden)
Addi HeartStopper
Addi Click Crochet Hook Interchangeable Set

About Franklin

Designer, teacher, author and illustrator Franklin Habit is the author of It Itches: A Stash of Knitting Cartoons (Interweave Press, 2008). His newest book, I Dream of Yarn: A Knit and Crochet Coloring Book was brought out by Soho Publishing in May 2016 and is in its second printing.

He travels constantly to teach knitters at shops and guilds across the country and internationally; and has been a popular member of the faculties of such festivals as Vogue Knitting Live!, STITCHES Events, the Maryland Sheep and Wool Festival, Squam Arts Workshops, the Taos Wool Festival, Sock Summit, and the Madrona Fiber Arts Winter Retreat.

Franklin’s varied experience in the fiber world includes contributions of writing and design to Vogue KnittingYarn Market News, Interweave KnitsInterweave CrochetPieceWorkTwist Collective; and a regular columns and cartoons for Mason-Dixon Knitting, PLY Magazine, Lion Brand Yarns, and Skacel Collection/Makers’ Mercantile. Many of his independently published designs are available via Ravelry.com.

He is the longtime proprietor of The Panopticon, one of the most popular knitting blogs on the Internet (presently on hiatus).

Franklin lives in Chicago, Illinois, cohabiting shamelessly with 15,000 books, a Schacht spinning wheel, four looms, and a colony of yarn that multiplies whenever his back is turned.

Follow Franklin online via Twitter (@franklinhabit), Instagram (@franklin.habit), his Web site (franklinhabit.com) or his Facebook page.

Fridays with Franklin: Fluff My Cushions

fwf-logo-columnsizeFor an introduction to what goes on in this column, click here.

If you ask me, you can tell a civilization is in decline when it stops caring about good throw pillows.

Most of us, if we are lucky, spend quite a bit of time with our throw pillows, and they do so much for us. They hide that coffee stain on the sofa from visitors, they add a certain quelque chose to the bed on days when we make the bed, they support our backs as we knit in a favorite chair, they cradle our heads while we fall blissfully asleep during a weekend binge of The Crown or America’s Next Top Cake Hero.

Yet how much thought do we put into the selection of these small but essential elements of the well-appointed home? Judging from the pillows I’ve seen lately (including on my own sofa), shamefully little.

roz-and-pillow.jpg
Rosamund doesn’t like it, either.

I’ve taken a hard look at the soft furnishings of our nest this winter, in part because for a couple of weeks I couldn’t leave the nest or the Chicago weather would have killed me. And I feel the need of an upgrade.

I don’t even know where that green sofa pillow and its twin came from. They mystify me, because I don’t like that depressing olive green and I don’t like that clammy fabric.

I suspect they came home because I was out at some discount store, remembered that we needed new pillows, and grabbed the least offensive pair off the shelf because they were a) cheap and b) meh, good enough.

Is that any way for a man who claims to be a fancier of fine textiles to act? No, it is not.

Out of the Past

A few years ago I was visiting a friend’s great-aunt, and the friend told her that I knit and crochet. The great-aunt said languidly that the afghan over the back of the couch upon which we were sitting was her own work, circa 1950; and it was the first and last thing she’d ever made because needlework was boring as all hell.

It was quite a showpiece, fashioned entirely from wool, weighing in at about three hundred and forty thousand pounds. Most fascinating to me were five square panels set into the center and corners, each embroidered with florals in cross stitch.

I asked if I could photograph it. She thought that was a weird request, and said no. She changed the subject to the voracious and seismic lovemaking of the newlywed couple in the apartment above. They, on cue, went into action at that very moment and we scrambled to keep the tea service from bouncing off the table. The afghan was forgotten.

Months and months later, I came into possession of a 1916 book of knitting and crochet patterns that included an afghan with cross-stitched panels.

fwf-58-bookpage
I strained my rudimentary crochet skills to understand the method, which the book called “afghan stitch,” and realized it was what I had seen demonstrated at a couple of fiber shows as “Tunisian crochet,” and had read about in a few Victorian books as “tricot crochet” or “tricot stitch.” (And yes, “tricot” is French for “knitting.” Foreshadowing!)

Ever since, I’ve been looking around for a chance to play with the technique, and at last hit me–why not do up a pretty sofa pillow/cushion cover in Tunisian crochet, and embroider it to suit?


The Apparatus

Now, the world of Tunisian crochet is large and varied. This is not the only stitch, but it’s the one called for in all old manuals for cross-stitched panels.

First, a note about the tools for working it.

Tunisian crochet is usually not made with typical crochet hooks, but specialized hooks intended for the purpose. Maker’s Mercantile sells them, and they are usually either double-ended, like these, or have a hook at one end and a stop at the other, like these.

But they also sell a set-up that interested me particularly because of the size of the panel I wanted to make. It looks like this.

fwf-58-hooksetup
An Addi Click Interchangeable Hook at one end, a cute little Addi Heartstopper at the other.

That’s a hook from the Addi Click Crochet Hook Interchangeable Set, with an interchangeable cable and, to keep the work from sliding off the end, an Addi HeartStopper. A long panel can be heavy, and using a hook on a cable means the weight of the growing fabric slides down the cable to rest, and won’t wreak havoc on your wrists as it might with a traditional hook–one of the same reasons circular knitting needles have become so popular, even for flat knitting.

Also, I knew I’d be working on this project on a lot of airplanes–and a short hook with a short cable is less cumbersome in an airplane seat and less attention-getting at security than a long metal hook.

The Tunisian Crochet or Afghan Stitch, Part I: The Set-Up

You may have noticed that those Tunisian hooks with an end stop look like knitting needles. That’s no coincidence, because this odd form of crochet acts a whole lot like knitting. (Hence the nineteenth century moniker “tricot crochet.”)

In fact, if you are a knitter and think you can’t possibly do this, let me give you all the fundamentals of the basic Tunisian stitch in two steps:

*1. Pick up and knit stitches into your fabric. Don’t turn the work.
2. Now bind off all but one of the stitches you just picked up. Repeat from *.

I’m not kidding. You pick up stitches and you bind them off. You can do that, right?

Let me show you how.

I’ll demonstrate some of the gold HiKoo Simpliworsted left from Rosamund’s superhero sweater. (If you want to crochet a washable afghan that incorporates this sort of fabric, Simpliworsted is a great choice.)

We have to start somewhere, and that somewhere is with a crochet chain. It’s no different than the standard chain you’d use to start a regular piece of crochet.

The chain has two sides to it. The front shows you little Vs.

chainvs

The back shows you little bumps.

chainbumps

We will work the next stage, the “forward” row of picked-up stitches, into the bumps.

Set-Up, Forward Row

Insert the hook into bump nearest the hook,

firstpickup

and pull through a loop of the working yarn. Now–and herein lies a great difference between Tunisian crochet and other sorts–we slip this new loop onto the shaft of the crochet hook. That’s right–just as we keep our knitting stitches on the shafts of our needles.

Continue to pick up a loop through every one of the bumps on the back of your chain, keeping all the newly-created stitches on the hook.

middle-of-setup-forward
In the midst of the set-up forward row.

Do not turn the work. That’s right–don’t turn the work. In fact, never turn the work.

Instead, we will now work a “reverse” row and bind off all these new stitches.

Set-Up, Reverse Row

Yarn over the hook, and pull a new loop through the stitch at the left end of the row.

setup-reverse-01
Yarn over hook, pull a loop through last stitch you made in your forward row.

Yarn over the hook, and pull a loop through the first two stitches on the hook.

set-reverse-02
Yarn over the hook, pull a loop through the first two stitches on the hook.

**Yarn over the hook, and pull a loop through the next two stitches on the hook.

Repeat from ** until you have only one stitch left on the hook.

setup-complete
The forward and reverse rows of the set-up are complete. One stitch remains on the hook. You’re ready to work the rest of the fabric.

Your set-up is now complete. The next section will tell you how to work the remainder of the fabric.

The Tunisian Crochet or Afghan Stitch, Part Two: All the Other Rows

You’ll continue to work your fabric in much the same way–with forward rows (right to left) in which you make new stitches; and backward rows (left to right) in which you bind off all but one of them.

Forward Row

Look at the fabric you’ve created in the set up. You will see a series of vertical “bars.” I’ve marked them here to make them obvious.

verticalbars

Each bar you see has a mate on the back side of the work. We will work only into the bars on the front until the last bar of the forward row.

Put the hook under the second bar in from the right selvedge of the work. Yarn over the hook and pull up a loop.

forward-01
Slide the new loop onto the shaft of the hook.

Repeat into the next bar, and all remaining bars until you reach the final bar–the one at the left selvedge.

forward-02
Working a forward row, making a stitch under each vertical bar at the front of the fabric.

Create the stitch at the left selvedge by sliding the hook under both the front and back bars, yarn over the hook, and pull up a loop.

forward-03
The left selvedge stitch is picked up under both the front and back vertical bars (outlined in orange).

This little change gives you a neat left selvedge that matches the right selvedge.

DO NOT TURN THE WORK.

Reverse Row

Note: This is pretty much identical the reverse row in the set-up!

Yarn over the hook and pull a loop through the first stitch on the hook only.

***Yarn over the hook and pull up a loop through the first two stitches on the hook.

Repeat from *** until one stitch remains on hook.

DO NOT TURN WORK.

first-row-completed
First complete row of fabric (made from one forward and one reverse row) completed.

Begin the next Forward Row, as above.

Bind off as you would any flat piece of crochet.

The fabric this stitch creates is intriguing: dense, cushy, and with a surface texture that reminds me of the little square cells in a waffle.

DSC05149

Destination: Throw Pillow 

For my pillow cover, I settled on HiKoo CoBaSi Plus. It’s a worsted weight–unlike the original CoBaSi, which is a fingering weight, and fabulous for wool-free socks and summer shawls.

fwf-58-hikoo-cobasi-plus
Yes, please.

CoBaSi Plus (a mix of cotton, bamboo, and silk–get it?) is strong, soft, durable, springy, lustrous, washable, and feels nice against your face–all important in a cushion you’d like to be beautiful and useful.

In setting about making my fabric, I learned a few things very quickly.

First, when guides to Tunisian crochet tell you to use a hook size that seems large for the weight of your yarn, they mean it. This fabric is tight. Use a hook that would be reasonable for, say, a granny square, you may find very that your fabric is impossible to work without damaging your fingers.

How do you figure out which hook to use? SWATCH. No way around it.

cobasi-swatch
I tried three sizes of hook. The smallest (at the bottom of the photo above) made a fabric so dense that was nearly impenetrable on forward rows. The largest (at the top) made a fabric loose enough for the fabric of the pillow form to show through…tacky. The hook in between (in the middle), a 5mm, was just right. You can barely see the difference in the photograph–but it’s there.

Also, Tunisian crochet has a reputation for being tough on the hands and wrists. I won’t disagree with that–it can be. Using the loosest suitable tension (therefore, the largest suitable hook) will help, as will avoiding yarns (like pure cottons) that don’t like to stretch.

I also found it was far easier on my hands and wrists when I grasped my hook knife-style (in the palm of the hand, rather than resting pencil-style on the thumb), and held it nearer the lower end of the hook, where it joined the cable.

Coming Up…

The making of the fabric was quite pleasant, if occasionally monotonous. But what I was really looking forward to was turning it into a big, bold piece of cross stitch.

fwf-58-newsletter-promo
For that more on that, see you in two weeks.

Tools and Materials Appearing in This Issue
HiKoo CoBaSi Plus (55% Cotton, 16% Bamboo, 8% Silk, 21% Elastic Nylon; 220 yards per 50 gram hank)
HiKoo Simpliworsted (55% Merino Wool, 25% Acrylic, 17% Nylon. 140 yards per 100 gram hank)
Addi HeartStopper
Addi Click Crochet Hook Interchangeable Set

About Franklin

Designer, teacher, author and illustrator Franklin Habit is the author of It Itches: A Stash of Knitting Cartoons (Interweave Press, 2008). His newest book, I Dream of Yarn: A Knit and Crochet Coloring Book was brought out by Soho Publishing in May 2016 and is in its second printing.

He travels constantly to teach knitters at shops and guilds across the country and internationally; and has been a popular member of the faculties of such festivals as Vogue Knitting Live!, STITCHES Events, the Maryland Sheep and Wool Festival, Squam Arts Workshops, the Taos Wool Festival, Sock Summit, and the Madrona Fiber Arts Winter Retreat.

Franklin’s varied experience in the fiber world includes contributions of writing and design to Vogue KnittingYarn Market News, Interweave KnitsInterweave CrochetPieceWorkTwist Collective; and a regular columns and cartoons for Mason-Dixon Knitting, PLY Magazine, Lion Brand Yarns, and Skacel Collection/Makers’ Mercantile. Many of his independently published designs are available via Ravelry.com.

He is the longtime proprietor of The Panopticon, one of the most popular knitting blogs on the Internet (presently on hiatus).

Franklin lives in Chicago, Illinois, cohabiting shamelessly with 15,000 books, a Schacht spinning wheel, four looms, and a colony of yarn that multiplies whenever his back is turned.

Follow Franklin online via Twitter (@franklinhabit), Instagram (@franklin.habit), his Web site (franklinhabit.com) or his Facebook page.


This Is Not Going to Be Pretty, Part III: Actually Kind of Pretty

fwf-logo-columnsizeFor an introduction to what goes on in this column, click here.

For the beginning of this project, click here.

I knew if I hesitated before setting the uneven warp to rights, I’d never finish this piece of weaving. I had to take the tide of madness at the flood.

The bunny who represents my Better Judgment had given up on me for the time being and was posting Instagram selfies from various scenic locations in central Ohio.

fwf-58-bunny-selfie
After a fitful night’s sleep, I carried the loom back down to the cellar, clamped it to the table, and set about unrolling the warp. In anticipation, had already cut a long strip of freezer paper to the proper width, carefully, using a rotary cutter and self-healing mat.

In theory I would unwind the warp and re-wind it with proper separation (the freezer paper) between the layers. This isn’t a fun thing to do, but it can be done.

I got about three feet of yarn free of the loom. Then it refused to budge. Refused.

I investigated and found my previous sloppiness had allowed about forty strands at the left edge to slide so far off course that they were now tangled around the warp beam, around the cords that hold the bar to the warp beam, around the bar itself, and around each other.

This meant I couldn’t unroll the warp. I’d need to untangle it–one strand at a time. Then tie the untangled ends to the warp beam. Then re-sley the reed. Then re-wind the warp.

Now ensued a dark, dark moment of the soul in which I considered ripping it all to shreds. Not just the warp. Also the loom. And then setting the house on fire, and changing my name, and moving to Mexico, and beginning life anew as one of those people who sells decorated coconuts outside Señor Frog’s in Cozumel.

If you think I’m kidding, you’ve never stood and contemplated how long it will take you to separate two hundred sticky alpaca warp threads, enmeshed together more tightly than an entire subdivision of suburban swingers throwing themselves into the last orgy before school lets out.

I would show you photographs, but I haven’t any. I was so utterly demoralized I couldn’t pick up the camera.

The only thing that got me through the dark moment was you, dear reader. Also you, and you, and those other readers over there.

It turns out the fear of total failure in front of thousands of people is, for me, motivational.

It took me two days to get the warp back on the loom.

Then I had to weave the damn thing.

fwf-58-rewound

Gettin’ Sticky With It

The re-wound warp was evenly tensioned, but still sticky as an entire subdivision of suburban swingers who have just finished throwing themselves into the last orgy before school lets out.

Baby llama likes to cling to itself. It may become stickier still if you paint it.

This extra-sticky yarn will be even more inclined to stick if you sley it close together. That’s what I had done by putting the Delilah Undyed DK Yarn into in the 12-dent reed that would normally hold fingering or lace weight yarns.

Why do this? Because when you want a warp-dominant fabric–which was my original goal–you will tend to pack the warp threads closer together.

The result of all this stickiness? My sheds wouldn’t open. I’d move my reed up or down, and the warp would just kinda sit there and laugh.

I was able to take care of the worse of the two sheds–the down shed–with a pick-up stick. I put the reed into the down position, then carefully opened the shed with the stick. Once it was open, I put the stick into the shed behind the heddle and kept it there.

fwf-58-stickplacement
When it was time for a down shed, I brought it forward to just behind the reed and pressed it downward. Ta-daaa, open shed. It was an extra step, but it was still faster than having to open the down shed bit by bit.

When it was time for an up shed, I slid the stick to the back of the loom.

Unfortunately, I couldn’t insert a corresponding pick-up stick for the up shed. The two sticks wouldn’t slide past each other behind the heddle as they went into and out of service.

The up sheds took a long time to open. The fabric was creeping along.

I was having renewed visions of selling souvenir coconuts when one of the finest weaving teachers I know–Susan, the owner of Yarnorama in Paige, Texas–stepped in with some advice:

1) Crank up the tension on the warp. Crank it as high as it will go without snapping threads.

2) Spray the warp, as it comes off the warp beam, with a bit of hair spray.

The latter suggestion sounded a little Out There, frankly; but at this point I was desperate. If she had told me to dip the entire loom in honey mustard I would have tried it.

6a00d83451ccbc69e20134852ba7f2970c-600wi

It worked. The sheds began to separate. Not always perfectly, but near enough to make me happy.

fwf-58-weavingitoff

Reader, I Finished It

How to describe the feeling of pulling the woven fabric off the loom? My thesaurus fails me. A fizzy cocktail of relief, joy, pride, excitement.

fwf-58-offdaloom
I secured the ends with hemstitching (which is discussed at length in our previous undertaking, The Warp with Two Brains). Because both the warp and weft (HiKoo Alpaca Lace Light) yarns were–have I mentioned this?–sticky, I worked the hemstitching with pure cotton sewing thread in a pale ecru that matched the warp.

fwf-58-newsletter-shot
A wet finish was essential. There are different ways of doing it. Here’s what I did for this project:

1) I tossed the fabric into hot water with some Soak,

2) smacked the heck out of it with a couple of hefty wooden spoons for a good fifteen minutes (therapeutic),

3) plunged it into cold water, then

4) threw it into my washing machine’s normal spin cycle to remove the excess moisture.

Some folks iron their damp woven fabrics dry at that point. I had other things to do, so I laid mine flat in a space where I was reasonably confident it would be left alone. I took care to make sure it was flat, because there is a danger at this point that wrinkles you leave in place may, in fact, become permanent.

When it was dry, I trimmed the ends

fwf-58-edgetrim

and then brushed them with a hairbrush to make them a little looser and bushier. Not a complete frizz, mind you. And that was purely a design choice. I just thought it looked nicer that way.

fwf-58-fringe

Warp a Lot, Weave a Little

I planned a large wrap with a painted lotus pattern. I put on nine feet of warp.

In the end, I created a scarf 13 inches wide and five feet long. The painted warp is dominant and clearly visible, but the lotus pattern is just a shadowy memory.

During the final spin, some of the twist in the warp let go, so and created interesting little passages of looser, fluffier fabric.

fwf-58-untwist
The fabric is buttery soft. The drape is FAB. U. LOUS.

fwf-58-finished-wrap

This is, without question, the most luxurious and interesting textile I have yet woven. I learned a lot, most of it the hard way. I am excited to try a painted, patterned warp again–knowing what I know now.

I’m glad I did it. Even the Bunny admits that, in the end, the destination was worth the journey. Right? Right?

fwf-58-bun-tired
Next Time…

I cannot wait to show you what I’ve been doing to these skeins of HiKoo CoBaSi Plus

fwf-58-hikoo-cobasi-plus
with these things…

fwf-58-addi-hook-addi-heartstopper

Tools and Materials Appearing in This Issue

Schacht Cricket Rigid Heddle Loom (15-inch version shown)
Schacht Cricket 12-Dent Reed (for 15-inch loom)
Schacht Cricket 15-inch Pick-Up Stick (also available in 10-inch length)
Delilah Undyed DK Yarn (100% Baby Llama, De-Haired)
HiKoo Alpaca Lace Light (shown in 1006 Smoke, 100% Baby Alpaca, 1540 yards per 100 gram hank)
HiKoo CoBaSi Plus (55% Cotton, 16% Bamboo, 8% Silk, 21% Elastic Nylon; 220 yards per 50 gram hank)
Addi HeartStopper
Addi Click Crochet Hook Interchangeable Set
Createx Acrylics Fabric Paint

About Franklin

Designer, teacher, author and illustrator Franklin Habit is the author of It Itches: A Stash of Knitting Cartoons (Interweave Press, 2008). His newest book, I Dream of Yarn: A Knit and Crochet Coloring Book was brought out by Soho Publishing in May 2016 and is in its second printing.

He travels constantly to teach knitters at shops and guilds across the country and internationally; and has been a popular member of the faculties of such festivals as Vogue Knitting Live!, STITCHES Events, the Maryland Sheep and Wool Festival, Squam Arts Workshops, the Taos Wool Festival, Sock Summit, and the Madrona Fiber Arts Winter Retreat.

Franklin’s varied experience in the fiber world includes contributions of writing and design to Vogue KnittingYarn Market News, Interweave KnitsInterweave CrochetPieceWorkTwist Collective; and a regular columns and cartoons for Mason-Dixon Knitting, PLY Magazine, Lion Brand Yarns, and Skacel Collection/Makers’ Mercantile. Many of his independently published designs are available via Ravelry.com.

He is the longtime proprietor of The Panopticon, one of the most popular knitting blogs on the Internet (presently on hiatus).

Franklin lives in Chicago, Illinois, cohabiting shamelessly with 15,000 books, a Schacht spinning wheel, four looms, and a colony of yarn that multiplies whenever his back is turned.

Follow Franklin online via Twitter (@franklinhabit), Instagram (@franklin.habit), his Web site (franklinhabit.com) or his Facebook page.

This Is Not Going to Be Pretty, Part II: The Warpening

fwf-logo-columnsizeFor an introduction to what goes on in this column, click here.

I don’t want for a moment to give the impression that the idea I started messing with last time–painting a pattern on a warp-dominant fabric–is original to me.

fwf-56-finishedlotus
The experiment begun. For full details, see the previous installment of “Fridays with Franklin.”

There are many forms of weaving that paint or dye the warp to create a pattern in the finished cloth.

My inspiration was a fabric, not terribly well known these days, called chiné. Now, chiné (shee-NAY) is not the same as crèpe de chine or China silk. The name means “Chinese” and it may well have originated in China; though the examples of it that inspired me are not, in fact, Chinese, but French. Are you with me so far?

Chiné probably hit its all-time peak of popularity in France in the latter part of the 18th century. There is a tradition (not terribly well founded) that Madame de Pompadour liked to wear it, so on occasion you’ll find it called “Pompadour Taffeta.”

It’s expensive to produce. Christian Dior used it in the heyday of the New Look; and more recently designer Raf Simons (the now-former Creative Director of Dior) put it into his first collection for the house.

The fundamental aspect of chiné is the pattern painted upon the stretched warp threads before weaving–just as I painted my lotuses. The pattern persists in the finished fabric.

Here is a spectacular example from the collection of the Metropolitan Museum of Art in New York: a silk and linen evening overdress from the tail end of the eighteenth century. (For full details, see the dossier on the Met’s Web site.)

Picture 029
Evening Overdress in Chiné Weave. British, 1797-99. Collection of the Metropolitan Museum of Art, 2009.300.2198a, b. Image courtesy of the Metropolitan Museum of Art.

That repeating sprig motif is woven right into the fabric. You can see it clearly in this view of the back.

Picture 008
Detail of Evening Overdress in Chiné Weave. British, 1797-99. Collection of the Metropolitan Museum of Art, 2009.300.2198a, b. Image courtesy of the Metropolitan Museum of Art.

The hallmark of chiné, which you either like or you don’t, is patterns that have lost their hard edges and become either dreamy as watercolor (if you like them); or blurry and out-of-focus (if you don’t).

I like them.

The softness is in part a result of painting upon those parallel strands of warp. During the painting process, they’re close together and held in place at both ends. They can support motifs with a fair amount of detail, like (or so I hoped) my lotus:

lotus-whole-orange

When the warp is wound onto the loom so weaving can begin, those painted parallel strands will inevitably shift a bit vertically in relation to one another. This result is a visual shimmer, sort of like this.

lotus-shiftedRe-Enter the Bunny of Better Judgment

You remember this fellow from last week? The Bunny of my Better Judgment?

bun-hitired

Direct-warping a rigid heddle loom like my Schacht Cricket isn’t difficult or terribly time-consuming. I can usually put a plain warp on in an hour or less.

But this warp, because it was going to be painted, couldn’t be done in the comfort of my dining room. No, I had to work in the unheated cellar of the Chicago Victorian in which I live–in November. It’s dark and chilly down there, and it kinda smells like the fall of the house of Usher.

The stretched, nine-foot warp had to be stenciled. I’d never done that before. It took ages to finish each motif, especially before I got a feel for the process about halfway through.

fwf-56-paintedwarp

By the time all the paint had dried to the touch, it was late and getting dark (or maybe my vision was going black). My feet hurt and my neck hurt and my knees hurt and my toes were numb and Rosamund needed to go for a walk and I was hungry and…

Project - Sketch 1_5

Yes. It would have been perfectly reasonable to call a halt, run around the neighborhood with Rosamund, and enjoy a celebratory fizzy water.

Instead, I decided to rush forward and wind on the warp. It would feel so good, I thought, to know I could start cranking out fabric the next morning.

Project - Sketch 1_8

How Not to Wind on Your Warp

I have never had trouble winding on a warp before. Not once. Not even though I am still a rank novice of a weaver.

I clipped the peg-end of the strands and started to crank, and immediately had issues at both ends of the process.

At the peg end, I had done nothing to keep the threads under tension. They began to shift, and continued to shift, and never stopped shifting until they were tied on. If you can’t guess that happened because of that, you’ll see in a moment.

At the loom end, I decided to use the roll of freezer paper (the paper I’d used to make my stencil) as a warp separator.

You can’t just crank your unwoven warp onto the naked back beam. You need to separate the layers, as they build up on the beam, with something sturdy–stout paper, slats of wood, slats from a window blind. Otherwise the yarns sink into one another and your tension is uneven. When your tension is uneven, your finished fabric is correspondingly uneven.

I had always used sliced-up brown paper bags to separate my warp, and I reuse the same paper repeatedly. But my brown paper stash was insufficient for this project–it wasn’t long enough and it wasn’t wide enough. The freezer paper was wider than the beam, but I figured I could just fold it up and stuff it in.

I should have measured it carefully and sliced precisely it to make a single layer of paper just wide enough. I didn’t.

I just rolled and folded. Usually my folding wasn’t very good. The paper shifted and bunched. I just kinda scrunched it down and kept winding.

Project - Sketch 1_6

Garbage In…

At length, the warp was wound, and so was my bobbin of quite gorgeous HiKoo Alpaca Lace Light.

filled-bobbin
HiKoo Alpaca Lace Light, ready to become weft. It’s so good that it has re-awakened my long-dormant fine lace mojo. That’s another column, though.

I don’t even have time this week to tell you about everything that went wrong with the weaving–I’m saving some of that for the next column.

I’ll tell you this. The devil-may-care folding and scrunching of the separating paper caused the tension of my warp threads to vary so widely that every shot of weft was an adventure. Would it pack in? Would it not? Heck, would the shed even open for me?

At great length, and only with much swearing and sweating and salty tears of frustration, I had woven a whopping five inches of fabric in the amount of time it would usually take to weave fifteen. This warp was, may I remind you, nine feet long.

Press Rewind

A sane person would have declared the warp a “dog” (weaving slang for a warp that just won’t work), cut it off, and thrown it out. I was tempted.

I was at least going to need to re-wind it with proper tension and a proper spacer. I decided to think it over, and meanwhile cut off the five woven inches and wet finish them.

This is what came out.

sample-02

I wish you could feel it. It’s dreamy. Weightless. Soft as Rosamund’s tummy. Drapes like mad.

sample-01
I have to admit that I even like the way the uneven weft (the result of the lousy winding job) wiggles back and forth, spreading in some places and bunching in others. Thanks in part to the sticky alpaca and llama fibers, no part of the fabric is unstable.

sample-03

Mind you there’s no pattern at all. Nothing but now-random scatters of paint. It’s pretty, but it’s not the lotus I drew. That part of the experiment is a complete flop–this time. I will try it again.

The fabric, though…I loved the sample fabric. I had to see how it would turn out. I had to keep going.

See you in two weeks.

Tools and Materials Appearing in This Issue

Schacht Cricket Rigid Heddle Loom (15-inch version shown)
Schacht Cricket 12-Dent Reed (for 15-inch loom)
Delilah Undyed DK Yarn (100% Baby Llama, De-Haired)
HiKoo Alpaca Lace Light (shown in 1006 Smoke, 100% Baby Alpaca, 1540 yards per 100 gram hank)
Createx Acrylics Fabric Paint

About Franklin

Designer, teacher, author and illustrator Franklin Habit is the author of It Itches: A Stash of Knitting Cartoons (Interweave Press, 2008). His newest book, I Dream of Yarn: A Knit and Crochet Coloring Book was brought out by Soho Publishing in May 2016 and is in its second printing.

He travels constantly to teach knitters at shops and guilds across the country and internationally; and has been a popular member of the faculties of such festivals as Vogue Knitting Live!, STITCHES Events, the Maryland Sheep and Wool Festival, Squam Arts Workshops, the Taos Wool Festival, Sock Summit, and the Madrona Fiber Arts Winter Retreat.

Franklin’s varied experience in the fiber world includes contributions of writing and design to Vogue KnittingYarn Market News, Interweave KnitsInterweave CrochetPieceWorkTwist Collective; and a regular columns and cartoons for Mason-Dixon Knitting, PLY Magazine, Lion Brand Yarns, and Skacel Collection/Makers’ Mercantile. Many of his independently published designs are available via Ravelry.com.

He is the longtime proprietor of The Panopticon, one of the most popular knitting blogs on the Internet (presently on hiatus).

Franklin lives in Chicago, Illinois, cohabiting shamelessly with 15,000 books, a Schacht spinning wheel, four looms, and a colony of yarn that multiplies whenever his back is turned.

Follow Franklin online via Twitter (@franklinhabit), Instagram (@franklin.habit), his Web site (franklinhabit.com) or his Facebook page.

2017 Holiday Wishlist

‘Tis the season for giving, and we have had so much fun collecting all kinds of neat items for presents. After asking the creative team at Makers’ Mercantile what one item they’d suggest as the ideal gift for the crafter in their life, here’s what they came up with:

image6.jpeg

Kim LOVES our sheep bowls, and thinks they’d be a great gift filled with candy or yarn as a host/hostess gift! Also she likes the Zauberball sock yarn because of its fun color changing and also how this single-ply version works up so snuggly soft!

image2.jpeg

Liz also couldn’t pick just one item. (and yes, she made that cardigan; isn’t it great!? She wants a few skeins of Oh! because it knits up so amazingly… and also another mug from Creative With Clay.

image5.jpeg

Kathleen loves Zauberball as well… and she chose the line Starke 6 for her favorite thing. Even when worked in a simple pattern this yarn makes such a great finished object. Imagine a lovely garter stitch scarf or seed stitch wrap!

image3.jpeg

Our colorful friend Kesten grabbed another squishy favorite, Sueno! It comes in full size hanks HERE, and mini-hanks HERE! It’s a super soft fiber that’s perfect for big cozy sweaters, wraps, or even cowls!

image7.jpeg

Oh…and then there’s me. I have tons of favorite things in the shop. Of course I will say (and this is true from ALL of us) that our customers are our favorites. You’re so creative and fun and inspire us every day!

But I have to pick something too, so I choose our new leggings! They’re so comfy!! Also, of course the addi® needles are a much-loved favorite. I do believe that when we work with good quality materials it makes a large impact on the quality of our finished projects.

So that’s it from us for now. We hope you continue to stay safe, and that you’ll come hang out with us in the shop or online very soon!


Happy Holidays from all of us at Makers’ Mercantile!

–Kyle

This Is Not Going to Be Pretty

fwf-logo-columnsizeFor an introduction to what goes on in this column, click here.

I am unabashedly in love with rigid heddle weaving. I’ve written about it repeatedly, in “Fridays with Franklin” and elsewhere.

My Schacht Cricket rigid heddle loom was reasonably priced and is sturdy, portable, reliable, and easy to use. I love what I make with it. I love the way it helps me to burn through stash and see new possibilities in old yarns.

I have crowed so much about it that shops and guilds have begun asking me to come over and teach rigid heddle weaving. I’d love to, but have said over and over that I don’t feel I’m quite ready yet to do that.

I’ve said over and over that I won’t feel qualified to teach it until I’ve done enough to have made lots more mistakes.

But this project, the project I will be writing about today, has moved me miles closer to be ready to teach rigid heddle weaving. Yeah. Let’s look at it that way.

Before we begin, I’d like to introduce the little bunny who will be playing the part of my Better Judgment.

fwf-56-firstbunny
We’ll be hearing a lot from him.

The Idea

This past summer I was privileged to attend a weaving conference for the first time. I took a bunch of excellent classes from some legendary teachers. I saw techniques in the fashion show and the gallery that set my brain on fire, including methods for decorating the fibers before weaving (i.e., painted warps) and after weaving (i.e., felted decorations, embroidery, shibori).

The painted warps especially grabbed my attention because of the possibility adding pattern to plain-woven fabric. Most of the painted warps were utterly abstract–bold splashes of color running into one another. Pretty, but it seemed to me that many yarns (like our own, dear HiKoo Concentric) could give much the same effect right off the ball.

What I wondered was whether I could paint a repeating pattern on a warp, then weave a warp-dominant (see next section) fabric with it. The finished piece would be boldly patterned and full of curves–large-repeat patterns and curves being the preserve, generally, of multi-shaft looms–but also be made simply on my Schacht Cricket.

I asked a pack of the experienced weavers I know if they had any advice about this, and they all said no, in their collective 600 years of weaving they hadn’t seen it done before quite as I proposed to do it.

fwf-56-toldyoubunny
Yes, perhaps.

The Canvas

A warp-dominant fabric is one in which the warp threads enjoy greater visual prominence than the weft threads that cross them. This may be a result of a difference in warp and weft yarn weights; or the result of packing of the warp yarns closer together than would be called for in a balanced weave.* Or it may be a combination of the two.

I wanted a big thick warp to paint on, and a delicate little weft to hold the warp together but not grab the spotlight.

So for warp I chose Delilah Undyed DK Yarn.

undyed-alpaca

And for weft I chose HiKoo Alpaca Lace Light.

fwf-56-alpacalacelight

My weaving friends said those fibers would be prone to stick together, so I might want to think twice. But they’re almost always weaving slippery stuff–tencel, silk, cotton, rayon. Whereas I have almost always worked in wool, and that is practically alpaca which is practically llama, if you squint. So what did they know?

fwf-56-bunnyeyescovered

Pegging It Out

One of the reasons I wanted to use the Schacht Cricket for this is that I’d always seen warp painting done (“always” being, you know–twice, from a distance) with the parallel strands of the warp stretched out on a framework. And of course if you use the direct-warp method on a rigid heddle loom, before winding on that’s exactly what you get.

The only change I needed to make, it seemed to me, was the orientation of the warping peg. The warping peg is usually vertical, and this causes the yarns to tilt as they approach it.

fwf-56-vertpeg
Standard vertical warping peg.

To keep my yarns horizontal all the way from loom to peg, I did this–which I’ll draw, since a drawing will be easier to understand than a photograph.


fwf-56-horziontal-warping-peg

You want to use a sturdy dowel, of course, or a length of smooth metal pipe or a metal rod. Your peg shouldn’t bend under the tension of all those wrapped yarns. If it bends, your yarn ends will be different lengths, and there your troubles will begin.

I hoped this theory would work in practice. You can imagine my delight when I stood looking at this.

fwf-56-stretchedwarp
The heddle is at the far end, to keep the it out of the way of the painting. This seemed like a good idea at the time.

The Motif

I knew perfectly well that no matter how much I care I took to preserve the lengths and alignments of my warp threads, they were going to wiggle and slip some during the process. So I told myself:

1) Do something large and abstract, rather than figural or representational.

2) Don’t put any fine, or even medium, detail into it. It’ll just get lost.

Then I started sketching. Within ten minutes I had forgot both 1 and 2. Ultimately I devised an Art Nouveau(ish) lotus with lots of detail.

lotus-cutout

The little bunny, in case you’re wondering, was out having a smoke at the time.

fwf-56-bunnycloset

The Stencil

I hadn’t done any stenciling in years, and never on yarn. In “Fridays with Franklin” I always use supplies from Makers’ Mercantile, so I asked them to send me two colors of their Createx Fabric Paint. This is a paint, not a dye. You apply it to the fiber and it sticks, and can be set permanently by putting the fabric in a hot dryer for 40 minutes after the paint is dry to the touch, or by ironing it. Nice.

I cut my stencil out of freezer paper, bought at the grocery store. It was inexpensive, a good size, and I was able to trace the design through it onto the shiny side of the paper.

fwf-56-tracelotus
Yeah, I added leaves. The flower looked so lonely without them.

and cut it out neatly with an X-Acto Knife.

fwf-56-cutstencil
Like buttah.

The Painting

I smugly made certain my warp was long enough to allow me some space to experiment. That was good thing, because my first lotus was a mushy mess.

I soon realized that I needed to support the warp on a smooth, flat surface while I stenciled. In my case, a couple of box lids stacked on the table underneath worked fine.

fwf-56-boxlids


Dabbing from the top with little vertical jabs worked well to apply the paint only where I wanted it, disturbing the threads as little as possible.

fwf-56-paintingstencil

But the wet stencil was pain to handle, even when I held it with one hand while dabbing with the other. (You can see it buckling in the photo above.) So I taped it (with strong packing tape) into an improvised, stiff frame made of cardboard strips. It worked!

With each repeat, my pace picked up and soon the lotuses were looking good, but ghostly.

fwf-56-silverlotus
The paint was dark in the bottle, but the yarn sucked it up and diluted it to a pale pearl. I was happy to have the gold to hand for reinforcements. With the silver dry to the touch, I offset the stencil and dabbed on the gold to turn the silver into a pretty, smoky shadow.

fwf-56-finishedlotus
Not half bad, if you ask me.

It wasn’t a quick process, but so what? This was starting look, dare I say it, I amazing.


fwf-56-paintedwarp
Dang, I’m good.

The rest was just weaving. And I know how to weave. What could possibly go wrong?

fwf-56-bunny-ring
See you in two weeks.

*A balanced weave has the same number of threads per inch in both its horizontal and vertical grains.

Tools and Materials Appearing in This Issue

Schacht Cricket Rigid Heddle Loom (15-inch version shown)
Schacht Cricket 12-Dent Reed (for 15-inch loom)
Delilah Undyed DK Yarn (100% Baby Llama, De-Haired)
HiKoo Alpaca Lace Light (shown in 1006 Smoke, 100% Baby Alpaca, 1540 yards per 100 gram hank)
Createx Acrylics Fabric Paint

About Franklin

Designer, teacher, author and illustrator Franklin Habit is the author of It Itches: A Stash of Knitting Cartoons (Interweave Press, 2008). His newest book, I Dream of Yarn: A Knit and Crochet Coloring Book was brought out by Soho Publishing in May 2016 and is in its second printing.

He travels constantly to teach knitters at shops and guilds across the country and internationally; and has been a popular member of the faculties of such festivals as Vogue Knitting Live!, STITCHES Events, the Maryland Sheep and Wool Festival, Squam Arts Workshops, the Taos Wool Festival, Sock Summit, and the Madrona Fiber Arts Winter Retreat.

Franklin’s varied experience in the fiber world includes contributions of writing and design to Vogue KnittingYarn Market News, Interweave KnitsInterweave CrochetPieceWorkTwist Collective; and a regular columns and cartoons for Mason-Dixon Knitting, PLY Magazine, Lion Brand Yarns, and Skacel Collection/Makers’ Mercantile. Many of his independently published designs are available via Ravelry.com.

He is the longtime proprietor of The Panopticon, one of the most popular knitting blogs on the Internet (presently on hiatus).

Franklin lives in Chicago, Illinois, cohabiting shamelessly with 15,000 books, a Schacht spinning wheel, four looms, and a colony of yarn that multiplies whenever his back is turned.

Follow Franklin online via Twitter (@franklinhabit), Instagram (@franklin.habit), his Web site (franklinhabit.com) or his Facebook page.


It’s beginning to look a lot like way too much knitting…

Happy November!! We have been very busy this month and we suspect a lot of you are busy too, preparing for the holidays and making things for people that you love.

First I have a confession to make. I am a lunatic and have pretty much no concept of how much knitting I can accomplish in a month. This little Advent stocking project has been an adventure. First I procrastinated and was no where near done…so I rewrote this entire piece confessing my not finishing but having the patterns ready to share. And then I discovered I had the deadline wrong and I had a whole extra week to knit. Which would have been very helpful had I knit on the actual project that week. And then! I got one more week and I don’t even know why and finally I got 24 tiny stockings knit. I would say based on how many I have knit and how much time I have wasted not actually knitting,  you could get this project done before the first day of December. I would love to hear about it if you do.

This is the face of someone who’s relieved to be almost finished with 4 feet of  lucet cord for the Advent calendar. (And then she did all four feet over because she liked icord better. Lol!)

Let’s talk for a moment about shiny yarn. As a general rule I pretty much HATE metallic yarns. They are rough and difficult and I will avoid them at all costs. And then I got a box of Vegas. This yarn is lovely! Its got lots of sparkle and shine, it feels nice and even if I had to rip back a bit the yarn cooperated nicely. Some red and green and I was happily knitting an assortment of sparkly little stockings. The cones go a long way…and Cee Cee’s project this month uses Vegas too so you might just need one in every color.

I knit four sizes of stockings using two patterns and every bit of my willpower to actually fininsh. I made one that is 16 stitches around and one that is 24, and then I did a few of the stockings holding the yarn double which created a little more variation in size. If you hold the yarn double, just know I added an extra row or two on the foot before doing the toe so the foot would look long enough. Turning a tiny heel is just as amazing as turning a full grown sized one, and that little bit of wonder will help you carry on when you are somewhere between 15 and 20 and its turning into a LOT of little stockings.

I make probably between 50 and 100 of these during the holiday season, because they are a great little gift. I keep a few on hand in case I need a hostess gift or a little something for someone. Last year all my students got a tiny stocking for Christmas. This year I sold a bunch that someone will be tucking Christmas bonus checks in. They make great package ties instead of a bow, They are a fun way to make a small gift extra special. The smallest size holds a lip balm very well, so that’s a fun way to make an inexpensive thing a special thoughtful gift. And even before I finished this project and when I was still very tired of knitting stockings, a friend needed 8 for her staff…and I agreed to do them without even flinching. They really are that delightful. 

Cee Cee has been busy and actually does things with sticks beside knitting….here she is playing steel drums with composer Tyler Swick at her fall concert. (she knit him an elephant). 

And then we went to see something that had been on our bucket list for awhile, the Chihuly Exhibit at Maker’s Mark in Loretto, Kentucky. And it was beautiful…

Her project this month is awesome because it involves buttons, a very small amount of yarn and a very short amount of time. The folks at Loome have figured out how to make one tool do a variety of braids, pom poms and tassels.They have a few different models to choose from, and also a tool to help you trim a pom pom that doubles as a kumihimo braiding tool. Makers’ sent her the loome tool she had been wishing for, and she got a chance to experiment with using it as a lucet and learning a very old craft. She’s a totally history nerd so she loves learning how to do really old things…and making a square braid on a lucet is a really old thing. Lucets have been made out of bone, deer antlers, and all sorts of things. This one would be fun to add a doodle to, or personalize, but she hasn’t decided what she wants to do yet.

Cee Cee says “This would be a great gift for kids to find in their Christmas stockings!”   (I expect that was a hint to have  every variety Loome makes in HER Christmas stocking) And I think ages 10 and up would have a lot of fun with it. The folks at Loome have a fabulous Instagram feed and lots of videos on YouTube. A lucet braid is a very simple braid to learn and hey, if you’ve got some travel time this holiday season, this would be a great thing to do instead of playing video games or watching movies the whole time.

We attach the button to the square end where we start, and then make a loop just big enough for the button when we sew through the end and securely finish it off. Don’t stop with one length…make a bracelet that wraps around 2 or three or more times. We use a lot of scraps but are very fond of CoBaSi for lucet braids…the stitch definition makes for a beautiful bracelet.

Cee Cee discovered that not all yarn makes great lucet cord and had an afternoon of frustration with beautiful ombre wool that she was crazy about. She tried and tried but the tugging on the lucet made it too tight and it would occasionally break when she was tugging it. And then she remembered the icord.                                       

This bracelet was done in icord and then finger crochet and finished off with a gorgeous button.

This one is a triple wrap icord and a bright pop of color for a button.

And since we’ve been seeing pom poms dangling from bags and keychains, she decided to try that too!

And one final gorgeous button with just a little sparkle and some icord. (Vegas yarn is so elegant used in a bracelet!)

A three stitch icord or lucet braid is so easy and works up quickly so it’s easy to have a last minute gift… less than ten yards of yarn for any of our projects here, and nothing took longer than an hour and a half.

She has two more really pretty bracelets in progress, but you’ll just have to wait to see them (since her Mom had her braiding 4 feet of cord for an Advent calendar.)

Cee Cee really enjoys giving gifts…this whole journey began with her desire to give something to comfort others. So I asked her to tell me why making gifts to give is so important to her. “When you make something to give, it shows that you took time to create something one of a kind for that person to enjoy. I love the joy of creating something that a person loves to receive and is just especially for them.”

The other thing we’ve been thinking about is presents… it’s the season for choosing things to get for the people we cherish. (And both of us absolutely love making a wish list because getting stuff is fun too!) The best part is, you can make  a wish list too and somebody is going to win a wonderful prize! So here’s a list of things that both of us love from Makers’ Mercantile:

  1. This has been on Cee Cee’s wish list awhile…it’s a coloring book by Franklin Habit. Cee Cee got to meet Franklin a few years ago and she adores his artwork.
  2. We’re both working on improving our knitting skills so we want to try out Alterknit. It looks like a great book!
  3. Buttons…this idea was all Cee Cee. Choose a good hand full of glorious buttons and sprinkle them in a stocking. (You can point your crafter to this post, or Franklin’s post about cufflinks if they need an idea or two)
  4. We are both bag obsessed, and Cee Cee loved the Crafters gonna craft craft craft bag ( the tune sounds familiar) and the Love Sack bag in the blanket stripe pattern
  5. CoBaSi…. Just get all of it in every color. Trust us. It’s a great yarn. (The sock yarn is awesome! I’m knitting Cee Cee a gift out of it for the blog next month. Shhhh! It’s a secret )
  6.  And because we are constantly taking them away from each other…more Flipsticks. We really like having two different tips on a needle, and Cee Cee loves that they are different colors because that helps her keep track of which needle she is on.
  7. : Mumbles something about olive wood interchangeable needles, hot pink scissors and a delightful sewing box:
  8.  And maybe more yarn. Because….yarn.
  9. Sheep pull toy. We can’t have a real one and this one would be a beautiful addition in our crafting space.

Have a wonderful Thanksgiving friends. We will see you next month with some fun last minute Christmas ideas.

P.S. Cee Cee says I have to share the little nutty moment I had 3 seconds after knitting the final stocking. I was done. You know how it is. You love a project, it’s wonderful but it is done. After counting twice, much to the amusement of my dear daughter I was coming up with 23 instead of 24 stockings. I jumped up and started fussing and Cee Cee started laughing at me…I was sitting on number 24! So as you hustle through your last minute holiday crafting, don’t forget to check the chair cushions for missing parts.

-BeLinda

ABOUT 

CeeCee1Cee Cee Creech is growing up in a home full of creativity. Mom BeLinda loves making things, and Cee Cee loves it too. In 2011, Cee Cee changed their lives when she wanted to knit elephants to comfort the residents of Joplin, MO after a tornado destroyed their town.

This mom/daughter team has raised thousands of dollars, and made/distributed toys for charities all over the world. Today, Cee Cee is a high school student, curious maker, and the teen craft ambassador for Makers’ Mercantile. Follow their adventures on the Craft Corner.

Waffler Hat Pattern

IMG_2688

First things first: Get the free pattern HERE!

Next: Gather your materials in the shop. (Use code: VICKIE10 at checkout for 10% off!)

One hank Super-Quick Alpaca in the color of your choice HERE

Size U.S. 36 (20mm) addi® needles HERE

Large eye tapestry needle

Happy Making!

-Vickie

vickiehowell

ABOUT VICKIE HOWELL

Vickie Howell is the Host/Executive Producer of The Knit Show with Vickie Howell. Season one debuts on YouTube on October 5, 2017. For more information on Vickie and the rest of her projects follow @vickiehowell and @theknitshow on social media.

Wonder Woofin III: Starry Starry Butt

fwf-logo-columnsizeFor an introduction to what goes on in this column, click here.

I thought at first that I’d use duplicate stitch for the stars on Rosamund’s costume, but duplicate stitch has one great weakness. You are limited to embroidered stitches the size and shape of your knit stitches.

That means her stars would have looked something like this.

fwf-55-starchart
Not even in my most wishful state of mind is that a five-pointed star. That looks like a Space Invader doing front squats. Unacceptable.

In the dim recesses of my memory lurked an image of my late grandmother, the tailor, embroidering perfect five- and six-pointed stars on a client’s fancy party outfit. I dug through every embroidery guide on my shelf–about two dozen books, from the eighteenth century to the present–and found nothing. The entries for “Stars, embroidered” led to this kind of thing…

fwf-55-starstitch

which is fine for folksy work, but not what I needed; or this kind of thing

fwf-55-lazydaisy

which is a Lazy Daisy, not a star. Don’t try to tell me otherwise.

I began to wonder if past-life regression therapy might get me where I needed to go. Or perhaps I ought to hire a medium? Would my grandmother be annoyed if I contacted her in the great beyond to ask how she put the stars on Mary Ellen Zemicki’s bicentennial hostess pajamas? Was there a good time to call? When do they air Lawrence Welk in heaven?

48c10e0fa5a7045215c008455723c21b
“Hush now,” said my grandmother’s ghost. “I’m trying to watch the Lawrence Welk program.”

Star Map

Meanwhile, I went ahead and mapped out the placement of the stars on the tail of the costume. I used contrasting yarn and basting to give myself a set of guidelines, just as I’d done for the eagle.

fwf-55-starfield
In the first and third rows, the stars are centered on the lines. In the second row, the stars are centered between the lines.

Oh Say Can You Sew

In the end, a séance was just too much work to throw together quickly and I had to rely on experimentation and blind luck. I could remember this: you began by embroidering something that looked just like a child’s drawing of a five-pointed star. And I half-remembered a chant that started, “One and three, and two and four…”.

I cracked it. Here it is.

This is not a complicated stitch. I’m going to break it down very, very carefully so you can do it on your own without getting lost.

Our star will be based on an underlying shape: a pentagon. The five points of the pentagon will become the five points of our star, and we number them like so for reference:

star-diagrams-01

We begin with a base layer, worked once, like this:

Needle up at 1, needle down at 3.

star-diagrams-02

Needle up at 2, needle down at 4.

star-diagrams-03

Needle up at 3, needle down at 5.

star-diagrams-04

Needle up at 4, needle down at 1.

star-diagrams-05

Needle up at 5, needle down at 2.

star-diagrams-06

The base layer is now complete.

From here, we continue ’round and ’round the points of the star in rounds that grow smaller and smaller until the center of the star is filled in. All of these rounds follow the same rules, and here they are.

Needle up just below and to the left of  point 1.
Needle down just below and to the right of point 3.

star-diagrams-07

Needle up just below and to the left of point 2.
Needle down just below and to the right of point 4.

star-diagrams-08

Needle up just below and to the left of point 3.
Needle down just below and to the right of point 5.

star-diagrams-09
Needle up just below and to the left of point 4.
Needle down just below and to the right of point 1.

star-diagrams-10.jpg

Needle up just below and to the left of point 5.
Needle down just below and to the right of point 2.

star-diagrams-11

Round complete.

Continue in this manner, with the stitches of each round being taken a little closer to the center of the star. This diagram shows (in blue) what the next round will look like after it has been worked. The star is complete when the center is filled in, ending with a stitch from 5 to 2.

star-diagrams-12
The key is:

“Up at the left.
Skip a point.
Down at the right.
Back a point.”

If you remember that, you’ll remember the stitch.

Tips…

When you’re learning this stitch, rotate the work as you go so that the point you are dealing with is pointing UP. This will help you keep your “rights” and “lefts” clear.

Each round of stitching moves a little closer to the center of the star. How much closer? About the thickness of your embroidery yarn is a good bet.

Tip your needle so that you taking all stitches after the base layer from just under the threads laid down in the previous layer.

The number of round you’ll require to fill in the center of the star will depend upon the dimensions of the star and the size of your embroidery yarn.

Perfect and Uniform

One perfect star is a fine thing to achieve, but a field of many looks best if all are uniform in size and spacing. I’d laid out my guidelines, but I knew I couldn’t freehand twelve matching stars. Variation is fine for a folksy look, but not for this project.

So I printed out a plain pentagon of the proper size, and traced the points twelve times onto a sheet of medium weight water-soluble stabilizer with a fine-tipped permanent marker.

fwf-55-sharpietrace

fwf-55-penttraced
I cut out the pentagons as I needed them, one at a time, and pinned them to the sweater.

fwf-55-pinnedstabilizer
Using a sharp chenille needle with an eye large enough to accommodate my yarn (a size 18, in this case), I embroidered the stars over the stabilizer and the knitted fabric. A blunt tapestry needle won’t work well with stabilizer.

fwf-55-allembroidered
When they were all complete, I immersed the sweater in plain, cold water to remove the stabilizer. Voilà.

fwf-55-tryon
Rosamund, suited up and ready to fight injustice.

Do allow the piece to dry completely, of course, before trying it on.

Tricolor Muffin Hat Pattern Now Arriving on Runway Four

Meanwhile, we’ve put together the pattern for the Tricolor Muffin Hat. It’s free–just click HERE.

fwf-52-side-wideshot
The Tricolor Muffin Hat.

It may be, of course, that red, white, and blue is not your cuppa tea this winter; so here are some possible alternate color sets in HiKoo Simplicity (with coordinating LOVaFUR pompoms) for your consideration.

With Pompom: Fox–Scarlet 399032-0015

trio-01
Turkish Coffee, Really Red, Silver Hair

With Pompom: Raccoon–White 399028-0001

trio-02
Nile Blue, Still Waters Multi, Seattle Sky

With Pompom: Luxury Raccoon–Black 

trio-03.jpg
Black, Purple Reign Multi, Edgy Eggplant

With Pompom: Luxury Raccoon–Royal 

trio-04
Royal Blue, Indigo, Grape Soda

With Pompom: Kids Gold–Leopard

trio-05
Brown Bear, Make Me Blush, Edgy Eggplant


What’s up next?

Well, if you stop by in two weeks I’ll show you what I’m doing with these…

undyed-alpaca
…and a couple bottles of paint.

Tools and Materials Appearing in This Issue

HiKoo Simpliworsted (55% Merino Wool, 25% Acrylic, 17% Nylon. 140 yards per 100 gram hank)
HiKoo Simplicity (55% Merino Wool, 28% Acrylic, 17% Nylon. 117 yards per 50 gram hank)
Delilah Undyed DK Yarn (100% Baby Llama, De-Haired. 109 yards per 50 gram hank)
LOVaFUR Handmade Vegan Fur Pompoms
addi® Click Turbo Interchangeable Needle

About Franklin

Designer, teacher, author and illustrator Franklin Habit is the author of It Itches: A Stash of Knitting Cartoons (Interweave Press, 2008). His newest book, I Dream of Yarn: A Knit and Crochet Coloring Book was brought out by Soho Publishing in May 2016 and is in its second printing.

He travels constantly to teach knitters at shops and guilds across the country and internationally; and has been a popular member of the faculties of such festivals as Vogue Knitting Live!, STITCHES Events, the Maryland Sheep and Wool Festival, Squam Arts Workshops, the Taos Wool Festival, Sock Summit, and the Madrona Fiber Arts Winter Retreat.

Franklin’s varied experience in the fiber world includes contributions of writing and design to Vogue KnittingYarn Market News, Interweave KnitsInterweave CrochetPieceWorkTwist Collective; and a regular columns and cartoons for Mason-Dixon Knitting, PLY Magazine, Lion Brand Yarns, and Skacel Collection/Makers’ Mercantile. Many of his independently published designs are available via Ravelry.com.

He is the longtime proprietor of The Panopticon, one of the most popular knitting blogs on the Internet (presently on hiatus).

Franklin lives in Chicago, Illinois, cohabiting shamelessly with 15,000 books, a Schacht spinning wheel, four looms, and a colony of yarn that multiplies whenever his back is turned.

Follow Franklin online via Twitter (@franklinhabit), Instagram (@franklin.habit), his Web site (franklinhabit.com) or his Facebook page.


Wonder Woofin II: Ply Like an Eagle

fwf-logo-columnsizeFor an introduction to what goes on in this column, click here.

Another Halloween has come and gone.

I happily observed several of my own favorite seasonal customs, including re-reading The Turn of the Screw, watching “It’s the Great Pumpkin, Charlie Brown!” twice, and re-watching Sally Brown’s spectacular concluding tirade a dozen times.

greatpumpkin08
“YOU OWE ME RESTITUTION!” Image from “It’s the Great Pumpkin, Charlie Brown!”courtesy and © Warner Home Video.

Then I wandered over to Walgreens at midnight and waited for them to put all the leftover candy on sale for half price.

Since last Thursday’s sneak preview, Rosamund has made the rounds in her new costume, knit from HiKoo Simpliworsted.

fwf-53-roz-ww-sweater-front
Her heroic efforts to return the rabbits, squirrels, and pigeons of our Chicago neighborhood to the side of peace and justice earned her many cookies and pats on the head.

roz-patrol
“Come out here! It’s not too late–we can live in peace and harmony!”

She posed for souvenir photos with tourists visiting Wrigley Field. And she was quite the toast of our favorite hangout, Murphy’s Bleachers, when we paused for refreshment during a long patrol.


22829752_10214616193183126_3213446761524812307_o
Making the world safe is thirsty work.

We will call this a success.

I plan to raise the neckline about three inches to make it more suitable for long-term wear as part of Rosamund’s wardrobe of winter sweaters. She loves wearing clothes (except hats–therefore no tiara with the costume). And in our neck of the woods, no domesticated animal with a coat as fine as hers is safe outdoors in midwinter without extra warmth.

I’ve had many requests for the pattern, which is immensely flattering. Patterns for dog sweaters are notoriously problematic, though.

Dogs vary in shape and size to an extent that makes the grading system used to re-size human garments almost useless. A chihuahua, a dachshund, and a mastiff are the not same figure scaled upwards; you cannot just add stitches and rows to a chihuahua sweater to fit it on a mastiff. And that’s to say nothing at all of mixed breeds.

The best way to knit a sweater for a dog is to tailor the sweater to THAT dog. This is not particularly difficult, and in fact is a great way to dip your toe into the shallow end of the knit-to-fit pool.

Rosamund’s knit-to-fit Halloween sweater is the same basic shape I knit for her in this series and this series, with changes to color, ease, and detail.

If you wish to knit for your dog, the best thing to do is:

  • become familiar with the method of measuring and calculating I laid out in the first series and refined a bit in the second series,
  • sketch out some ideas for what shape, fit, and details you want,
  • take your dog’s measurements,
  • knit and measure an ample gauge swatch,
  • do a bit of math, and
  • cast on, knitting to fit as you go along.

That’s why I’m not going to take you through the whole process of making this sweater from start to finish. It’s ground we’ve covered before.

I was already familiar with the yarn–HiKoo Simpliworsted is fantastic for pet sweaters, being both tough and washable. I took a new set of measurements to see if Rosamund had changed shape appreciably. (She hadn’t.)

And I sketched, because sketching pushes me to think out those all-important transition points in a project. For example, should the costume’s waistband sit a Rosamund’s own natural waist, just behind her ribs? (Yes.) Should I attempt some sort of trompe l’oeil effect near the shoulders to suggest a strapless bustier? (No.) (NO.)

fwf-54-roz-hallow-sketch
After that, I knit to the measurements–simple. Well, simple except when my math was wrong and my rate of decrease at the neckline was so slow that by the time I sensed a problem, the neck of the sweater was long enough to accommodate a baby giraffe.

Big Yellow Birdie

A gold eagle across the chest was a must, as we were paying homage to the 1940s/50s vision of the superhero in question.

I thought I might do the eagle in intarsia, but ultimately settled on duplicate stitch–a form of embroidery also sometimes called Swiss darning. (I don’t know why it’s supposed to be Swiss. I couldn’t find a truly plausible explanation anywhere. Switzerland isn’t the only place it’s found, and in fact doesn’t seem to be any more proprietary about it than any other country full of knitters.)

Why duplicate stitch?

Partly for ease of working. I wanted to knit the upper part of the sweater in the round, with steeks for the legs. Intarsia can be done in the round, most happily with Anne Berk’s “Annetarsia” method–as we saw in this series. But intarsia is best for large, solid shapes; the eagle, as I first charted it out, had rather a lot of detail.

I thought of knitting the gold and afterwards using duplicate stitch to embroider the red details. That would have been silly, though–duplicate stitch will (especially at a worsted gauge) stand out a bit from the base fabric. We wouldn’t want the background overshadowing the foreground. So why not knit with red and duplicate stitch in gold?

The other advantage to duplicate stitch: I could look at the finished chest, count the available stitches and rows, and figure out exactly where to place the eagle.

Eagle Charting

If you’re going to work a motif in duplicate stitch, most likely you’ll want to follow a chart. If you make your own, on ready-made graph paper with a square grid, beware of the distortion this will cause. Your knit stitches are unlikely to be square, unless you achieve a plain stockinette gauge in which your stitch and row counts are identical.

So in plotting a duplicate stitch chart, take advantage of so-called “knitter’s” graph paper, in which the grid is made up of rectangles that mimic the proportions of your stitches. A little Web searching will uncover multiple sources of printable papers, some of which will allow you to type in numbers from your swatch and get a custom grid. (I hesitate to link to any, because the addresses of such sites change constantly.)

Knitter’s graph paper will allow you to create a design with the confidence that your finished motif will not be distorted. I began by sketching mine with a pencil, then moved over (in the interest of saving time) to a computer program. About an hour of messing around got me to this point.

chest-eagle-knit-v1
The working draft, jiggles and all.

The rough-and-ready cut-and-paste method I used in Adobe Illustrator to move the gold stitches around makes it rather jiggly, but it was enough to get a nod of approval from a friend whose comic book expertise I trust. I knew how many stitches and rows I had to work with because I was able to count them on the finished chest. (I counted three times, to make sure.)

With the chart ready and the sweater ready, I could start stitching.

Eagle Placement

Now, if you’ve never embroidered something like this before, you may well wonder how you know where to begin. The answer is that most embroidery (not all, most) will begin near the center of the design.

First, find the center of your chart and mark it with a line. Most often, you’ll mark the center horizontally and vertically. But you don’t have to do only that. You can mark whatever parts of the design you feel will help you keep track of where you are. On large designs like this, I often add guidelines either at regular intervals or (as with the eagle) along key points of the motif like the top and bottom of the body.

Here’s the chart with my guidelines added in white.

chest-eagle-knit-v2

Next, you mark those same guidelines on your fabric. There are many ways to do it, but on knitted or crochet fabrics I prefer thread tracing.

Grab a highly contrasting yarn or thread, one that does not appear anywhere in the embroidery. In this case I’m using some spare white Simpliworsted.  Thread it on your needle and sew a running/basting stitch lines in exactly the places your guidelines appear on the chart.

fwf-54-threadtrace
(I had to use my phone camera in the available lousy light on an airplane–therefore the lousy picture. I think it will, at least, show you the idea.)

Usually I’d prefer to use something finer to trace the lines, like a doubled strand of sewing thread. But as I was working away from home, on an airplane, without recourse to stash, I used what I had. That’s what you do. That’s life.

Once your fabric is marked, it’s merely a question of counting out from a guideline to your starting point of choice and beginning to embroider. As your thread-traced lines gradually grow superfluous, it’s okay to take them out.

fwf-54-eagle-progress
So let’s talk about how duplicate stitch is worked.

Eagle Stitching

Duplicate stitch is one of the simplest forms of embroidery, and is so called because the embroidery stitches mimic the shapes of the knit stitches underneath. Ideally, once duplicate stitch is complete it looks as though the embroidery is part of the knitting. Often, it’s used to add small details to intarsia projects when just a stitch or two of a certain color is needed.

It can be done on stockinette, ribbing, and garter stitch; but it’s easiest to learn on stockinette.

You’ll want to use a blunt needle–the sort you use for weaving in ends is fine–and a yarn the same weight as the yarn you used to knit the fabric.

The basic stitch is no more than this:

  1. Come up from the wrong side, at the base of the stitch to be duplicated–the point marked A in the diagram.
  2. Insert the needle beneath the “shoulders” of the stitch as shown in the diagram and pull the yarn through.
  3. Send the needle down to the wrong side again at point A, pulling the yarn through until the tension of the embroidered stitch matches the tension of the knitted stitch.
fwf-54-dup-step-01
Come up at A, behind the shoulders of the stitch, and go down at A.

To duplicate a block of stitches, you’ll generally want to work in rows from the bottom to the top, right to left. (Left-handed embroiderers may prefer to work bottom to top, left to right.) So, our next stitch in the row begun above would start at the asterisk (see diagram below), and proceed as directed above.


fwf-54-dup-step-02
Come up at the asterisk, which now serves as hole A, and repeat the directions above.

With every other row in a block of duplicate stitches, turn the work 180 degrees so that your first row is worked with the motif right-side up, the next with the motif upside-down. This isn’t strictly necessary, but may be less taxing on your fingers, and means you will always be working right-to-left or left-to-right. The stitching will be identical, though hole A will be above the stitch you’re duplicating rather than below it (see diagram below).

Basic RGB
The first row of three stitches having been completed, the work is rotated 180 degrees. The first stitch of the new row begins at A.

For single columns of duplicate stitches (there are lots of those in the eagle), work from the bottom to the top.

Tips:


If you want to work different parts of the design with the same length of yarn, take care not to carry the embroidery yarn more than a scant inch across the wrong side. It gets messy, causing lumps that distort the right side of the work.

Start and end each length of yarn by leaving 6-inch tails on the wrong side of the fabric. When that group is complete, weave the tails under the stitches on the wrong side to secure them and trim the tail short.

That’s all there is to it. Stop and examine your work-in-progress frequently. Not only will this help you catch and fix errors before you are very far gone; but it may also help you improve your design.

I found as I worked that a lot of the stitches I’d charted to shape the top of the wings were overkill–I only needed about two blocks across the top to get a perfectly fine effect. Since tons and tons of duplicate stitching can interfere with the stretch and drape of a piece of knitting, paring it down to just what’s essential is always advisable.

The finished eagle:

fwf-54-eaglefinished

Coming Up: Star Booty and Muffin Top

The costume also needed decoration at the other end: five-pointed stars across the tush. I could have used duplicate stitch for those, as well; but instead went with an embroidery stitch that gave me a far better result and was fun to work, too. In two weeks, I’ll give you the full details in glorious color.

fwf-54-starstush
The lasso is made from lucet cord–but that’s a topic for another day.

And speaking of glorious color, we’ll also be releasing a free pattern for the Tricolor Muffin hat, with suggestions for alternate color trios in HiKoo Simplicity and coordinating LOVaFur Pompoms. Red, white, and blue will be far from your only options. Both Simplicity yarns and the LOVaFur pompoms are presently on sale…

fwf-52-newsletter-teaser
The Tricolor Muffin:Free Pattern Arriving Soon

Tools and Materials Appearing in This Issue

HiKoo Simpliworsted (55% Merino Wool, 25% Acrylic, 17% Nylon. 140 yards per 100 gram hank)
HiKoo Simplicity (55% Merino Wool, 28% Acrylic, 17% Nylon. 117 yards per 50 gram hank)
LOVaFUR Handmade Vegan Fur Pompom (shown in red/white/blue)
addi® Click Turbo Interchangeable Needle

About Franklin

Designer, teacher, author and illustrator Franklin Habit is the author of It Itches: A Stash of Knitting Cartoons (Interweave Press, 2008). His newest book, I Dream of Yarn: A Knit and Crochet Coloring Book was brought out by Soho Publishing in May 2016 and is in its second printing.

He travels constantly to teach knitters at shops and guilds across the country and internationally; and has been a popular member of the faculties of such festivals as Vogue Knitting Live!, STITCHES Events, the Maryland Sheep and Wool Festival, Squam Arts Workshops, the Taos Wool Festival, Sock Summit, and the Madrona Fiber Arts Winter Retreat.

Franklin’s varied experience in the fiber world includes contributions of writing and design to Vogue KnittingYarn Market News, Interweave KnitsInterweave CrochetPieceWorkTwist Collective; and a regular columns and cartoons for Mason-Dixon Knitting, PLY Magazine, Lion Brand Yarns, and Skacel Collection/Makers’ Mercantile. Many of his independently published designs are available via Ravelry.com.

He is the longtime proprietor of The Panopticon, one of the most popular knitting blogs on the Internet (presently on hiatus).

Franklin lives in Chicago, Illinois, cohabiting shamelessly with 15,000 books, a Schacht spinning wheel, four looms, and a colony of yarn that multiplies whenever his back is turned.

Follow Franklin online via Twitter (@franklinhabit), Instagram (@franklin.habit), his Web site (franklinhabit.com) or his Facebook page.