For an introduction to what goes on in this column, click here.
I haven’t finished messing around with artfelt–in fact, I can’t wait to show you what I’ve been up to. But I’m going to have to wait, because today another project needs the spotlight.
We’ve been wanting to do a knit-along in this column for ages. We’ve waited, though, until the perfect yarn appeared for the idea we had in mind.
This is the yarn.
It’s called Infinito, from Zitron, and it’s a 100% extra fine, fingering weight merino–and it’s a Makers’ Mercantile exclusive.
Infinito is a gradient yarn, and what I love about it is the sllllllllllloooooooooowwwwww nature of the color change. In this colorway (Number 2), the skein begins with a deep purple and shifts, almost imperceptibly, to a handsome lavender as the strand progresses. (Note: The white bit that makes it look like the Bride of Frankenstein isn’t actually knit–it shows you where the color repeat begins. Very useful for multiple-skein projects!)
Because the shift is so gradual, I knew I could use this for lace without any risk of the color obscuring the patterning. And with the generous yardage (550 yards, or 500 meters, in a single 100 gram hank), I suspected I could also do something really impressive with one skein.
I also had a hankering to dip into waters where I love to swim–my collection of knitting manuals from the 19th century.
So that’s going to be our knit-along. We’re going to work, together, through a 19th century pattern. Here is our goal:
It’s a scarf, quite a luxurious one, worked in one piece from beginning to end. It’s about five feet long by about nine inches wide. As you’ll see however, the basic pattern is easily adapted to change both the length and the width. At this size, it requires one skein of Zitron Infinito.
Where did this pattern come from? I’m not going to reveal all just yet, but I’ll tell you this much: it’s a (very) light adaptation by a nineteenth century master of our craft; and as the knit-along progresses, you’ll learn much more about her.
On four successive Fridays in February, I’ll be releasing another piece of the pattern. Along the way, there will be historic information and tips about knitting lace, including a look at how and why this design works.
New lace knitters with an appetite for adventure will find it a fun challenge and skill-builder; veteran lace knitters may be surprised by some of the unusual maneuvers employed in fabric. There will be both charts and written directions, so you may take your pick.
This isn’t a superfine lace, you’ll note. The yarn is a fingering weight, and I used a US size 4 needle to work it. Your needle size may vary, of course, based upon your swatch (ahem). More on swatching to come.
All the while, participants will be able to interact with each other and the supportive Makers’ Mercantile hosts in the KAL forum. The exact location will be announced; in the meantime, watch the Makers’ Mercantile blog and join the shop’s mailing list.
At the end, as a finale, I will publish a facsimile of the original printed pattern, along with notes about how to read it, and how our modern version differs from the designer’s vision.
No registration is required. Supplies of Zitron Infinito are (how ironic) finite, so do go and buy your skein as soon as possible to be sure you get the colorway you like best.
I do hope you’ll join us. To tempt you, here are a few more photographs.
We’ve got plenty of room in the Time Machine. You can add the project to your Ravelry queue right here.
Tools and Materials Appearing in This Issue
Zitron Infinito (100% extra fine merino, 550 yards [500m] per 100g hank), shown in Colorway 2
He travels constantly to teach knitters at shops and guilds across the country and internationally; and has been a popular member of the faculties of such festivals as Vogue Knitting Live!, STITCHES Events, the Maryland Sheep and Wool Festival, Squam Arts Workshops, the Taos Wool Festival, Sock Summit, and the Madrona Fiber Arts Winter Retreat.
Franklin’s varied experience in the fiber world includes contributions of writing and design to Vogue Knitting, Yarn Market News, Interweave Knits, Interweave Crochet, PieceWork, Twist Collective; and a regular columns and cartoons for Mason-Dixon Knitting, PLY Magazine, Lion Brand Yarns, and Skacel Collection/Makers’ Mercantile. Many of his independently published designs are available via Ravelry.com.
He is the longtime proprietor of The Panopticon, one of the most popular knitting blogs on the Internet (presently on hiatus).
Franklin lives in Chicago, Illinois, cohabiting shamelessly with 15,000 books, a Schacht spinning wheel, four looms, and a colony of yarn that multiplies whenever his back is turned.
For an introduction to what goes on in this column, click here.
My first idea is seldom my best idea.
I started my three-part Zitron Art Deco challenge with knitting. It felt good to be back on familiar ground again after so much crochet.
Mind you, I’m increasingly fascinated by crochet. But I’m in that Slough of Despond I reach whenever I’ve learned enough about a new craft to want to play with it, yet haven’t learned enough to get very far on my own.
My challenge is to take this self-patterning yarn…
…and use three techniques (knitting, crochet, ZoomLoom weaving) to mess around with the patterning that Zitron intended. Their pattern is very handsome; I’m just a congenital contrarian.
Now, commercial self-patterning yarns most often assume three things:
1) you’ll be knitting stockinette,
2) you’ll be knitting at an “average” gauge (not notably tight or loose),
3) you’ll be making rounds or rows of “average” length (not notably short or long).
So the first and easiest way to break the self-patterning is to choose a texture other than stockinette. Even switching to garter stitch will incite a metamorphosis.
I didn’t feel much like playing with very loose gauge, and only a die-hard masochist would undertake very tight gauge. I picked a needle I figured would give me decent garter stitch and cast on.
It’s also fun to see what happens to self-patterning yarns when you employ any method that pulls a stretch of yarn out of what would otherwise be its accustomed row. Knitting into the row below will do it; so will slip stitch knitting.
Slippy McSlipstitch is three rows high.
In all my years of knitting I’d not yet tried what you might call extreme slip stitch, in which the stitches to be slipped are given extra yarn (usually through double, or even triple, yarn overs); and then these stitches are slipped on three, four, five, or even six (or more) rows.
That’s where I started, and the result was okay.
It’s not unattractive. With some elaboration–changing the frequency of the slipping, or varying the lengths–it might become quite interesting. It didn’t grab me, though. I was mildly curious about what else to pursue along this line, but only mildly.
Is mildly enough?
There’s one other tactic you can take with self-patterning yarns. Rather than breaking up the pattern–which is really a carefully organized form of color pooling–you can keep the pooling, but change the way it shows up.
I was thinking about this as I set out to once again clean up the samples in my workroom. The ad-libbed short row purse liner from Cage Match came to light,
Cage Purse with Knitted liner in various Makers’ Mercantile yarns and fabric lining by Cotton + Steel.
and I wondered if I might not just use the same technique–building of up a fabric made of continuous short-rowed motifs–to alter the pooling and patterning in Art Deco.
I won’t get into the nitty-gritty of short rows here–if you’d like to know more, do click over to read the Cage Match series–but in brief, I decided I’d try knitting a fabric built up gradually from small short row lozenges like this.
Many turns make a lozenge.
The early stages were, as early stages in any repeating fabric often are, ungainly. When I teach motif design, a point I hammer home is that a repeating motif only begins to sing when you let it repeat.
One round of lozenges wasn’t much too look at. It wasn’t enough knitting to even bring every color in the color way into play.
You’ll notice there are also little passages of stockinette mixed in with the garter. At first, this was a mistake. It happened because I turned the work and knit in the wrong direction.
You may have heard, though, that a mistake repeated regularly becomes a design element. I thought, why not keep it and see what happens?
So the fabric grew.
And as it has grown larger, I have found myself very pleased indeed. The self patterning is there…it’s just not there in the way the maker intended.
I like this so much that when the challenge is complete, we will put the pattern together–it’s a cowl, worked in the round–and issue it right here on the Makers’ Mercantile blog.
Meanwhile, the second part of the challenge–crochet–is under way with Art Deco in Color 05. I’ll show you in two weeks.
Where Are They Now? – An Occasional Look at Past Projects
I am pleased to report that the embroidered Tunisian crochet pillow (in HiKoo CoBaSi Plus) is giving excellent service as a companion to loafing and napping. It still looks as crisp as the day it was finished. Please enjoy this action shot starring Rosamund.
We have plans to eliminate the remaining ugly green throw pillows as quickly as possible.
Tools and Materials Appearing in This Issue
Zitron Art Deco (80% Virgin Wool, 20% Nylon; 437 yards per 100 gram ball). Shown in Colors 01, 02, and 03.
He travels constantly to teach knitters at shops and guilds across the country and internationally; and has been a popular member of the faculties of such festivals as Vogue Knitting Live!, STITCHES Events, the Maryland Sheep and Wool Festival, Squam Arts Workshops, the Taos Wool Festival, Sock Summit, and the Madrona Fiber Arts Winter Retreat. He will lead his own knitting cruise to Bermuda in September, 2018.
Franklin’s varied experience in the fiber world includes contributions of writing and design to Vogue Knitting, Yarn Market News, Interweave Knits, Interweave Crochet, PieceWork, Twist Collective; and a regular columns and cartoons for Mason-Dixon Knitting, PLY Magazine, Lion Brand Yarns, and Skacel Collection/Makers’ Mercantile. Many of his independently published designs are available via Ravelry.com.
He is the longtime proprietor of The Panopticon, one of the most popular knitting blogs on the Internet (presently on hiatus).
Franklin lives in Chicago, Illinois, cohabiting shamelessly with 15,000 books, a Schacht spinning wheel, four looms, and a colony of yarn that multiplies whenever his back is turned.
At the bottom was a note suggesting that I take the contents (the yarn and pompom, that is–not the sheep bowl) and make them into something. A challenge. A dare!
I’m as patriotic as the next knitter, but those colors were a curveball. Red, white, and blue is a charged combination for lots of folks–not only Americans–and it’s not often associated with chilly weather. To me, it shouts fireworks, barbecues, and swimming pools.
I briefly considered crocheting a 1970s Yankee Doodle bikini,
but
a) HiKoo Simplicity streeeeeeeeeeetches when soaking wet, and
b) I couldn’t think of any place to stick the pompom that wouldn’t be either ridiculous or indecent.
With three skeins of wool blend and a pompom, clearly I ought to make a hat. Alrighty, then.
Swing Time
The pompom was the key. I have in my albums a few photographs of my mother in full 1960s regalia: Mary Quant knock-offs meant to give Detroit teenagers some of the verve and spark of swinging Londoners.
I saw that in the winter of 1969 she had gone to Niagara Falls in an oversized newsboy cap topped with just such a big, fluffy faux fur pompom. It perfectly matched her dressy short overcoat, with equally fluffy faux fur collar and cuffs.
The effect was goofy, but fun–an ensemble for a party girl who didn’t mind if her clothes shouted a bit.
There was my answer–let the pompom be the crowning touch on a hat that was boldly graphic, happy, even silly. A hat with some swing, in Union Jack colors. You can accessorize with red, white, and blue in the winter. Sure you can. James Bond did, while parachuting off a precipice in the Alps.
It didn’t take long to realize that the effect I wanted didn’t come across in conventional, concentric stockinette stripes running ’round and ’round from the band to the crown. I’d seen that a million times. It wasn’t surprising enough to support the pompom.
I toyed with a few other ideas, like an asymmetrical Mondrian-inspired take on stranded colorwork.
That didn’t get far. It’s not a bad idea, though structurally it’s more suited to intarsia than stranding. I might come back to this one another time. But no matter what I did, in these colors I couldn’t get it to look anything other than an Uncle Sam hat gone horribly awry.
Over the Top
I’d ripped back to just the band for the fourth time when I thought about the garter stitch short rows in the cage purse. Those had been so much fun to knit. I could do the hat in garter stitch, right? No law against that. And I could also build it in successive short rows. Like this:
Each stripe would “eat up” two of the live stitches at the top of the band. The stripes would run across the top of the hat, instead of around the circumference. And there would be none of the usual decreases in the crown to interference with the progression of red, white, blue, red, white, blue.
Too Much of a Good Thing
Nothing gets me overexcited like trying out a new way to knit a familiar shape. I hate stopping to eat, or pee, or answer e-mails, or see people. I just want to go go go go go go until I find out whether it’s going to work or not.
I figured before I began that I’d need to increase in each stripe or the hat would be very short and fit like a teeny-weenie beanie. I planned the placement and rate of increases and zoomed along until in a gratifyingly short time the hat was almost off the needle. So I stuck it on my head.
I think the stitch markers really add to the je ne sais quoi.
Oh, yeah. Fetching. Yeah.
Those two weird outcroppings at the right and left would have to go–or the whole idea would have to go.
The diagnosis? The bulges were the fault of the constant, violent increasing–clearly I needed to slow it down a bit. I’d been so worried about the hat being too small that I made it too big. Too big at each side. It sprouted saddlebags.
The next version, with increases tapering off about halfway through, was better.
This better #@$!* work the second time, he thought.
I figured I could eliminate the remaining oddity in the shape with judicious blocking. HiKoo Simplicity is very malleable when wet.
As is my custom with any tam, I stretched the unblocked piece over a dinner plate. Rather than soak it, I pulled out my steam iron and shot the top and (especially) the turned edge with jets and more jets of very hot steam, until everything except the band was quite damp. (If your iron doesn’t have a steam jet option, you can do this over a boiling tea kettle if you promise to be careful with your fingers.)
Hover the hot iron near the fabric as you steam, but don’t touch the iron to the fabric.
I avoided steaming the band, because wet Simplicity stretches and a sopping wet band would have grown too large to fit properly. (Simplicity returns to its original dimensions after a spin in the tumble dryer–but then the entire hat would have come unblocked.)
Leaving the steamed hat on the plate, I set it aside to dry thoroughly overnight.
Drying things overnight is wonderful, because at some point exhaustion kicks in and I fall asleep and stop poking the piece every five minutes to see if it’s ready yet.
Crowning Touch
To find the exact center of the dry crown, I measured with the hat still on the plate and marked the spot with a locking ring stitch marker.
I tied on the pompom. (LOVaFUR poms tie on, so you can change them out and move them around if you like.)
I called over a friend who has the perfect look for a hat like this.
I held my breath. I put it on her.
I’m calling it a success.
I’m calling it groovy, baby.
I’m calling it…the Tricolor Muffin.
Coming Up…
Wouldn’t you know it, the yarn for the next project arrived while this hat was in progress. And wouldn’t you know, it’s also heavy on red, white, and blue–though this time in HiKoo Simpliworsted and with the addition of gold.
When I opened the box, somehow Rosamund (whom you may remember from The Adventure of the Warm Puppy and More Excuses to Show You Pictures of My Adorable Dog) knew the contents were intended for her. Smart girl.
Stop by in two weeks and I’ll show you what’s up.
In the meantime, we’ll be putting together a free pattern for the Tricolor Muffin. And if you don’t think you’re feeling quite up to the patriotic combo, we’ll have suggestions about other trios, other yarns, and other coordinating pompoms in the LOVaFUR line.
He travels constantly to teach knitters at shops and guilds across the country and internationally; and has been a popular member of the faculties of such festivals as Vogue Knitting Live!, STITCHES Events, the Maryland Sheep and Wool Festival, Squam Arts Workshops, the Taos Wool Festival, Sock Summit, and the Madrona Fiber Arts Winter Retreat.
Franklin’s varied experience in the fiber world includes contributions of writing and design to Vogue Knitting, Yarn Market News, Interweave Knits, Interweave Crochet, PieceWork, Twist Collective; and a regular columns and cartoons for Mason-Dixon Knitting, PLY Magazine, Lion Brand Yarns, and Skacel Collection/Makers’ Mercantile. Many of his independently published designs are available via Ravelry.com.
He is the longtime proprietor of The Panopticon, one of the most popular knitting blogs on the Internet (presently on hiatus).
Franklin lives in Chicago, Illinois, cohabiting shamelessly with 15,000 books, a Schacht spinning wheel, four looms, and a colony of yarn that multiplies whenever his back is turned.
For an introduction to what goes on in this column, click here.
I grew up in a family of Jewelry Guys. Guys like my grandfather. He wore dark, conservative suits to work; but at leisure, he treated each finger to a fat, gold ring and fastened thick ropes and chains of gold around his neck and wrists. The term “bling daddy” was not then in common usage, so my grandfather was described by Marv, his favorite jeweler, as being “a connoisseur of the finer men’s accessories.”
I inherited one of my grandfather’s signet rings. It’s a lump of solid gold with his initials engraved in a script so florid that it’s totally illegible. I never wear it. First, because my grandfather’s hands were so plump that this (a pinky ring) is too large to wear on my thumb. Second, it’s so heavy that if I hung it around my neck (as a friend suggested) I would be unable to stand upright.
I did not care for my grandfather’s aesthetic. He was, in my hotheaded teenaged opinion, far too shiny far too much of the time. What with the gold decorations, the rayon camp shirts, and the Brilliantine that glued his remaining hair to his skull, he sparkled like the top of the Chrysler Building at dawn. A bit much, I thought, for a quiet, middle-class life in the Detroit suburbs.
Then I grew to manhood. And though my own gold chains and charms (all childhood gifts from grandpa’s side of the family) sit untouched next to that enormous ring, I have discovered that I, the little bauble, have not fallen far from the gewgaw tree.
The only difference is where I put the decorations.
My weakness? Cuff links.
Oh, sweet sainted Harry Winston how I do love cuff links. My collection is ridiculous.
No, that’s not all of them. Not even close.
I wear them, yes. I but I don’t wear them absolutely every day; and even if I did, no person needs this many cuff links. It’s not as though they wear out frequently. And most cuffed shirts come with, you know, buttons. Buttons are far more convenient. Buttons are practical. Buttons make sense.
Yet I keep on buying cuff links.
The Perfect Motif
Not that I buy indiscriminately. Heavens, no. Aside from the potentially catastrophic drain on my bank balance, the most frustrating thing about the cuff link obsession is that modern jewelers assume men want links reflecting one of these lifestyles:
These do not appeal to me, but the cuff link world tips heavily to designs incorporating golf tees, horseshoes, mallards, anchors, propellers, aces and spades, and huge weird agglomerations of colored rhinestones stuck in large chunks of all that glitters but is not gold.
No, thank you.
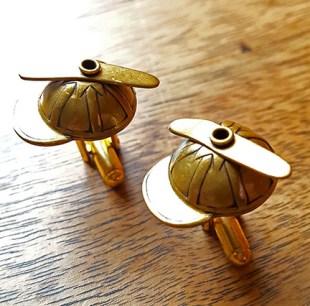
When I do find a set that expresses Who I Am as a Cuff Link Wearer, I snatch it right up. For example, florals. I love flowers. These anonymous Art Nouveau snowdrops were in a jar in a Seattle antiques mall. I got ’em for less than twenty bucks.
And these beanies? A gift, from a friend whose husband wore them for years on the bench as a judge. I may ask to be buried in them.
Those are propellers I can dig. (And they spin!)
Do It Yourself
I am delighted to find that some of the paraphernalia of traditional American and European menswear is making a comeback. There are burgeoning cuff link collectors groups, and groups for men who like suits, and what-have-you.
Most manufacturers have yet to catch up with the modern diversity of tastes, though. So it’s a relief and a pleasure to learn that if you have access to a supplier like Makers’ Mercantile, which carries the full line of Skacel Buttons, you can quite easily make handsome, fun cuff links that speak to those outside the horsie-duckie-boaty set.
There are many ways to go about making cufflinks from buttons. I’m going to show two in this column. Both methods are accessible to people who are not otherwise deeply into making jewelry, and who haven’t got any special jewelry-making equipment at home.
First, though, let’s have a look at a few buttons.
Two-button links require, as the name suggests, two buttons for each cuff. They are double-sided, meaning the finished link is decorative on both sides. They are not only extra handsome, they’re also best for shank buttons whose shanks are difficult or impossible to remove.
Pliers (left) and Nippers (right)
To make them, you’ll need:
• four shank buttons, matching or coordinating
• two four-inch lengths of 18-gauge craft wire
• wire nippers
• needle nose pliers
The buttons I chose for this method are from Skacel’s line of European glass. I could have ground or filed off the shanks (more about that in the next section), but there’s a risk of breakage. Also, I am deeply enamored of this design and wanted to multiply it by four.
Step 1. Slide the wire through the shank of the first button and, using the pliers, bend back half an inch of the wire.The first button is now loosely secured in place.
Note: 18-gauge wire is sturdy enough not to snap from normal use, but flexible enough that you won’t need brute strength to work with it. Most folks can easily bend and twist it with fingers, but pliers will make it easier to be precise.
Step 2. Slide the other end of the wire through the shank of the second button, until the button rests against the cut end of the first bend.
Step 3. Bend back the free end of the wire to loosely secure the second button.
Step 4. With the pliers, gently coil the free end of the wire around and around the length of wire connecting the buttons, starting just past the shank of the second button. Continue to coil until you reach the shank of the first button.
Step 5. With the nippers, snip off the remainder of the wire.
Step 6. With the pliers, press the cut end of the wire into the coil to secure.
And there you have a double-sided cufflink.
IMPORTANT NOTE. In this case, I am using four of the same button. But here’s a caveat: some buttons may be the right diameter to serve as links, but may also be too thick to easily fit through a ready-made buttonhole. That is, in fact, the case with these glass buttons.
Does it mean I can’t use these? Not at all. My preferred shirt brand is extra-generous with the buttonholes, so these will squeak through. But what I will likely do for ease of dressing is replace the second button with a smaller, coordinating button like this one, BR0971G14, which is 14mm rather than 18mm:
Then only the smaller button need pass through the holes. Combining a smaller button and a larger button looks perfectly fine, and does allow you (if you so desire) to use quite large and flashy buttons for the outside of your two-button link. That’s an especially fun way to dress up a plain blouse, by the way.
Method Two: Lever-Back Links
This is even simpler than method one. ‘
cuff link blanks
You will need:
• two buttons, matching or coordinating
• two good-quality cuff link blanks, available from Makers’ Mercantile
• a metal file or a motorized grinding tool
• a hot glue gun
• safety glasses or goggles
• a small vise (if using motorized grinder)
First, we want to get rid of the button shanks.
Before we do that, keep in mind that we’re dealing with metal. Bits of it tend to fly off as we work. This isn’t difficult, and it’s nothing to be scared of. However, reasonable safety precautions are vital. First, eye protection: safety goggles or safety glasses.
Second, do this only in area where you will not endanger others–keep pets, kids, nosy partners, etcetera, well away. A workshop, garage, or outdoor space is a best bet; and always do a thorough sweep/vacuum afterwards to remove all metal debris you create.
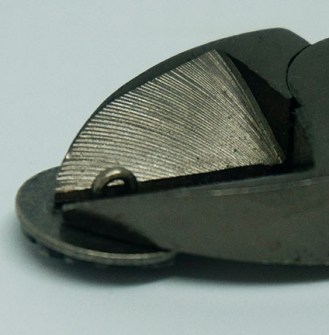
On all the metal-back buttons I selected, I was able to easily snip off the shanks…
…using a pair of standard, inexpensive wire nippers–easily procured from a hardware dealer, and likely already sitting in your toolbox if you have one.
Post clipping, all the buttons still had vestigial nubbins on the back.
To make a really nice set of links, we want to remove the nubbins and create a completely flat surface.
There are two options. The first works perfectly well, but takes a little longer. Use a metal file…
…and file away by hand until the nubbins are gone. It takes less time than you think.
Or, if you have a little motorized helper like a Dremel, you can pop in a metal-grinding attachment (this is Dremel Head 8193)…
…and use it to grind off the nubs after you have placed the button securely in a vise…
…which I like to drape with a piece of scrap cloth or (better) a thin rubber pad to avoid scraping the finish on the public side of the button.
After grinding, give the button a minute to cool down completely before you take it out of the vise.
It should go without saying, but I’ll say it anyway: Do not ever attempt to grind the back of a button with a motorized tool while holding the button in your hand.
With the back of your buttons nice and smooth, fetch your cuff link blanks and your hot glue gun.
pew pew pew
Apply a nice blob of hot glue to the pad on the blank, spreading it out a bit but keeping away from the edges…
…and immediately press it against the center back of the button.
The glue will set quickly, but let the piece sit and harden for a good 30 minutes before you try to put it on. If you find any stray “hairs” of glue showing, they’re easy to pick off before you give the link a final buff with a clean cloth.
Should you mess up, by the way–say, you don’t put the two surfaces together quite quickly enough and they won’t stick–it’s possible to pick off the dry glue and try again. Ask me how I know.
Cuff Link Giving Guide
In less than an hour, I found myself with multiple new, cute sets of cuff links–all of them slick enough for me to wear in a dressy setting. I can’t keep them all, sadly, so I’ve been thinking about who else might like to have them.
Zap! Splat!
Suited To: Comic Book Fans, Gamers, Superheroes, Illustrators, Stylish Street Fighters
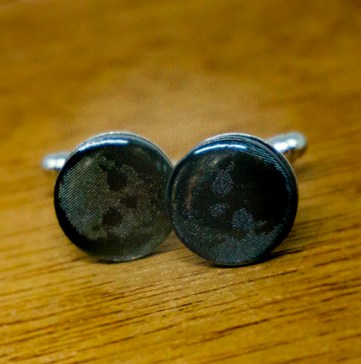
Skulls
Suited To: Undertakers, Horror Fans, Bikers, Anatomy Professors, Goth Bankers, The Undead
Kitties
Suited To: Cat People, People with Cats, Cat Fanciers, Most Knitters You Will Ever Know, Veterinarians
Oak Leaf and Acorns
Suited To: Academics, Botanists, Lumberjacks, Tree Surgeons, Squirrels, Piglet
Next Time…
I put away the glue gun, roll up my sleeves, and try to figure out what to do when Makers’ Mercantile sends me this.
He travels constantly to teach knitters at shops and guilds across the country and internationally; and has been a popular member of the faculties of such festivals as Vogue Knitting Live!, STITCHES Events, the Maryland Sheep and Wool Festival, Squam Arts Workshops, the Taos Wool Festival, Sock Summit, and the Madrona Fiber Arts Winter Retreat.
Franklin’s varied experience in the fiber world includes contributions of writing and design to Vogue Knitting, Yarn Market News, Interweave Knits, Interweave Crochet, PieceWork, Twist Collective; and a regular columns and cartoons for Mason-Dixon Knitting, PLY Magazine, Lion Brand Yarns, and Skacel Collection/Makers’ Mercantile. Many of his independently published designs are available via Ravelry.com.
He is the longtime proprietor of The Panopticon, one of the most popular knitting blogs on the Internet (presently on hiatus).
Franklin lives in Chicago, Illinois, cohabiting shamelessly with 15,000 books, a Schacht spinning wheel, four looms, and a colony of yarn that multiplies whenever his back is turned.
You know what I did first, don’t you? You know you do, you just don’t want to hear me say it.
I swatched.
Confession time: I love swatching.
If that makes you bristle, let me reassure you that I understand. I wasn’t always like this. I used to hate swatching. Swatching was vile. Swatching was the pile of green beans my mother used to force-feed me before I was allowed to have a cookie. I hated green beans.*
Why did I change? Experience. People say swatches lie, and swatches do. But the most deceitful swatch still tells you more that no swatch at all.
Swatching isn’t just about checking your gauge to make sure you end up with something of the correct size. It’s also about testing the fabric. Does it look good? Does it have the right amount of drape? Frankly, it doesn’t matter if you “get” gauge but the yarn you’ve chosen to get it gives you a fabric stiff as cardboard and you’re looking to make a shawl.
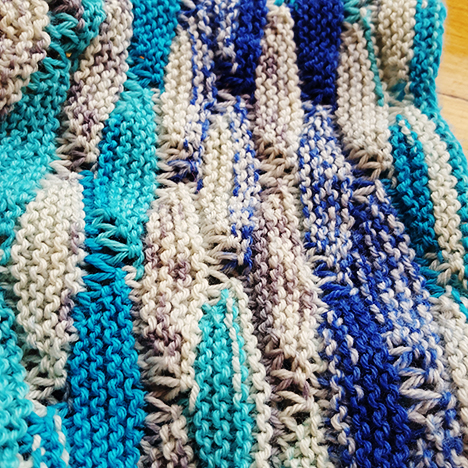
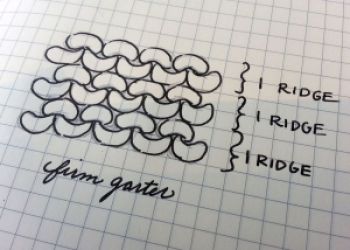
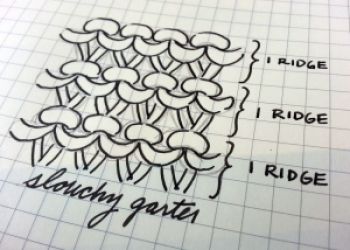
With shadow knitting, my favorite way to swatch is just to pick one color or the other and start knitting a piece of garter stitch. Here’s the kind of garter stitch I look for:
See how nice and snug those ridges are? That’s good. Here’s what I avoid:
If you get snug garter stitch, the gauge of your shadow fabric will generally give you a bold, legible hidden pattern.
This was also a good test flight for the Schoppel Gradient. As I mentioned in the last installment, I was concerned that the slightly irregular nature of the yarn might render it unsuitable for shadow knitting. But when I saw these nice, plump garter ridges
I knew I was good to go.
That’s what a swatch is supposed to do for you, you know–let you set forth without anxiety. Or at least with less anxiety.
What pattern to knit, though? I wanted, on this test flight, to try out the shifting colors and see how they’d play against one another. That meant keeping it simple. A square would have grown monotonous very quickly, so I charted up a circle.
As I’d hoped, what grew was a series of bold explosions on a moody background. The nature of shadow knitting is to stretch out motifs, so they were more oblong than circular. I liked that.
I also liked the way the simultaneous changes in the background and foreground led to the unexpected.
All the while, one thought kept nagging me. These looked like something I’d seen. What was it? Paints in a paintbox? Not quite. Candies on a tray? Definitely not.
I was talking with a knitter friend when it hit me.
“They look like the sun rising through clouds. In the morning, when they’re storm clouds full of city pollution, and I’m at the airport, and it’s really early, and my eyes are kind of bleary, and I have hours of horrible flying before I’ll get any kind of rest.”
“That’s cheery,” he said.
“Angry sunrises,” I said. “Eleven angry sunrises.”
“Some people are inspired by pretty flowers,” he said.
“That’s what I’m going to call this,” I said. “Eleven Angry Sunrises.”
“You can’t call a knitting pattern ‘Eleven Angry Sunrises.’”
“Why not?”
“Because it sounds angry. Knitting is supposed to make you think happy thoughts.”
“Well, I’m not calling it Eleven Happy Sunrises.”
“Why not?”
“Because it sounds like the name of a cult.”
“And what is knitting?”
I have to admit he had a point.
Your Own Adventure: Recipe for Eleven Happy (or Angry) Sunrises
Procure two skeins of Schoppel Gradient in different colorways. The more difference between your colorways, the bolder your surprises will be.
You will also need two stitch markers, and the shadow circle chart above. And of course, scissors and a tapestry needle. (Do I really have to tell you that? Patterns always tell you that, but do they really have to?)
As described above, knit a good-sized garter stitch swatch (about four inches by four inches will do it) to make sure you have a firm but not tight fabric. If the fabric could stand up in the corner by itself, it’s too firm. If it looks like fishnet, it’s too loose.
Don’t bind off the swatch; rip it out so you can use the yarn.
With your first color, cast on 27 stitches.
You’re going to put garter stitch borders around the sunrises just for pretty. So knit two rows with Color One, then join Color Two and knit two rows with that. From this point on, you will always alternate two rows of Color One, then two rows of Color Two.
Enough border. Time for pattern.
With Color One, knit three stitches. That’s your right-hand garter stitch border. Place a stitch marker. Knit the first row of the chart. You’ll have three stitches left; place a marker, then knit them. Those are your left-hand border.
Now, follow the chart when you’re inside the markers. Outside the markers, knit all stitches. Don’t cut the yarns at the end of each stripe, just carry them up the right-hand selvedge as you work.
When you have had quite enough, knit two more garter stripes–one in each color–and bind off using the color of the final stripe.