The more I worked on the knitted crazy quilt square, the more I began to appreciate why crazy quilting had become a craze in the nineteenth century.
There is a freedom of invention in the work you simply don’t find in pieced quilting that commits you to, for example, create identical multiples of a half-square triangle (as I did in the Floralia Blanket). Beyond that, the decorative embroidery along the seams is a holiday of invention.
You don’t have to commit to much of anything when you’re embroidering the seams on a crazy quilt. If you have, say, fifty seams to embroider, you can embroider them fifty different ways. You can combine as many different stitches along a seam as you can fit. You can change your colors as you will. You can use floss, thread, yarn, or ribbon.
The square was looking pretty good with its combination of open and closed buttonhole stitches…
…and even on such a small piece there was still room for more experimentation.
I switched to a color of HiKoo Sueño that I’d ordered, but had rejected out of hand as being probably too stark to look well on the patches: 1111 Cream, which isn’t bone white, but would (I felt sure) appear unpleasantly cold against the intarsia patchwork.
The stitch I chose is an old favorite–and another I learned from my grandmother. It’s common name is feather stitch, and my grandmother said it was her mother’s quick decoration of choice for the collars of little girls’ blouses.
Following buttonhole and closed buttonhole (see the previous installment of this saga) with feather stitch shows us once again how often small changes in how a stitch is made turns it into something with a surprisingly different appearance. Feather stitch is really just a variation on buttonhole. Here’s how you do it.
You’ll want to imagine (or draw in, or trace with basting stitches in contrasting thread) three parallel guidelines, like so:
The stitches will be worked from the top down.
At Point 1, bring the needle up on B (the center line). Take it down at Point 2, on C (the right line). Immediately bring it up again at B, with–this is important!–the working yarn under the needle tip as shown below.
If you’ve been playing along at home, you’ll notice that this is quite similar to the creation of a buttonhole stitch. You create a loop of yarn on the right side of the fabric by coming up at 1 and going down at 2; and by keeping that loop under the needle as you come up at 3, you catch the loop on the working yarn and create the first stitch.
Next, you’ll do pretty much the same thing, but in mirror image.
Go down at Point 1 on A, the left line. Come up at 2 on B, the center line–keeping the loop of working yarn under the needle as you pull through.
Then do the same from C to B. Then the same from A to B. Then C to B. Then A to B. Then C to B. Then A to B. And so forth, until you have the length of stitching you desire. To end a line of feather stitch, take a final small stitch down into B to secure the last loop.
Feather stitch is lots of fun and–as my great-grandmother understood–it gives you a lot of bang for your buck, because it is quick to work and yet looks far more complicated than it actually is.
My big surprise at this stage was finding that the color of HiKoo Sueño I’d considered unsuited for this project actually worked better, in my eyes, than the others.
I thought it wouldn’t do enough to tone down the unintentional 1980s Colors of Benetton brightness of the patchwork. I have to admit, it shows up beautifully.
In fact, I may take out all the embroidery and rework it in Color 1111.
The more of this crazy work I do, the happier I am to be going crazy.
Next time we’ll finish up the embroidery and decide what exactly to do with this piece.
He travels constantly to teach knitters at shops and guilds across the country and internationally; and has been a popular member of the faculties of such festivals as Vogue Knitting Live!, STITCHES Events, the Maryland Sheep and Wool Festival, Squam Arts Workshops, the Taos Wool Festival, Sock Summit, and the Madrona Fiber Arts Winter Retreat.
Franklin’s varied experience in the fiber world includes contributions of writing and design to Vogue Knitting, Yarn Market News, Interweave Knits, Interweave Crochet, PieceWork, Twist Collective; and a regular columns and cartoons for Mason-Dixon Knitting, PLY Magazine, Lion Brand Yarns, and Skacel Collection/Makers’ Mercantile. Many of his independently published designs are available via Ravelry.com.
He is the longtime proprietor of The Panopticon, one of the most popular knitting blogs on the Internet (presently on hiatus).
Franklin lives in Chicago, Illinois, cohabiting shamelessly with 15,000 books, a Schacht spinning wheel, four looms, and a colony of yarn that multiplies whenever his back is turned.
My friends, I’ve been at sea leading a knitting cruise; and we have landed in Bermuda after across seas as smooth as glass and blue beyond blue.
But as you can see below, I’ve brought Maker’s Mercantile with me.
Hamilton, Bermuda. #placesyoucanknit
The color of Zitron Trekking XXL Sport Sock that I’m using, Number 1406, has proven to be an uncannily perfect match to the blue of the water and more than a few of the beautiful buildings here in Hamilton.
I’m working these as plain socks in a solid color on addi FlexiFlips, and I’m going to embroider them with duplicate stitch motifs as a sort of companion/sequel to the Bee Socks–which were also knit in Trekking XXL Sport. Yeah…I love this yarn. It’s the not just the clear colors that get me, it’s the quality. The strength. It lasts. I know I can trust it not to wear out in a month.
The first shipment of yarns intended for the embroidery on my knitted crazy quilt square is still out there, somewhere, possibly at the bottom of Lake Michigan. The second shipment arrived intact. It’s a beauty.
HiKoo Sueño from Skacel.
The square was knit in HiKoo Sueño Worsted, so I chose its little (DK weight) sister, HiKoo Sueño, for the finishing touches.
A great deal of the beauty in traditional crazy quilting lies, of course, in the purely ornamental “seams” that run along the borders between patches. The earliest guides in my collection (from the 1880s) are wildly inventive in this regard. Seams were often made from combinations of two, three, or more stitches. The effect was dazzling and rich.
In later crazy quilts, especially those from the 1920s and 1930s, these decorations are usually far simpler, even crude.
On the one hand, this may well be because twentieth century women had more outlets for their creativity, and were less confined to the home. And that’s wonderful.
On the other hand, the quilts (in my opinion) became far less interesting and far less beautiful.
Fancy seams would be my choice for the knitted square, but as I contemplated the reality of the test piece a few things became clear.
I am very happy with the appearance of the garter stitch fabric. When I roll all these techniques into a class, we’ll be working garter stitch intarsia. But the bumps of garter fabric present a challenge to the embroiderer–they will tend to obscure very fine details. Embroidery floss, for example, is going to sink into the crevices and disappear.
To combat that, I chose a dk weight yarn. Heavy enough to show up on the fabric, light enough (I hoped) to allow a modest amount of intricacy.
The sizes of my “patches,” though, meant I’d given myself very little room to play with. For future experiments, I’m planning on larger patches–and fewer of them.
Meanwhile, I needed to work with the fabric I’d made.
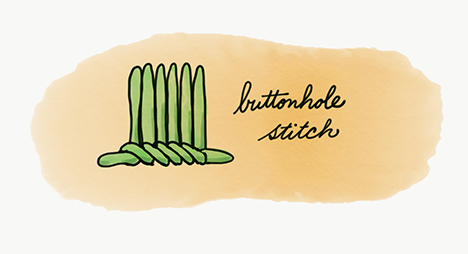
For a bold effect I chose a favorite stitch that is so easily varied that its forms can (and do) fill entire chapters in embroidery guides: buttonhole/blanket stitch.
If you’re wondering about the slash, it’s because these two stitches–buttonhole and blanket–are worked almost identically. The chief difference is spacing and scale.
Blanket stitches are usually larger, and stand a bit apart from one another.
Buttonhole stitches are usually finer, and by definition are taken so close together that no fabric shows between them.
In embroidery, however–as opposed to plain sewing–the term “buttonhole stitch” often designates the stitch made as an embellishment, even if the uprights of the individual stitches do not touch.
Before I go any further, I will mention that an online debate has been raging over whether what I am about to describe is truly buttonhole stitch or whether that name is more properly applied to a similar stitch worked somewhat differently. And that’s all I’m going to say about the debate, because I think it’s uninteresting and I don’t care.
Anyway, here’s buttonhole/blanket stitch as taught to me by my late grandmother, Pauline. She began sewing buttonholes for money when she was seven years old, and continued to work as a professional tailor and seamstress until she was 93.
Pauline as a seven-year-old schoolgirl in Smock, Pennsylvania, in the 1920s.
The plain vanilla version of the stitch asks you to imagine two parallel guidelines, like so.
The upper and lower guidelines, in blue.
If you are right-handed, you will work the seam from left to right. If you are left-handed, you will work right to left. These diagrams are drawn from the right-handed point of view, because the world is unfair and left-handed people know that.
Begin by bring the needle up through the lower guideline, at the spot marked START HERE.
From there, all stitches are made in the same way. Take the needle down through the upper guideline at Point A. Bring it up at Point B, on the lower guideline.
As you bring the needle up–this is IMPORTANT, so PAY ATTENTION–make sure the loop of working yarn on the right side of the fabric is under the needle, as shown. Pull through until the the loop gently but firmly catches on the working yarn.
Repeat for length of seam. To finish, take a final stitch downward at Point C, to the right on the lower guideline.
Buttonhole stitch looked nice on the knitted square. Not spectacular, but you gotta start somewhere.
Now, as I mentioned above, buttonhole’s variations are many and lovely. One of my favorites is closed buttonhole stitch, which makes tiny triangles along the seam.
In my embroidery classes, some students see these as a fleet of sailboats. Others see them as a school of shark fins. This probably says something about them, psychologically, but I’d rather not know what it is.
Please do not ever tell me your innermost thoughts.
Closed buttonhole stitch takes two steps. The first step, simply enough, is to make a buttonhole stitch.
Closed buttonhole, step one.
Now we close the buttonhole stitch. Take the needle down again at Point A (yes, the same hole), and bring it up at Point C, on the lower guideline, a little further along to the right.
Closed buttonhole, step two.
Repeat as desired. Make a buttonhole stitch, close it. That’s all.
On the knitted square, closed buttonhole looked pretty darn cute.
My favorite crazy quilt seams combine multiple stitches to make the embroidery really sing, so the experimentation will continue. I need to play with all the colors, too. Never be satisfied with your first attempt at anything.
He travels constantly to teach knitters at shops and guilds across the country and internationally; and has been a popular member of the faculties of such festivals as Vogue Knitting Live!, STITCHES Events, the Maryland Sheep and Wool Festival, Squam Arts Workshops, the Taos Wool Festival, Sock Summit, and the Madrona Fiber Arts Winter Retreat.
Franklin’s varied experience in the fiber world includes contributions of writing and design to Vogue Knitting, Yarn Market News, Interweave Knits, Interweave Crochet, PieceWork, Twist Collective; and a regular columns and cartoons for Mason-Dixon Knitting, PLY Magazine, Lion Brand Yarns, and Skacel Collection/Makers’ Mercantile. Many of his independently published designs are available via Ravelry.com.
He is the longtime proprietor of The Panopticon, one of the most popular knitting blogs on the Internet (presently on hiatus).
Franklin lives in Chicago, Illinois, cohabiting shamelessly with 15,000 books, a Schacht spinning wheel, four looms, and a colony of yarn that multiplies whenever his back is turned.
For an introduction to what goes on in this column, click here.
All of us who make things are prone to funny little peeves and preferences.
One of mine–one that I have in fact shared with students who bring up the question of inspiration–is an aversion to pieces of needlework in which one technique tries to ape another. Knitting pretending to be crochet. Crochet pretending to be knitting. Knitted or crocheted versions of things usually (and for good reason) sewn with woven fabrics. I don’t care for it.
There’s no rhyme or reason to this aversion of mine. It’s purely personal. Instinctive.
So imagine my surprise when I was leafing through a much-loved copy of Weldon’s Practical Needlework (a late Victorian publication from England, available in facsimile reprints) and stopped at this, one of my favorite illustrations…
…and found myself thinking, It would be fun to knit a crazy quilt.
I’m not supposed to think that. If you want to make a crazy quilt, I said to myself, then get out the rag bag and sew one.
My naughty brain would not leave the idea alone. It had been some time since I’d indulged myself in intarsia–a technique too maligned, too often considered unwieldy. This would be a golden opportunity to play with it.
Crazy quilting, if you are not familiar with it, became something of a Craft Madness in the latter part of the nineteenth century.
Unlike the workaday cotton or wool pieced quilts meant as bedcovers, crazy quilts most often recycled odds and ends of luxury fabrics like silk and velvet. But any fabric could be used. The combinations found in extant pieces are astonishing. This example from the Metropolitan Museum of Art is representative.
Aletta Whitehouse Davis (1830?–1925), Crazy Quilt (c. 1885). Made in New England from silk, silk velvet, cotton, and chenille. Metropolitan Museum of Art, New York. Gift of Reverend and Mrs. Karl Nielsen, 1962.
The scraps could be any shape. Colors, textures, and fibers were mixed at the pleasure of the maker.
The result–sometimes called an “art quilt”–was often used as a stylish throw for the parlor sofa, or might be draped over the furniture in a fashionable “Turkish corner” filled with artsy exotica.
And because a crazy quilt isn’t only about the joining of colorful bits with odd shapes, I’d get to decorate the piece with embellishments. Embellishments were fundamental to crazy quilting–the place for the needlewoman to really flaunt her creativity.
The Davis quilt is covered with embroidery and appliqué in cheerful profusion.
Embellishment meant I could look forward not merely to intarsia, but to intarsia with stuff on it. And, as you will have noticed if you tune in regularly, I am in love with projects that allow me to combine techniques.
When I realized that after two months of daydreaming I still wanted to try this, I gave in and asked Makers’ Mercantile for a mess of HiKoo Sueño Worsted in a jumble of pretty colors.
The pot basket from Big Blue Moma (you can get one from Makers’ Mercantile) is so cute I want to carry it everywhere.
This is a favorite workhorse worsted of mine. It’s warm. It’s soft, but tough. The color range is wide enough to allow craziness. It makes a handsome finished fabric.
I chose colors that I remembered seeing in old crazy quilts, especially my favorite 1880s-1890s examples.
The late Victorian crazy quilters were the most exuberant and profuse in their decorating, even including things like appliquéd paper scraps and photographs, beads and buttons, tassels and fringes, and even paint.
I didn’t know if I’d go that far, but I figured my experimental base ought to at least admit the possibility.
Crazy Knitting Without Going Crazy
Now, intarsia (if we set aside extreme examples) is not the frenetic waltz with an octopus that it is often imagined to be.
Yes, it can get kinda stringy with multiple ends hanging off the work-in-progress. But a little advance planning keeps them nicely managed.
Me, I love intarsia; but I choose my projects carefully. The technique is wonderful for bold patterns constructed from large areas of flat color. It is less wonderful (from the standpoint of the knitter) for fussy patterns constructed from fifty billion wee bits of color.
My crazy square,* therefore, was laid out with enough shapes and colors to evoke patchwork. But the shapes were mostly on the large side, and almost no row in my chart ever had more than four strands of color in play.
Here’s my chart. There was no plan to it. I just filled in shapes until it looked like I thought it ought to.
The collision of the star symbol and the dot symbol is unfortunate, but I was in a hurry. After I printed out a working copy to take on the road, I shaded the star squares lightly with a pencil to make them easier to read.
I also decided to work this experiment as intarsia in garter stitch. For those of you who are new to the party (welcome!) that means that in my flat-knit fabric, all stitches would be knit stitches. No purling (until the final row, but more on that later).
My reasons for this were as follows:
• The gauge of garter stitch is roughly square–the number of stitches per inch is usually about the same as the number of rows per inch.
So I could lay out my chart on a plain ol’ square grid and not worry about differences between stitch gauge and row gauge. Yes, I have access to “knitter’s graph paper” with a non-square grid; but this was easier. And it was right at hand. And as you know, if you read this column regularly, I am LAZY.
• The primary visual feature of garter stitch is the ridge formed by two consecutive rows of knitting: once across the right side, once across the wrong side.
Working my chart in garter stitch meant that the order of the colors in any wrong side row would be identical to the order of the colors in the preceding right side row. So on all wrong side rows, I could ignore the chart and just work the colors as they presented themselves. If the next stitch on the left needle was blue, I would knit into it with the same blue. Ditto for all the colors. No need to look at the chart. Simple. Easy. See, “I am LAZY,” above.
• Garter stitch lies flat.
• Garter stitch looks pretty.
• I like garter stitch.
Using garter stitch meant numbering my chart rows appropriately, like so:
Right side rows are odd numbers, worked right to left. Wrong side rows are even numbers, worked left to right. Each row of squares in the chart is worked twice: once right to left, then once left to right.
Yes, every row of squares in the chart is knit twice. Once across for the right side, once across for the wrong side.
Now, as to the stringy bit.
Intarsia requires a separate strand of working yarn for every block of color in a given row. If you’re not familiar with intarsia at all, you might like to check out this installment of an earlier Fridays with Franklin adventure for a decent introduction.
To keep dangling ends to a minimum, one of the things I like to do is estimate how much yarn a given block of color will require, then reel off that much of it. I don’t wind these strands onto intarsia bobbins, or wrap them into butterflies. I just let them hang.
How do I estimate the amount of yarn I need for a block of color? It’s pretty simple. Takes a bit of time and counting, but it’s worth it to me in terms of time saved (in the end) and annoyance avoided.
Estimating Yarn for One Block of Intarsia
Step One. Take the yarn you’ll be using, and wrap it gently but firmly ten times around the needle you’ll be using.
Wrap that needle.
Step Two. Remove the yarn from the needle and measure how much you used for those ten wraps. That’s how much you need for ten stitches. (Let’s say, for demonstration purposes, you got a result of 6 inches.)
Measure the yarn you wrapped.
Step Three. Count up the number of stitches in that block of your intarsia design. (Let’s say, for demonstration purposes, you have 108 stitches in the block.)
Step Four. The math bit.
If you’re working in stockinette stitch (each row in the chart is worked one time), do this:
Divide the number of stitches in the block by 10. (We get 10, with a remainder of 8.)
Multiply the resulting whole number (ignore the remainder for the moment) by the number of inches you needed for 10 wraps. (We multiply 10 by 6, and get 60).
To this number, add additional length for the remainder. (Since eight is pretty near 10, I’ll add in the full six inches needed for 10 wraps. Our total is now 70.)
Add in an additional 12 inches for tails at the beginning and end.
So our hypothetical strand would be measured out to 78 inches.
If you are working in garter stitch, do as above; but multiply your total by 2 before you add in the 12 inches for your tails. (We do this because every square in our chart represents two knit stitches, not one.)
This is a loosey-goosey way to estimate, yet I’ll be darned if it doesn’t get me the right length almost every time.
The Naked Square
Once I had done up a chart, and counted the squares in each block, the knitting clicked along with refreshing ease.
I cast on using the long tail method, following the color order given in row 1.
Since the long tail cast on not only casts on, but also works your first row of knit stitches, I followed it by knitting row 2 of the chart. In the photo above, I’ve just finished row six. I think it’s row six. I’m pretty sure it’s row six. Where are my glasses?
From there, it was shockingly quick work to finish the entire chart. I ended by binding off in purl, following the order of the colors, on the right side after completing wrong side row 80.
See?
It’s not perfectly square, but it’s close enough that it could be easily blocked to square; or I could adjust the chart to make it knit up square. All part of the experimentation process.
Also, please admire my tidy backside.
If this side is wrong, I don’t wanna be right.
Just for fun, I put a photo of the finished square into Photoshop and multiplied it. I do this a lot, by the way, to see how a small sample of a repeating motif will look across a larger field.
It’s encouraging. This is the same square repeated, of course; but if you used the same chart, and knitted it in different colors each time; then rotated the squares as you put them together; you could achieve a finished knitted quilt with something of the non-repeating verve the original quilts offer.
I kinda hoped that would be the case.
The greatest surprise was finding that my colors were strongly evocative of the “paint spatter” Trapper Keeper I carried to school in the 1980s. This was not, I admit to you, an entirely pleasant surprise.
But now comes the embellishment, and we’ll see if we can temper the Valley Girl vibe with that. Fer shure.
See you in two weeks.
*Note that the Davis crazy quilt, like many from the time, is formed from small squares later joined into a single large square. This kept the work as portable as possible for as long as possible, and allowed for flexibility and adjustment in laying out the final design. A sensible method indeed.
He travels constantly to teach knitters at shops and guilds across the country and internationally; and has been a popular member of the faculties of such festivals as Vogue Knitting Live!, STITCHES Events, the Maryland Sheep and Wool Festival, Squam Arts Workshops, the Taos Wool Festival, Sock Summit, and the Madrona Fiber Arts Winter Retreat. He will lead his own knitting cruise to Bermuda in September, 2018.
Franklin’s varied experience in the fiber world includes contributions of writing and design to Vogue Knitting, Yarn Market News, Interweave Knits, Interweave Crochet, PieceWork, Twist Collective; and a regular columns and cartoons for Mason-Dixon Knitting, PLY Magazine, Lion Brand Yarns, and Skacel Collection/Makers’ Mercantile. Many of his independently published designs are available via Ravelry.com.
He is the longtime proprietor of The Panopticon, one of the most popular knitting blogs on the Internet (presently on hiatus).
Franklin lives in Chicago, Illinois, cohabiting shamelessly with 15,000 books, a Schacht spinning wheel, four looms, and a colony of yarn that multiplies whenever his back is turned.
For an introduction to what goes on in this column, click here.
People who wish to organize themselves often say they’re “getting their ducks in a row.” I envy people with ducks. I don’t have ducks, I have bunnies.
The thing about bunnies is, bunnies multiply.
Quickly.
May and June have been months of near-constant work travel; and that always fools with my brain. When my body gets unsettled, my brain goes with it. I lose focus. The upside of that is ideas multiplying like–well, like bunnies.
The downside is that I follow this bunny, then that bunny, and never catch up with any of them.
My worktable (which is, in reality, two worktables in Chicago; the folding trays of forty airline seats; and innumerable hotel desks and restaurants) is entirely too cluttered. So I’ve been decided it’s time to finish up, clear up, and round up.
The long-awaited Bee Socks (done in good ol’ Trekking XXL Sport) are getting their final duplicate stitch additions to the swarm.
I’ve been having so much fun with these, but if I don’t call a halt then I won’t get anywhere with the next pair (also to be duplicated stitched) I cast on in Color 1496. I haven’t settled on a motif yet. That’s one of the advantages of duplicate stitch–I can have a good ponder while I knit. Dogs? Penguins? Excerpted lyrics from Anita Ward’s immortal 1979 disco classic “Ring My Bell”? I can’t decide, and for the moment I do not have to.
And I have not given up on the Zoom Loom triangle shawl that I wrote about last week. The more squares I add on, the more I like it. That’s not uncommon with a self-patterning yarn. You have to give the self-patterning (or, in this case, the colors that would have self-patterned) enough room to repeat before the piece starts to look balanced. An ugly duckling stage is inevitable.
The hand of the fabric, by the way, is lovely. I’m thinking I might do more weaving with Zitron Art Deco, perhaps on my Schacht Cricket.
Don’t stop believing.
With the Bee Socks and the Zoom Loom project tidied up, I’ll be able to focus on an idea I’ve had in mind for ages, and about which I am so excited that I think it’s going to become a new class. It’s a piece of knitting, and here’s the inspiration…
And this is the yarn…
My African woven pot basket from Big Blue Moma runneth over.
It’s HiKoo Sueño Worsted, a mix of merino and viscose that comes in a handsome array of colors and feels like a pat on the head from an angel.
I’ll show you what I’m up to in two weeks.
Note: The contest I mentioned at the end of the previous column has been postponed because y’all bought so much Zitron Art Deco all of a sudden that Makers’ Mercantile is nearly sold out. When supplies have been replenished (more is on the way from Germany) we’ll tell you what we have in mind.
Tools and Materials Appearing in This Issue
Zitron Art Deco (80% Virgin Wool, 20% Nylon; 437 yards per 100 gram ball). Shown in Color 05.
Zitron Trekking XXL Sport Sock Yarn(75% Superwash Merino Wool, 25% Nylon. 459 yards per 100 gram skein.) Shown in Color 1407 (sock), 1476 (bee), 1496 (blue).
He travels constantly to teach knitters at shops and guilds across the country and internationally; and has been a popular member of the faculties of such festivals as Vogue Knitting Live!, STITCHES Events, the Maryland Sheep and Wool Festival, Squam Arts Workshops, the Taos Wool Festival, Sock Summit, and the Madrona Fiber Arts Winter Retreat. He will lead his own knitting cruise to Bermuda in September, 2018.
Franklin’s varied experience in the fiber world includes contributions of writing and design to Vogue Knitting, Yarn Market News, Interweave Knits, Interweave Crochet, PieceWork, Twist Collective; and a regular columns and cartoons for Mason-Dixon Knitting, PLY Magazine, Lion Brand Yarns, and Skacel Collection/Makers’ Mercantile. Many of his independently published designs are available via Ravelry.com.
He is the longtime proprietor of The Panopticon, one of the most popular knitting blogs on the Internet (presently on hiatus).
Franklin lives in Chicago, Illinois, cohabiting shamelessly with 15,000 books, a Schacht spinning wheel, four looms, and a colony of yarn that multiplies whenever his back is turned.
For an introduction to what goes on in this column, click here.
My first idea is seldom my best idea.
I started my three-part Zitron Art Deco challenge with knitting. It felt good to be back on familiar ground again after so much crochet.
Mind you, I’m increasingly fascinated by crochet. But I’m in that Slough of Despond I reach whenever I’ve learned enough about a new craft to want to play with it, yet haven’t learned enough to get very far on my own.
My challenge is to take this self-patterning yarn…
…and use three techniques (knitting, crochet, ZoomLoom weaving) to mess around with the patterning that Zitron intended. Their pattern is very handsome; I’m just a congenital contrarian.
Now, commercial self-patterning yarns most often assume three things:
1) you’ll be knitting stockinette,
2) you’ll be knitting at an “average” gauge (not notably tight or loose),
3) you’ll be making rounds or rows of “average” length (not notably short or long).
So the first and easiest way to break the self-patterning is to choose a texture other than stockinette. Even switching to garter stitch will incite a metamorphosis.
I didn’t feel much like playing with very loose gauge, and only a die-hard masochist would undertake very tight gauge. I picked a needle I figured would give me decent garter stitch and cast on.
It’s also fun to see what happens to self-patterning yarns when you employ any method that pulls a stretch of yarn out of what would otherwise be its accustomed row. Knitting into the row below will do it; so will slip stitch knitting.
Slippy McSlipstitch is three rows high.
In all my years of knitting I’d not yet tried what you might call extreme slip stitch, in which the stitches to be slipped are given extra yarn (usually through double, or even triple, yarn overs); and then these stitches are slipped on three, four, five, or even six (or more) rows.
That’s where I started, and the result was okay.
It’s not unattractive. With some elaboration–changing the frequency of the slipping, or varying the lengths–it might become quite interesting. It didn’t grab me, though. I was mildly curious about what else to pursue along this line, but only mildly.
Is mildly enough?
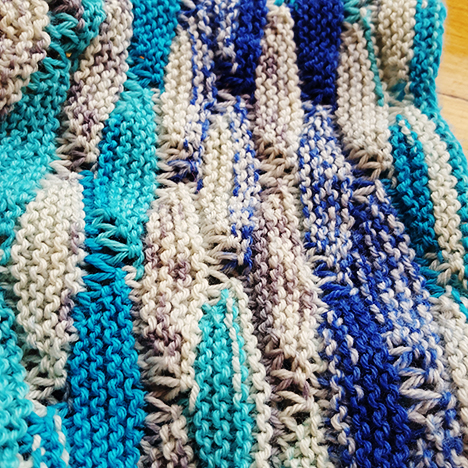
There’s one other tactic you can take with self-patterning yarns. Rather than breaking up the pattern–which is really a carefully organized form of color pooling–you can keep the pooling, but change the way it shows up.
I was thinking about this as I set out to once again clean up the samples in my workroom. The ad-libbed short row purse liner from Cage Match came to light,
Cage Purse with Knitted liner in various Makers’ Mercantile yarns and fabric lining by Cotton + Steel.
and I wondered if I might not just use the same technique–building of up a fabric made of continuous short-rowed motifs–to alter the pooling and patterning in Art Deco.
I won’t get into the nitty-gritty of short rows here–if you’d like to know more, do click over to read the Cage Match series–but in brief, I decided I’d try knitting a fabric built up gradually from small short row lozenges like this.
Many turns make a lozenge.
The early stages were, as early stages in any repeating fabric often are, ungainly. When I teach motif design, a point I hammer home is that a repeating motif only begins to sing when you let it repeat.
One round of lozenges wasn’t much too look at. It wasn’t enough knitting to even bring every color in the color way into play.
You’ll notice there are also little passages of stockinette mixed in with the garter. At first, this was a mistake. It happened because I turned the work and knit in the wrong direction.
You may have heard, though, that a mistake repeated regularly becomes a design element. I thought, why not keep it and see what happens?
So the fabric grew.
And as it has grown larger, I have found myself very pleased indeed. The self patterning is there…it’s just not there in the way the maker intended.
I like this so much that when the challenge is complete, we will put the pattern together–it’s a cowl, worked in the round–and issue it right here on the Makers’ Mercantile blog.
Meanwhile, the second part of the challenge–crochet–is under way with Art Deco in Color 05. I’ll show you in two weeks.
Where Are They Now? – An Occasional Look at Past Projects
I am pleased to report that the embroidered Tunisian crochet pillow (in HiKoo CoBaSi Plus) is giving excellent service as a companion to loafing and napping. It still looks as crisp as the day it was finished. Please enjoy this action shot starring Rosamund.
We have plans to eliminate the remaining ugly green throw pillows as quickly as possible.
Tools and Materials Appearing in This Issue
Zitron Art Deco (80% Virgin Wool, 20% Nylon; 437 yards per 100 gram ball). Shown in Colors 01, 02, and 03.
He travels constantly to teach knitters at shops and guilds across the country and internationally; and has been a popular member of the faculties of such festivals as Vogue Knitting Live!, STITCHES Events, the Maryland Sheep and Wool Festival, Squam Arts Workshops, the Taos Wool Festival, Sock Summit, and the Madrona Fiber Arts Winter Retreat. He will lead his own knitting cruise to Bermuda in September, 2018.
Franklin’s varied experience in the fiber world includes contributions of writing and design to Vogue Knitting, Yarn Market News, Interweave Knits, Interweave Crochet, PieceWork, Twist Collective; and a regular columns and cartoons for Mason-Dixon Knitting, PLY Magazine, Lion Brand Yarns, and Skacel Collection/Makers’ Mercantile. Many of his independently published designs are available via Ravelry.com.
He is the longtime proprietor of The Panopticon, one of the most popular knitting blogs on the Internet (presently on hiatus).
Franklin lives in Chicago, Illinois, cohabiting shamelessly with 15,000 books, a Schacht spinning wheel, four looms, and a colony of yarn that multiplies whenever his back is turned.
For an introduction to what goes on in this column, click here.
This column most often shows you the progress of one project at a time, which I’ve realized gives you a false impression of how I work.
I’ve been cleaning out my primary workspace for eight years, which is the same amount of time I’ve spent working in my primary workspace.
It’s not a complete mess, mind you. If it were a complete mess, it would be complete. Nothing in here is complete.
I have a sort of area devoted to “Fridays with Franklin” works in progress. It grows and shrinks and changes its shape and moves hither and thither, like a restless volcanic island made from yarn.
At any given moment there will be three things in progress, supplies for a couple more ideas, supplies from Makers’ Mercantile for which no idea has yet presented itself, and leftover bits of finished projects that haven’t been sorted into storage.
Right now the top of the island is covered by a large (well, large for me) crochet project using HiKoo Concentric, an intriguing alpaca gradient yarn that arrived attractively packaged in a plump bun.
Two luscious buns of HiKoo Concentric from Skacel.
Two these buns have become little bundles of granny squares, and the granny squares need assembly into the final thing.
But that means hauling around all the granny squares, and I’ve been on the move. That means the first over the finish line will be this pair of socks made with old favorite Zitron Trekking XXL Sport Sock Yarn, shown here in progress on my first set of addi Flexi Flips.
(I love the FlexiFlips, by the way. My preferred tools for sock knitting have been double-points or two circulars, and these are a sort of hybrid of the two methods. You get a set of three, and two hold the work while you knit with the third. They took a little getting used to, but after about ten rounds, I found myself working faster than usual with hands that were relaxed and comfortable.)
These socks are for me. I don’t have much time to knit for myself, so I choose personal projects with care. Things I need go to the top of the waiting list.
I need these socks, because the only reliable source of reasonably-priced, durable store-bought socks that I’ve counted on for years recently slashed its line to remove all the colors I wanted to wear. No more bright yellows, reds, or purples. No more vivid greens. No pinks, no lavenders, no royal or robin’s egg blues. They still love to trumpet that they offer dozens and dozens of choices; but now all of those choices are either browns, tans, greys, black, or navy. Whee!
I also need these socks because I want socks with a fun motif on them. You can buy men’s socks with motifs, but these are almost always selected from the acceptable list of Things Men Can Have On Their Clothes.
I am in no way knocking you if you want these things on your socks. But you are well provided for, and can if you so desire buy what you like right off any number of shelves.
Me, I want colorful wool socks decorated with things men aren’t supposed to like, such as this curly-swirly lyre, taken from a nineteenth-century needlework booklet.
It’s a symbol of the god Apollo, sure; but Apollo doesn’t count as a superhero as he hasn’t got his own best-selling comic book and movie franchise. Apollo wrote poetry and cavorted with muses, both activities the modern American male is supposed to avoid.
Clocked
The socks I want have clocks. A “clock,” in hosiery, is a decoration at the ankle, possibly spreading up the leg a bit. The plural is either “clocks,” which makes sense, or “clox.” I hate the second spelling.
I could knit the clock into the sock as a piece of intarsia. I have quite a few vintage knitting books with patterns for intarsia clocks,
But I bristle at the thought of working a sock with a dozen strands of yarn coming off it. I’m sorry, no.
So I thought, why not try to make this happen with duplicate stitch? I’m an old hand at duplicate stitch–last seen in this column on the chest of Rosamund’s Wonder Woofin’ sweater.*
Duplicate stitch embroidery mimics the structure of the knitting underneath, and if it’s done well it appears to be an integral part of the fabric. It preserves, as well as any embroidery can, the stretch of knitting. It might be just the thing.
Again, I’ve done plenty of duplicate stitch–but I had never done it on a sock. More to the point, I had never done it at the gauge of this sock–nine stitches to the inch.
It’s my usual practice when embroidering a closed piece of work (like a hat or glove) to insert something, usually a piece of stiff cardboard, inside the work so that I don’t have to worry about accidentally stitching through the wrong part of the fabric. In this case, I have a solid wood sock blocker that did the trick. The fabric wasn’t stretched drum tight–just enough to make it lie nice and flat.
Here we are once again, embroidering our work from a chart, so what do we need? We need guides. I put mine in, using plain white sewing thread, doubled. I put in a baseline, and lines for the horizontal and vertical centers of the motif.
Note: To make finding the center stitch a snap, before dividing the stitches to work the heel flap, I put a stitch marker halfway across the stitches at the back of the leg (seen here), and halfway across the stitches at the front of the leg.
For the motif, I first thought I’d use Color 1496. However, paired with Color 1027, it was too close to read well–another cool color, adjacent in the spectrum, almost identical in value. The embroidery would barely have shown up from a couple feet away.
Enter Color 1476, an emphatically yellow yellow. (One of the things I love about Zitron Trekking XXL Sport Sock is the enormous range of solid colors.)
Much better.
Then there was nothing more to do than slip a strand into a tapestry needle and get down to it.
Lyre
It did not go well.
It took me two hours to get about five rows up the lyre chart. They were two unpleasant hours, full of language unsuitable for mixed audiences.
After a walk around the block that included a stop at a bar on the far corner, I took a fresh look at the thing and found it to be lopsided, full of stitches not quite of the correct size, and containing one error so fatal that further progress was impossible.
I ripped it all out. Which took another hour.
Kaboom!
Lyre, Lyre
I tried twice more. I ripped out twice more. I threw things.
Hive Mind
I decided I didn’t really like the lyre, anyway. What I really wanted on my sock was a bee. This bee, from an Edwardian filet crochet chart. I’ve been wanting to put this bee into or onto a project of some kind for years.
Bees are a favorite symbol of mine. So industrious. Famously busy. Elegantly designed.
Twice more, I started.
Twice more, I ripped.
Just as I was about to give up and admit to you my utter failure, I realized what was tripping me up. I was doing everything I could to ensure success: working while alert, working without distractions, working under the best possible lighting conditions.
And yet, time and again, my it wasn’t working. I mean, look at this.
The problem? I couldn’t always see–even under brilliant lighting–which row of stitches was which. So I’d suddenly jump up or down a row, or take a stitch that was two rounds high instead of one.
I needed more guidelines.
So I ripped myself back to a blank slate, and I put in lots and lots of guidelines.
The center, of course, yes. But also a guideline for every row in the chart.
That may look like a lot to do, but we’re talking about a motif 19 rows high. Putting those guidelines in took about ten minutes.
And with them in place…
…the embroidery took about an hour. And it was fun. The guidelines saved me at least a dozen times from making a big mistake, and at least five times showed me that I’d made a mistake immediately, which allowed me to correct it without fuss.
The guidelines slid right out.
And I had my bee sock.
I’m pleased to report that the embroidery is perfectly comfortable and stretchy–no lumps or bumps, and it flexes along with the knitting.
The bee looks lonely, though, so I think I’ll add a second on the other side. And of course, two more on the other sock. Or maybe three.
Oh. The second sock. I need to knit the second sock.
Maybe after I finish the big crochet project. See you in two weeks!
*I know. Superhero. But she’s the only one I like.
Tools and Materials Appearing in This Issue
HiKoo Concentric (100% Baby Alpaca; 437 yards per 200 gram cake). Shown in Color 1027 (Trixie).
Zitron Trekking XXL Sport Sock Yarn(75% Superwash Merino Wool, 25% Nylon. 459 yards per 100 gram skein.) Shown in Color 1407 (sock), 1476 (bee), 1496 (blue).
addi FlexiFlips flexible knitting needles (length 8 inches, shown in size US 0)
He travels constantly to teach knitters at shops and guilds across the country and internationally; and has been a popular member of the faculties of such festivals as Vogue Knitting Live!, STITCHES Events, the Maryland Sheep and Wool Festival, Squam Arts Workshops, the Taos Wool Festival, Sock Summit, and the Madrona Fiber Arts Winter Retreat.
Franklin’s varied experience in the fiber world includes contributions of writing and design to Vogue Knitting, Yarn Market News, Interweave Knits, Interweave Crochet, PieceWork, Twist Collective; and a regular columns and cartoons for Mason-Dixon Knitting, PLY Magazine, Lion Brand Yarns, and Skacel Collection/Makers’ Mercantile. Many of his independently published designs are available via Ravelry.com.
He is the longtime proprietor of The Panopticon, one of the most popular knitting blogs on the Internet (presently on hiatus).
Franklin lives in Chicago, Illinois, cohabiting shamelessly with 15,000 books, a Schacht spinning wheel, four looms, and a colony of yarn that multiplies whenever his back is turned.
I almost always do a charity project of some sort for my birthday and this year I chose Linda’s Hats for Hope Initiative. When I was younger I collected lots of hand knit toys for charity and every year Linda would knit my age in donated toys. She’s sweet and generous and has helped me with so many projects so many times so this year I’m helping her by knitting my age in hats! It’s only January 15th when I’m writing this (I have to turn it in early for approval and stuff) and I’m already at 15 hats and a couple of scarves… So I think I’m going to send her a few extra if I keep knitting until January 27th.
Kenzie yarn makes a nice soft drapey hat and the colors are lovely too. But my favorite thing is Makers’ gives you yarn when you get a knitting machine. It’s soft and squishy and two balls makes a great hat.
Are you a process person or a product person? Mom is process person but I am a product person. Having a knitting machine is awesome because I can make so many hats in a short amount of time. I just have to be careful not to go too fast and drop stitches.
First off you need to watch the video Karin Skacel has for how to use a knitting machine. I watched the video and in an hour I had my first hat. Mom still helped with finishing, but a hat in an hour and it was so much fun to watch the knitting machine go around and around. Karin had some really important tips that helped me set the machine up successfully so that it wasn’t frustrating, like how to start and how to watch the counter.
Most of my hats are two colors and reversible. Sometimes if I have smaller amounts of yarn I add more stripes, but it is important for these hats to hold up well, so I try not to cut the yarn for no reason.
I do a total of 108 rounds on a hat. So its pretty easy…just 54 rounds of each color. I can divide by 3 to get even sections of 3 stripes.
I gather each end up tightly and carefully finish each end.
Then I turn one end inside the other. Make sure you leave a tail of yarn to join the inside so it will turn inside out without coming apart. The video I suggested has the cute topknot finish.
I hear weather reports about how cold it is up north and I hope these hats keep people warm this winter and that they know people care.
Next month I’m making an “unbearably” cute kit….it reminds me of a craft project my Grandmother did. I’ve been excited about making it ever since I got it and I can’t wait to show you guys. My Grandmother and Great -Grandmother were both really good at sewing, so I’m looking forward to more of that.
Mom is getting ready to start a knit a long over in the Makers‘ group on Ravelry…I love the scarf pattern. It’s called Holey scarf and it’s a free pattern. She’d love it if she had some friends to knit with.
And then! We’ve been snowed in for two days… probably tomorrow too because it just keeps snowing…Mom said “hey! I bet we could make a snowman.” She made the nose and I did the rest….we made a knitting machine snowman! I don’t have a pattern for him yet, but we’re working on it so you can make one too!
And p.s. if you want to join in the fun and get your own knitting machine, this is the one I have. I just love it!
I will see you in February! Post in the comments and tell me about projects you like to do when you are snowed in.
For an introduction to what goes on in this column, click here.
I thought at first that I’d use duplicate stitch for the stars on Rosamund’s costume, but duplicate stitch has one great weakness. You are limited to embroidered stitches the size and shape of your knit stitches.
That means her stars would have looked something like this.
Not even in my most wishful state of mind is that a five-pointed star. That looks like a Space Invader doing front squats. Unacceptable.
In the dim recesses of my memory lurked an image of my late grandmother, the tailor, embroidering perfect five- and six-pointed stars on a client’s fancy party outfit. I dug through every embroidery guide on my shelf–about two dozen books, from the eighteenth century to the present–and found nothing. The entries for “Stars, embroidered” led to this kind of thing…
which is fine for folksy work, but not what I needed; or this kind of thing
which is a Lazy Daisy, not a star. Don’t try to tell me otherwise.
I began to wonder if past-life regression therapy might get me where I needed to go. Or perhaps I ought to hire a medium? Would my grandmother be annoyed if I contacted her in the great beyond to ask how she put the stars on Mary Ellen Zemicki’s bicentennial hostess pajamas? Was there a good time to call? When do they air Lawrence Welk in heaven?
“Hush now,” said my grandmother’s ghost. “I’m trying to watch the Lawrence Welk program.”
Star Map
Meanwhile, I went ahead and mapped out the placement of the stars on the tail of the costume. I used contrasting yarn and basting to give myself a set of guidelines, just as I’d done for the eagle.
In the first and third rows, the stars are centered on the lines. In the second row, the stars are centered between the lines.
Oh Say Can You Sew
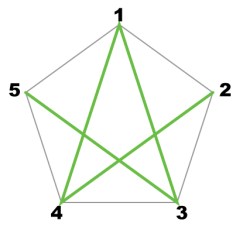
In the end, a séance was just too much work to throw together quickly and I had to rely on experimentation and blind luck. I could remember this: you began by embroidering something that looked just like a child’s drawing of a five-pointed star. And I half-remembered a chant that started, “One and three, and two and four…”.
I cracked it. Here it is.
This is not a complicated stitch. I’m going to break it down very, very carefully so you can do it on your own without getting lost.
Our star will be based on an underlying shape: a pentagon. The five points of the pentagon will become the five points of our star, and we number them like so for reference:
We begin with a base layer, worked once, like this:
Needle up at 1, needle down at 3.
Needle up at 2, needle down at 4.
Needle up at 3, needle down at 5.
Needle up at 4, needle down at 1.
Needle up at 5, needle down at 2.
The base layer is now complete.
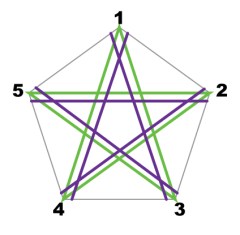
From here, we continue ’round and ’round the points of the star in rounds that grow smaller and smaller until the center of the star is filled in. All of these rounds follow the same rules, and here they are.
Needle upjust below and to the left of point 1.
Needle downjust below and to the right of point 3.
Needle upjust below and to the left of point 2.
Needle downjust below and to the right of point 4.
Needle upjust below and to the left of point 3.
Needle downjust below and to the right of point 5.
Needle upjust below and to the left of point 4.
Needle downjust below and to the right of point 1.
Needle upjust below and to the left of point 5.
Needle downjust below and to the right of point 2.
Round complete.
Continue in this manner, with the stitches of each round being taken a little closer to the center of the star. This diagram shows (in blue) what the next round will look like after it has been worked. The star is complete when the center is filled in, ending with a stitch from 5 to 2.
The key is:
“Up at the left. Skip a point. Down at the right. Back a point.”
If you remember that, you’ll remember the stitch.
Tips…
When you’re learning this stitch, rotate the work as you go so that the point you are dealing with is pointing UP. This will help you keep your “rights” and “lefts” clear.
Each round of stitching moves a little closer to the center of the star. How much closer? About the thickness of your embroidery yarn is a good bet.
Tip your needle so that you taking all stitches after the base layer from just under the threads laid down in the previous layer.
The number of round you’ll require to fill in the center of the star will depend upon the dimensions of the star and the size of your embroidery yarn.
Perfect and Uniform
One perfect star is a fine thing to achieve, but a field of many looks best if all are uniform in size and spacing. I’d laid out my guidelines, but I knew I couldn’t freehand twelve matching stars. Variation is fine for a folksy look, but not for this project.
So I printed out a plain pentagon of the proper size, and traced the points twelve times onto a sheet of medium weight water-soluble stabilizer with a fine-tipped permanent marker.
I cut out the pentagons as I needed them, one at a time, and pinned them to the sweater.
Using a sharp chenille needle with an eye large enough to accommodate my yarn (a size 18, in this case), I embroidered the stars over the stabilizer and the knitted fabric. A blunt tapestry needle won’t work well with stabilizer.
When they were all complete, I immersed the sweater in plain, cold water to remove the stabilizer. Voilà.
Rosamund, suited up and ready to fight injustice.
Do allow the piece to dry completely, of course, before trying it on.
Tricolor Muffin Hat Pattern Now Arriving on Runway Four
Meanwhile, we’ve put together the pattern for the Tricolor Muffin Hat. It’s free–just click HERE.
The Tricolor Muffin Hat.
It may be, of course, that red, white, and blue is not your cuppa tea this winter; so here are some possible alternate color sets in HiKoo Simplicity (with coordinating LOVaFUR pompoms) for your consideration.
With Pompom: Fox–Scarlet 399032-0015
Turkish Coffee, Really Red, Silver Hair
With Pompom: Raccoon–White 399028-0001
Nile Blue, Still Waters Multi, Seattle Sky
With Pompom: Luxury Raccoon–Black
Black, Purple Reign Multi, Edgy Eggplant
With Pompom: Luxury Raccoon–Royal
Royal Blue, Indigo, Grape Soda
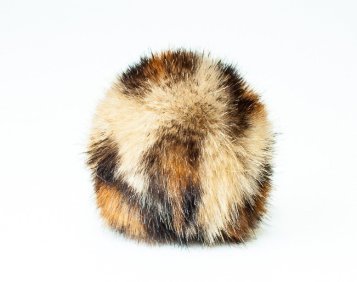
With Pompom: Kids Gold–Leopard
Brown Bear, Make Me Blush, Edgy Eggplant
What’s up next?
Well, if you stop by in two weeks I’ll show you what I’m doing with these…
He travels constantly to teach knitters at shops and guilds across the country and internationally; and has been a popular member of the faculties of such festivals as Vogue Knitting Live!, STITCHES Events, the Maryland Sheep and Wool Festival, Squam Arts Workshops, the Taos Wool Festival, Sock Summit, and the Madrona Fiber Arts Winter Retreat.
Franklin’s varied experience in the fiber world includes contributions of writing and design to Vogue Knitting, Yarn Market News, Interweave Knits, Interweave Crochet, PieceWork, Twist Collective; and a regular columns and cartoons for Mason-Dixon Knitting, PLY Magazine, Lion Brand Yarns, and Skacel Collection/Makers’ Mercantile. Many of his independently published designs are available via Ravelry.com.
He is the longtime proprietor of The Panopticon, one of the most popular knitting blogs on the Internet (presently on hiatus).
Franklin lives in Chicago, Illinois, cohabiting shamelessly with 15,000 books, a Schacht spinning wheel, four looms, and a colony of yarn that multiplies whenever his back is turned.
For an introduction to what goes on in this column, click here.
Another Halloween has come and gone.
I happily observed several of my own favorite seasonal customs, including re-reading The Turn of the Screw, watching “It’s the Great Pumpkin, Charlie Brown!” twice, and re-watching Sally Brown’s spectacular concluding tirade a dozen times.
Then I wandered over to Walgreens at midnight and waited for them to put all the leftover candy on sale for half price.
Since last Thursday’s sneak preview, Rosamund has made the rounds in her new costume, knit from HiKoo Simpliworsted.
Her heroic efforts to return the rabbits, squirrels, and pigeons of our Chicago neighborhood to the side of peace and justice earned her many cookies and pats on the head.
“Come out here! It’s not too late–we can live in peace and harmony!”
She posed for souvenir photos with tourists visiting Wrigley Field. And she was quite the toast of our favorite hangout, Murphy’s Bleachers, when we paused for refreshment during a long patrol.
Making the world safe is thirsty work.
We will call this a success.
I plan to raise the neckline about three inches to make it more suitable for long-term wear as part of Rosamund’s wardrobe of winter sweaters. She loves wearing clothes (except hats–therefore no tiara with the costume). And in our neck of the woods, no domesticated animal with a coat as fine as hers is safe outdoors in midwinter without extra warmth.
I’ve had many requests for the pattern, which is immensely flattering. Patterns for dog sweaters are notoriously problematic, though.
Dogs vary in shape and size to an extent that makes the grading system used to re-size human garments almost useless. A chihuahua, a dachshund, and a mastiff are the not same figure scaled upwards; you cannot just add stitches and rows to a chihuahua sweater to fit it on a mastiff. And that’s to say nothing at all of mixed breeds.
The best way to knit a sweater for a dog is to tailor the sweater to THAT dog. This is not particularly difficult, and in fact is a great way to dip your toe into the shallow end of the knit-to-fit pool.
Rosamund’s knit-to-fit Halloween sweater is the same basic shape I knit for her in this series and this series, with changes to color, ease, and detail.
If you wish to knit for your dog, the best thing to do is:
become familiar with the method of measuring and calculating I laid out in the first series and refined a bit in the second series,
sketch out some ideas for what shape, fit, and details you want,
take your dog’s measurements,
knit and measure an ample gauge swatch,
do a bit of math, and
cast on, knitting to fit as you go along.
That’s why I’m not going to take you through the whole process of making this sweater from start to finish. It’s ground we’ve covered before.
I was already familiar with the yarn–HiKoo Simpliworsted is fantastic for pet sweaters, being both tough and washable. I took a new set of measurements to see if Rosamund had changed shape appreciably. (She hadn’t.)
And I sketched, because sketching pushes me to think out those all-important transition points in a project. For example, should the costume’s waistband sit a Rosamund’s own natural waist, just behind her ribs? (Yes.) Should I attempt some sort of trompe l’oeil effect near the shoulders to suggest a strapless bustier? (No.) (NO.)
After that, I knit to the measurements–simple. Well, simple except when my math was wrong and my rate of decrease at the neckline was so slow that by the time I sensed a problem, the neck of the sweater was long enough to accommodate a baby giraffe.
Big Yellow Birdie
A gold eagle across the chest was a must, as we were paying homage to the 1940s/50s vision of the superhero in question.
I thought I might do the eagle in intarsia, but ultimately settled on duplicate stitch–a form of embroidery also sometimes called Swiss darning. (I don’t know why it’s supposed to be Swiss. I couldn’t find a truly plausible explanation anywhere. Switzerland isn’t the only place it’s found, and in fact doesn’t seem to be any more proprietary about it than any other country full of knitters.)
Why duplicate stitch?
Partly for ease of working. I wanted to knit the upper part of the sweater in the round, with steeks for the legs. Intarsia can be done in the round, most happily with Anne Berk’s “Annetarsia” method–as we saw in this series. But intarsia is best for large, solid shapes; the eagle, as I first charted it out, had rather a lot of detail.
I thought of knitting the gold and afterwards using duplicate stitch to embroider the red details. That would have been silly, though–duplicate stitch will (especially at a worsted gauge) stand out a bit from the base fabric. We wouldn’t want the background overshadowing the foreground. So why not knit with red and duplicate stitch in gold?
The other advantage to duplicate stitch: I could look at the finished chest, count the available stitches and rows, and figure out exactly where to place the eagle.
Eagle Charting
If you’re going to work a motif in duplicate stitch, most likely you’ll want to follow a chart. If you make your own, on ready-made graph paper with a square grid, beware of the distortion this will cause. Your knit stitches are unlikely to be square, unless you achieve a plain stockinette gauge in which your stitch and row counts are identical.
So in plotting a duplicate stitch chart, take advantage of so-called “knitter’s” graph paper, in which the grid is made up of rectangles that mimic the proportions of your stitches. A little Web searching will uncover multiple sources of printable papers, some of which will allow you to type in numbers from your swatch and get a custom grid. (I hesitate to link to any, because the addresses of such sites change constantly.)
Knitter’s graph paper will allow you to create a design with the confidence that your finished motif will not be distorted. I began by sketching mine with a pencil, then moved over (in the interest of saving time) to a computer program. About an hour of messing around got me to this point.
The working draft, jiggles and all.
The rough-and-ready cut-and-paste method I used in Adobe Illustrator to move the gold stitches around makes it rather jiggly, but it was enough to get a nod of approval from a friend whose comic book expertise I trust. I knew how many stitches and rows I had to work with because I was able to count them on the finished chest. (I counted three times, to make sure.)
With the chart ready and the sweater ready, I could start stitching.
Eagle Placement
Now, if you’ve never embroidered something like this before, you may well wonder how you know where to begin. The answer is that most embroidery (not all, most) will begin near the center of the design.
First, find the center of your chart and mark it with a line. Most often, you’ll mark the center horizontally and vertically. But you don’t have to do only that. You can mark whatever parts of the design you feel will help you keep track of where you are. On large designs like this, I often add guidelines either at regular intervals or (as with the eagle) along key points of the motif like the top and bottom of the body.
Here’s the chart with my guidelines added in white.
Next, you mark those same guidelines on your fabric. There are many ways to do it, but on knitted or crochet fabrics I prefer thread tracing.
Grab a highly contrasting yarn or thread, one that does not appear anywhere in the embroidery. In this case I’m using some spare white Simpliworsted. Thread it on your needle and sew a running/basting stitch lines in exactly the places your guidelines appear on the chart.
(I had to use my phone camera in the available lousy light on an airplane–therefore the lousy picture. I think it will, at least, show you the idea.)
Usually I’d prefer to use something finer to trace the lines, like a doubled strand of sewing thread. But as I was working away from home, on an airplane, without recourse to stash, I used what I had. That’s what you do. That’s life.
Once your fabric is marked, it’s merely a question of counting out from a guideline to your starting point of choice and beginning to embroider. As your thread-traced lines gradually grow superfluous, it’s okay to take them out.
So let’s talk about how duplicate stitch is worked.
Eagle Stitching
Duplicate stitch is one of the simplest forms of embroidery, and is so called because the embroidery stitches mimic the shapes of the knit stitches underneath. Ideally, once duplicate stitch is complete it looks as though the embroidery is part of the knitting. Often, it’s used to add small details to intarsia projects when just a stitch or two of a certain color is needed.
It can be done on stockinette, ribbing, and garter stitch; but it’s easiest to learn on stockinette.
You’ll want to use a blunt needle–the sort you use for weaving in ends is fine–and a yarn the same weight as the yarn you used to knit the fabric.
The basic stitch is no more than this:
Come up from the wrong side, at the base of the stitch to be duplicated–the point marked A in the diagram.
Insert the needle beneath the “shoulders” of the stitch as shown in the diagram and pull the yarn through.
Send the needle down to the wrong side again at point A, pulling the yarn through until the tension of the embroidered stitch matches the tension of the knitted stitch.
Come up at A, behind the shoulders of the stitch, and go down at A.
To duplicate a block of stitches, you’ll generally want to work in rows from the bottom to the top, right to left. (Left-handed embroiderers may prefer to work bottom to top, left to right.) So, our next stitch in the row begun above would start at the asterisk (see diagram below), and proceed as directed above.
Come up at the asterisk, which now serves as hole A, and repeat the directions above.
With every other row in a block of duplicate stitches, turn the work 180 degrees so that your first row is worked with the motif right-side up, the next with the motif upside-down. This isn’t strictly necessary, but may be less taxing on your fingers, and means you will always be working right-to-left or left-to-right. The stitching will be identical, though hole A will be above the stitch you’re duplicating rather than below it (see diagram below).
The first row of three stitches having been completed, the work is rotated 180 degrees. The first stitch of the new row begins at A.
For single columns of duplicate stitches (there are lots of those in the eagle), work from the bottom to the top.
Tips:
If you want to work different parts of the design with the same length of yarn, take care not to carry the embroidery yarn more than a scant inch across the wrong side. It gets messy, causing lumps that distort the right side of the work.
Start and end each length of yarn by leaving 6-inch tails on the wrong side of the fabric. When that group is complete, weave the tails under the stitches on the wrong side to secure them and trim the tail short.
That’s all there is to it. Stop and examine your work-in-progress frequently. Not only will this help you catch and fix errors before you are very far gone; but it may also help you improve your design.
I found as I worked that a lot of the stitches I’d charted to shape the top of the wings were overkill–I only needed about two blocks across the top to get a perfectly fine effect. Since tons and tons of duplicate stitching can interfere with the stretch and drape of a piece of knitting, paring it down to just what’s essential is always advisable.
The finished eagle:
Coming Up: Star Booty and Muffin Top
The costume also needed decoration at the other end: five-pointed stars across the tush. I could have used duplicate stitch for those, as well; but instead went with an embroidery stitch that gave me a far better result and was fun to work, too. In two weeks, I’ll give you the full details in glorious color.
The lasso is made from lucet cord–but that’s a topic for another day.
He travels constantly to teach knitters at shops and guilds across the country and internationally; and has been a popular member of the faculties of such festivals as Vogue Knitting Live!, STITCHES Events, the Maryland Sheep and Wool Festival, Squam Arts Workshops, the Taos Wool Festival, Sock Summit, and the Madrona Fiber Arts Winter Retreat.
Franklin’s varied experience in the fiber world includes contributions of writing and design to Vogue Knitting, Yarn Market News, Interweave Knits, Interweave Crochet, PieceWork, Twist Collective; and a regular columns and cartoons for Mason-Dixon Knitting, PLY Magazine, Lion Brand Yarns, and Skacel Collection/Makers’ Mercantile. Many of his independently published designs are available via Ravelry.com.
He is the longtime proprietor of The Panopticon, one of the most popular knitting blogs on the Internet (presently on hiatus).
Franklin lives in Chicago, Illinois, cohabiting shamelessly with 15,000 books, a Schacht spinning wheel, four looms, and a colony of yarn that multiplies whenever his back is turned.


 The stitches will be worked from the top down.