“Fridays with Franklin” is supposed to appear on Fridays. The clue is in the name. And today is Thursday.
But if I waited my turn, I wouldn’t have a chance to show you Rosamund’s Halloween costume before Halloween. So Makers’ Mercantile has graciously agreed to allow me to offer you this sneak peek.
In the pantheon of superheroes, there’s only one whose adventures I enjoyed as a child. The others bored me. Rosamund likes her, too; and is a princess, a protector, and a survivor in her own way.
She’s my little princess, anyhow.
The yarn is HiKoo Simpliworsted, and in these pictures it has already been once through the washer and dryer. Good stuff, for things that need to be washed and dried frequently.
In the next two installments of “Fridays with Franklin,” I’ll tell you more about how this was designed and worked–including an in-depth tutorials on the duplicate stitch eagle, and the embroidery of those stars. I’m rather proud of the stars. I’m also proud of the fit across the butt. Rosamund has such a curvaceous posterior. She gets it from my side.
(By the way, if you’re tuning in for the first time, you can jump back to the first “Fridays with Franklin” to learn what this column’s all about.)
He travels constantly to teach knitters at shops and guilds across the country and internationally; and has been a popular member of the faculties of such festivals as Vogue Knitting Live!, STITCHES Events, the Maryland Sheep and Wool Festival, Squam Arts Workshops, the Taos Wool Festival, Sock Summit, and the Madrona Fiber Arts Winter Retreat.
Franklin’s varied experience in the fiber world includes contributions of writing and design to Vogue Knitting, Yarn Market News, Interweave Knits, Interweave Crochet, PieceWork, Twist Collective; and a regular columns and cartoons for Mason-Dixon Knitting, PLY Magazine, Lion Brand Yarns, and Skacel Collection/Makers’ Mercantile. Many of his independently published designs are available via Ravelry.com.
He is the longtime proprietor of The Panopticon, one of the most popular knitting blogs on the Internet (presently on hiatus).
Franklin lives in Chicago, Illinois, cohabiting shamelessly with 15,000 books, a Schacht spinning wheel, four looms, and a colony of yarn that multiplies whenever his back is turned.
At the bottom was a note suggesting that I take the contents (the yarn and pompom, that is–not the sheep bowl) and make them into something. A challenge. A dare!
I’m as patriotic as the next knitter, but those colors were a curveball. Red, white, and blue is a charged combination for lots of folks–not only Americans–and it’s not often associated with chilly weather. To me, it shouts fireworks, barbecues, and swimming pools.
I briefly considered crocheting a 1970s Yankee Doodle bikini,
but
a) HiKoo Simplicity streeeeeeeeeeetches when soaking wet, and
b) I couldn’t think of any place to stick the pompom that wouldn’t be either ridiculous or indecent.
With three skeins of wool blend and a pompom, clearly I ought to make a hat. Alrighty, then.
Swing Time
The pompom was the key. I have in my albums a few photographs of my mother in full 1960s regalia: Mary Quant knock-offs meant to give Detroit teenagers some of the verve and spark of swinging Londoners.
I saw that in the winter of 1969 she had gone to Niagara Falls in an oversized newsboy cap topped with just such a big, fluffy faux fur pompom. It perfectly matched her dressy short overcoat, with equally fluffy faux fur collar and cuffs.
The effect was goofy, but fun–an ensemble for a party girl who didn’t mind if her clothes shouted a bit.
There was my answer–let the pompom be the crowning touch on a hat that was boldly graphic, happy, even silly. A hat with some swing, in Union Jack colors. You can accessorize with red, white, and blue in the winter. Sure you can. James Bond did, while parachuting off a precipice in the Alps.
It didn’t take long to realize that the effect I wanted didn’t come across in conventional, concentric stockinette stripes running ’round and ’round from the band to the crown. I’d seen that a million times. It wasn’t surprising enough to support the pompom.
I toyed with a few other ideas, like an asymmetrical Mondrian-inspired take on stranded colorwork.
That didn’t get far. It’s not a bad idea, though structurally it’s more suited to intarsia than stranding. I might come back to this one another time. But no matter what I did, in these colors I couldn’t get it to look anything other than an Uncle Sam hat gone horribly awry.
Over the Top
I’d ripped back to just the band for the fourth time when I thought about the garter stitch short rows in the cage purse. Those had been so much fun to knit. I could do the hat in garter stitch, right? No law against that. And I could also build it in successive short rows. Like this:
Each stripe would “eat up” two of the live stitches at the top of the band. The stripes would run across the top of the hat, instead of around the circumference. And there would be none of the usual decreases in the crown to interference with the progression of red, white, blue, red, white, blue.
Too Much of a Good Thing
Nothing gets me overexcited like trying out a new way to knit a familiar shape. I hate stopping to eat, or pee, or answer e-mails, or see people. I just want to go go go go go go until I find out whether it’s going to work or not.
I figured before I began that I’d need to increase in each stripe or the hat would be very short and fit like a teeny-weenie beanie. I planned the placement and rate of increases and zoomed along until in a gratifyingly short time the hat was almost off the needle. So I stuck it on my head.
I think the stitch markers really add to the je ne sais quoi.
Oh, yeah. Fetching. Yeah.
Those two weird outcroppings at the right and left would have to go–or the whole idea would have to go.
The diagnosis? The bulges were the fault of the constant, violent increasing–clearly I needed to slow it down a bit. I’d been so worried about the hat being too small that I made it too big. Too big at each side. It sprouted saddlebags.
The next version, with increases tapering off about halfway through, was better.
This better #@$!* work the second time, he thought.
I figured I could eliminate the remaining oddity in the shape with judicious blocking. HiKoo Simplicity is very malleable when wet.
As is my custom with any tam, I stretched the unblocked piece over a dinner plate. Rather than soak it, I pulled out my steam iron and shot the top and (especially) the turned edge with jets and more jets of very hot steam, until everything except the band was quite damp. (If your iron doesn’t have a steam jet option, you can do this over a boiling tea kettle if you promise to be careful with your fingers.)
Hover the hot iron near the fabric as you steam, but don’t touch the iron to the fabric.
I avoided steaming the band, because wet Simplicity stretches and a sopping wet band would have grown too large to fit properly. (Simplicity returns to its original dimensions after a spin in the tumble dryer–but then the entire hat would have come unblocked.)
Leaving the steamed hat on the plate, I set it aside to dry thoroughly overnight.
Drying things overnight is wonderful, because at some point exhaustion kicks in and I fall asleep and stop poking the piece every five minutes to see if it’s ready yet.
Crowning Touch
To find the exact center of the dry crown, I measured with the hat still on the plate and marked the spot with a locking ring stitch marker.
I tied on the pompom. (LOVaFUR poms tie on, so you can change them out and move them around if you like.)
I called over a friend who has the perfect look for a hat like this.
I held my breath. I put it on her.
I’m calling it a success.
I’m calling it groovy, baby.
I’m calling it…the Tricolor Muffin.
Coming Up…
Wouldn’t you know it, the yarn for the next project arrived while this hat was in progress. And wouldn’t you know, it’s also heavy on red, white, and blue–though this time in HiKoo Simpliworsted and with the addition of gold.
When I opened the box, somehow Rosamund (whom you may remember from The Adventure of the Warm Puppy and More Excuses to Show You Pictures of My Adorable Dog) knew the contents were intended for her. Smart girl.
Stop by in two weeks and I’ll show you what’s up.
In the meantime, we’ll be putting together a free pattern for the Tricolor Muffin. And if you don’t think you’re feeling quite up to the patriotic combo, we’ll have suggestions about other trios, other yarns, and other coordinating pompoms in the LOVaFUR line.
He travels constantly to teach knitters at shops and guilds across the country and internationally; and has been a popular member of the faculties of such festivals as Vogue Knitting Live!, STITCHES Events, the Maryland Sheep and Wool Festival, Squam Arts Workshops, the Taos Wool Festival, Sock Summit, and the Madrona Fiber Arts Winter Retreat.
Franklin’s varied experience in the fiber world includes contributions of writing and design to Vogue Knitting, Yarn Market News, Interweave Knits, Interweave Crochet, PieceWork, Twist Collective; and a regular columns and cartoons for Mason-Dixon Knitting, PLY Magazine, Lion Brand Yarns, and Skacel Collection/Makers’ Mercantile. Many of his independently published designs are available via Ravelry.com.
He is the longtime proprietor of The Panopticon, one of the most popular knitting blogs on the Internet (presently on hiatus).
Franklin lives in Chicago, Illinois, cohabiting shamelessly with 15,000 books, a Schacht spinning wheel, four looms, and a colony of yarn that multiplies whenever his back is turned.
I really enjoy reading and collecting knitting books, but I have a special place in my heart – and on my craft room shelves – for stitch dictionaries. Several months ago, when I first saw the announcement about Interweave’s new book Alterknit Stitch Dictionaryby Andrea Rangel, I immediately got excited and knew it would soon become part of my library. Like most people in this industry I have a craft room in my home, complete with shelves upon shelves of books. Vintage and new stitch dictionaries share the shelf, and for the most part, they offer traditional or traditional-inspired motifs. When this book arrived, I realized it was unlike the majority of books in my collection.
Flipping through the book for the first time, I was impressed with the wide array of Andrea’s color-work charts. Being a pretty conservative guy, I definitely enjoyed seeing her version of standard, classic geometric motifs. What really surprised me, was how much I enjoyed and was inspired by her less conventional designs! She has masterfully addressed more contemporary shapes and filled the pages of this book with unexpected patterns.
Motifs such as the Escher-inspired bats (page 70) could easily become a pattern on socks or gloves!
When I turned to the Broken Shield chart (page 89), I imagined a fun blanket with blocks of this pattern in in different colors. I like how the lines play with each other in this design… it’s such a neat optical illusion.
…and then things got really fun! I have never seen a pattern book with a “Poopin’ Pig” chart in it (Page 115)! Andrea, you’ve really made some designs that made me smile!
She has truly included options for all knitters!
The book then goes a step further and offers several full patterns that incorporate some of her motifs – included are mittens, a hat, a cowl, and a couple sweaters.
I think what I like most about stitch dictionaries is that they inspire me to think. To think about what I would make for myself with a certain motif or who would be the perfect recipient for the wacky Poopin’ Pig design! This book really is full of inspiration, and judging from how inspired I am after spending an afternoon reviewing its offering, I’m certain it will guide me from project to project for years to come!
Happy Making!
-Chuck
About
Chuck Wilmesher is the Director of New Product Development for Skacel Collection based just outside of Seattle, WA, and spends his days working to create new products for us to enjoy. He is also an avid knitter and fiber fanatic.
I almost feel as though this week I should begin with an apology for the lack of drama in what follows.
I try to give you a good read, truly I do, with laughs and thrills and the occasional car chase; but you can’t, as my grandmother famously said while on a date with Mick Jagger, always get what you want.
There are knitters who steer clear of making purses and bags on principle, just to avoid woven linings. This is a great pity. A knit or crochet bag with a woven lining will be stronger and more durable, less inclined to droop and pull out of shape, and less liable to catch and snag everything you put into it.
And sewing is not (or at least, need not be) the trauma some think it is. A simple bag lining is about as simple as sewing gets. More about that in a minute.
Make It Snappy
Now, the “official” pattern that comes with cage purse kits is available as a free download from Makers’ Mercantile. I used it as my guide for designing a lining of my own, and as usual I decided to make some adjustments. I don’t think I’ve ever followed anyone’s pattern exactly as written.
I decided to install the snaps, which are included with the cage,
before sewing in the lining, whereas the pattern suggests you do the reverse. On your purse, you choose.
If you’ve never put in a snap before, rest assured these are a breeze. Since my bag was quite freeform at the top, I put it into the cage to see exactly where the male* halves of my snaps (pictured above) needed to be in order to line up with the female* halves of the snaps on the cage (which come already installed). I marked these spots on the liner with locking ring stitch markers.
Then you make a little sandwich with each snap, one by one, like this…
…with the post on the back of the snap stuck right through the knitted fabric.
Then you place the cylinder tool…
over the nubbin on the front of the snap, and tap the cylinder with a hammer. I do mean tap. Brute force is not required. It took me two modest taps to get each snap set firmly. Boom.
I’ve never felt more butch.
The knitted portion of my liner being thus completed, it was time to add the woven lining.
Line It Up
The official pattern for the cage purse gives full instructions for this part of the project, so I’ll confine myself to a few notes about linings generally.
First. Use the best woven (as opposed to commercial knit/jersey) fabric you can afford. It need not be expensive; but if you have the choice, buy from a reputable retailer who carries reputable lines.
If you buy in person, give the fabric a good fondle and a few firm tugs. If it looksflimsy and feels sleazy, if the printing is muddy, if it seems inclined stretch out of shape easily, if you can read a comic book through it, it probably won’t stand up well to the demands placed on a handbag. It may, in fact, fall apart as you sew with it. Fabrics whose standard retail prices are super cheap are usually super cheap for good reason.
…because in my social circle, it’s inevitable that whoever gets this purse is going to stuff it with balls of yarn. She will probably also have at least one cat.
Note: The lighting in this shot tipped the blue quite a bit. It’s really far closer to the navy in the previous photograph.
Second. Don’t skimp on the preparatory steps.
Sewing has a different flow than either knitting or crochet. Both knitting and crochet consist, in the main, of knitting and crocheting. Other stuff–seaming, blocking, weaving in–comes in at the end. We front-load the fun. Sewing insists that you begin with planning, measuring, cutting, pinning. It takes time to get to the sewing part of sewing.
This feels ass-backwards somewhat odd to those of us who knit and crochet.
Listen. If you hate the preliminary steps, that’s okay. Acknowledge that. Embrace that. Then take a breath and do them anyway. It may help to have a good friend supervise you.
“After you weave in all those ends and take your measurements, you may have a cookie.”
Since my liner pattern was something I cooked up myself, I measured the end product to be certain it would accommodate the lining described in the official pattern. Turns out my liner was a smidge taller and a smidge narrower. I adjusted my cut pieces accordingly.
Measure twice, cut once. Maybe measure three times.
Third. Don’t let unfamiliar techniques frighten you.
When I teach Introduction to Hand Sewing, we end our class project with slip stitch–the same stitch that joins the woven lining to the knitting liner. Students often approach slip stitch with trepidation because it looks like a magic trick. You sew and sew, and when you’re finished you can’t see the sewing. You just have two fabrics that are now joined, invisibly.
Cool, right?
And you can do it. Yes, you can. Most of what used to be called plain sewing–the toolkit of handmade stitches necessary to turn out everyday items–was taught as a matter of course to little girls for centuries.
Are you going to let some little Dickensian imp in a dirty pinafore sew circles around you?
Heck no.
Here is all there is behind the “magic” of slip stitch.
After the lining pieces have been sewn together, turn and press the lining fabric to the wrong side as directed in the pattern.
Kindly note my new, adorable fire engine red Bohin embroidery scissors in background.
Place the liner inside the lining…
…and secure it with a generous number of straight pins so that you can focus on your stitching.
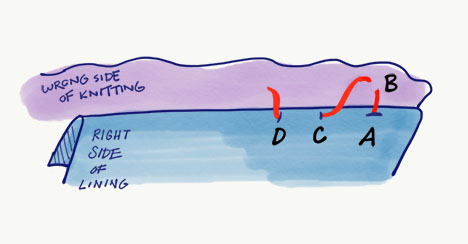
Step One.
Thread your sewing needle with a coordinating thread, and tie a stout knot at the end.
Bring the needle up through the fabric at point A, which you will notice is right on the fold of the lining. (Alternatively, especially if the ghost of my late grandmother is watching you, instead of using a knot you may secure the beginning with a series of tiny stitches at point A. This is called a “tack.”)
Step Two.
Take a small stitch in the liner (knitted) fabric at Point B (directly above Point A, near the top edge of the woven lining). Note: My stitches into the liner all went around–rather than through–strands of yarn, as this felt more secure than splitting strands with the sewing needle.
Step Three.
Take a horizontal stitch into the fold+ of the woven lining by putting the needle in at Point C and out at Point D.
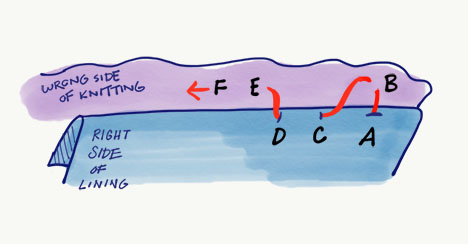
Step Four.
Take a horizontal stitch into the knitted liner from Point E to Point F, near to and parallel to the top edge of the woven lining.
Repeat Steps Three and Four all the way around the liner. Every few stitches, gently pull the thread to even out the tension of the sewing stitches. You want the lining to lie smooth against the liner– don’t pull so hard that puckers begin to form. When the seam is complete, fasten off with a discreet, small tack in the woven lining.
That’s it.
+Some say just behind the fold. Your choice. In sewing, as in knitting and crochet, there are many paths to the same destination.
In the Bag
What else can I say? I’m really pleased with it. I wanted the sinuous lines of the short rows to wiggle and play against the straight edges of the cage, and they do.
It could be about an inch bigger all around at the base, to really fill up the cage; but that’s about all I’d change.
What’s more: as the liner is held to the cage with snaps, it can be removed and replaced with any number of other linings whenever inspiration strikes or your mood changes.
It didn’t even take long to knit–comparable to a hat. I’m already thinking of other liners–crocheted, embroidered, woven. And other yarns, too. These were all left over from previous Fridays with Franklin projects, but they could have been:
assorted lengths of handspun…
souvenir yarns collected on a memorable trip…
the leftover yarn from a favorite sweater for a matching sweater/purse combo
bits of yarn (and blobs of knitting) contributed by a members of a group to make a special farewell or birthday gift…
And the yarns you put into a cage liner are right there, with you, visible and useful. A souvenir afghan is lovely, but it usually has to stay at home. Not to mention that the usual everybody-knit-a-square afghan requires a lot of work and a mountain of yarn. A souvenir/commemorative cage purse is well within the grasp of knitters or knitting groups who are short on cash, pressed for time, or just plain lazy.
Coming Up
The next Fridays with Franklin will be the first in which I get to use a vise and power tools. That’s all I’m telling you right now. Nope, sorry. My lips are buttoned.
*I’m not trying to be cute. That’s what they’re called.
He travels constantly to teach knitters at shops and guilds across the country and internationally; and has been a popular member of the faculties of such festivals as Vogue Knitting Live!, STITCHES Events, the Maryland Sheep and Wool Festival, Squam Arts Workshops, the Taos Wool Festival, Sock Summit, and the Madrona Fiber Arts Winter Retreat.
Franklin’s varied experience in the fiber world includes contributions of writing and design to Vogue Knitting, Yarn Market News, Interweave Knits, Interweave Crochet, PieceWork, Twist Collective; and a regular columns and cartoons for Mason-Dixon Knitting, PLY Magazine, Lion Brand Yarns, and Skacel Collection/Makers’ Mercantile. Many of his independently published designs are available via Ravelry.com.
He is the longtime proprietor of The Panopticon, one of the most popular knitting blogs on the Internet (presently on hiatus).
Franklin lives in Chicago, Illinois, cohabiting shamelessly with 15,000 books, a Schacht spinning wheel, four looms, and a colony of yarn that multiplies whenever his back is turned.
I was at a gathering once with a knitter who held up her shawl-in-progress and squealed, “This has been so much fun to knit! I’m actually slowing down because I don’t want it to end!”
I had no idea what she was talking about.
I am often sick to death of even a fun project weeks…months…years…before I bind off. This is nothing to boast of, and explains the shameful state of the dimmest corner of my workroom. There lie projects that it would be wrong to describe as “hibernating,” unless you would agree that the buried and fossilized remains of cretaceous reptiles are just having a nap down there.
…was so much fun to work on that I had to force myself to stop and bind off.
There were no great departures from the plan I tested in the miniature version. I knit the oval(ish) bottom in HiKoo Simpliworsted 952 (Peacock Tonal), beginning at the center with Judy’s Magic Cast On…
Please take a moment to admire my handsome bottom. Thank you.
…and was even more pleased with the results this time, since I used stitch markers right from the start and therefore didn’t misplace my increases quite so often.
When the bottom was big enough, I took stock of how many live stitches I had (answer: 108). This divides obligingly into four, which settled the question of how many stitches I’d use as the basis for each short-rowed blob of color (answer: 27). Since the bag would have no further shaping, it would always take me about four blobs* to go around once.
Given that I’d be using four different yarn bases in eight different colorways, I felt sure I could use a consistent base number without the blobs looking too much alike. I really wanted to avoid uniformity, to give this bag an organic feel, like layers of sediment** that had built up naturally atop one another.
Here is the recipe for a blob:
Row 1 (RS): Join the new color, knit 27 stitches. Wrap and turn a stitch in the adjacent blob (see part two).
Row 2 (WS): Knit all stitches in the new color. Wrap and turn a stitch in the adjacent blob.
Row 3 (RS): Knit to penultimate stitch of blob (1 stitch less than previous row). Wrap and turn.
Row 4 (WS): As Row 3.
Repeat Rows 3 and 4 until blob reaches desired blobbiness, ending with a WS row. Break working yarn, leaving a tail of 5-6 inches to weave in later.
Turn work. Slip the live stitches of the just-completed blob from left needle to right needle as if to purl until your right needle tip is wherever you’d like the next blob to begin. Begin again from Row 1 for next blob.
For added verve, vary the length and/or starting point of some blobs by a stitch or two. Pretty much anything you do is going to look interesting and quite possibly beautiful.
Tiny tip: when joining in each new color, leave the tail hanging on the right side of the fabric like this:
When you join a new yarn, let the tail hang on the right side of the work.
As you work, the tail gets pinched between the stitches on either side; and your first stitch won’t pull loose quite so readily as when you leave the tail hanging on the wrong side. (When it’s time to weave in ends, just bring the tail through to the wrong side and proceed as usual.)
…whereas HiKoo Rylie was so fine in comparison to Kenzington and the various forms of Simpliworstedthat I decided to knit it with a strand of each colorway (086 Periwinkle and 087 Freesia) held double.
I was thrilled with the blend.
Good blobs, on the whole; but as they all came from the bright-blue-into-purple camp I was afraid the bag might tip over into something too sweetly candy-colored for my taste.
I decided to run a occasional stripe of this through the fabric to break things up. Since the two colors of Rylie had worked so well together, I decided to try a strand each of colorways 980 and 7653 together….
…and you could see it from fifteen feet away. It screamed. So I ripped back and tried again with two strands of 7653 together.
Better. Rather than short-rowed blobs, these occasional bits of Leinen Los were short-rowed stripes. In other words, work all the way from the first stitch of the round to the last, wrap and turn, and knit back in the other direction. I could have knit a round and then purled a round–but I was having so much fun with the short rows I didn’t want to stop.
In fact, my enthusiasm never flagged. When at length it struck me that I ought to take a measurement and see if I’d made the bag tall enough, I was an inch over the target.
You know what? I really like it.
Once the ends have been woven in, I’ll give it a wet block to settle it into to its final proportions.
Then, the final step before it goes into the cage: a woven fabric lining. I love a woven lining in a knit or crocheted bag. I plan to plunder with pleasure the Makers’ Mercantile lines of lovely cotton prints. Did you know Makers’ Mercantile carries deluxe cotton prints, among other fabrics and trims?
He travels constantly to teach knitters at shops and guilds across the country and internationally; and has been a popular member of the faculties of such festivals as Vogue Knitting Live!, STITCHES Events, the Maryland Sheep and Wool Festival, Squam Arts Workshops, the Taos Wool Festival, Sock Summit, and the Madrona Fiber Arts Winter Retreat.
Franklin’s varied experience in the fiber world includes contributions of writing and design to Vogue Knitting, Yarn Market News, Interweave Knits, Interweave Crochet, PieceWork, Twist Collective; and a regular columns and cartoons for Mason-Dixon Knitting, PLY Magazine, Lion Brand Yarns, and Skacel Collection/Makers’ Mercantile. Many of his independently published designs are available via Ravelry.com.
He is the longtime proprietor of The Panopticon, one of the most popular knitting blogs on the Internet (presently on hiatus).
Franklin lives in Chicago, Illinois, cohabiting shamelessly with 15,000 books, a Schacht spinning wheel, four looms, and a colony of yarn that multiplies whenever his back is turned.
“I felt this piece ought to be as simple as possible.”
And I’d written this:
“This piece will be nothing but garter stripes.”
Ha. Haha. Hahahahahahahahahahahahaha.
Nice Bottom
After I’d posted Options 1 and 2…
…of course Options 3, 4, 5, 6, 7, 8, and 9 presented themselves at the darnedest moments. Walking Rosamund, waiting for the subway, showering, listening to upstairs neighbor’s kid practice her tap dancing at 4 a.m.
The more I turned over the ideas, the more I felt I’d like work the liner all in one piece. What about a bottom worked circularly? Could I do that?
It seemed to me I could.
This was my sketch.
The cast on you see referenced there is, of course, Judy’s Magic Cast on by the (let us now praise famous knitters) Judy Becker. She describes how to do better than I ever could, here at Knitty.com.
Judy invented it as a gorgeous and fuss-free beginning for toe-up socks, but I’ve never used it for toe-up socks. I’ve used it countless times, though, as either the circular beginning of a piece I want to grow outwards from the center; or whenever I want a cast on to work first in one direction (from the bottom row of stitches), and then in the other (from the top row).
(You may have noticed that the swatch, when it would no longer lie flat on one circular needle, got moved to two circular needles. A very slick designer would have put it on two identical addi® Olive Wood circulars so it would look pretty for the photograph. I, on the other hand, often make design decisions based on what’s closest to the couch. And this is a column about the realities of creativity. So here it is on one olive needle and one needle (of the same size, at least) from my set of addi® Click Interchangeables. Sue me.)
The above is what I think of as a proof-of-concept swatch–concrete evidence that the basic idea has merit. Even though I messed up the placement of my increases now and again (until I broke down and added the stitch markers), and even though I got an oval instead of a rectangle, the bottom is handsome and lies down as required.
I’m pretty sure I could move towards a rectangle by diddling the increase points, but I’m starting to groove on the idea of a curvy bag in a square cage.
Bonus: I don’t have to do a darn thing to get the sides going–just continue to work around on the live stitches, without further increases.
When I had swatched enough to convince myself this would be a suitable foundation, I decided to nail down a strategy for the sides.
Short Cut
Just garter stripes, right? That’s what I said. Just garter stripes.
Since these theoretical garter stripes would continue in the round, I’d have to purl every other row. I don’t mind purling. The bottom of the bag was purled on every other round.
But I’ve sometimes worked a “circular” piece of garter stitch with short rows. Usually I do it because my purl stitches and knit stitches are slightly different sizes. In some yarns, especially those with little stretch, that leads to “rowing out”–clearly visible differences in gauge from round to round. If I’m never purling, I’m never rowing out.
Short rows aren’t complicated. A short row is just a row you cease to knit before you reach the end. Instead, you turn the work and head back in the other direction. That’s all. Where you turn, you may form a gap in the fabric–but that, too is easily dealt with. More on that in a minute.
So, okay. I thought about using short rows in the bag to avoid rowing out. I hadn’t done it in multiple colors before. Feeling a little timid, I joined a new color to the bottom. Before I knew it, I was a bored with the idea of stripes.
I mean, stripes. Come on.
Even in all these different yarns and colors, stripes are just stripes.
What if I really pushed the short row idea, building up areas of each color before moving on to the next? Could I do something like this?
Only one way to find out.
Short ‘n’ Curvy
I decided to try this process for each new section of color/yarn.
1. On the right side, join in the new color (here, it’s HiKoo Simpliworsted in 033 Red Hat Purple) and knit some number of stitches. My first thought was to make it a pretty random number, since this a random jumble of leftover yarns I’m working with.
2. At the end of this first row, perform a wrap-and-turn to help prevent a gap at the turning point. A wrap and turn isn’t difficult. Just knit to the turning point, and slip the next (unworked) stitch from the left needle to the right needle as if to purl.
…then bring the working yarn between the needle tips to the near side of the work…
…then return the slipped stitch to the left needle….
Turn the work. Carry on knitting. Since we’re making garter stitch, the working yarn will already be where you need it to be, on what is now the far side of the work. That’s it. (Note: In most stockinette stitch short row techniques, there’s a maneuver for for picking up a wrap the next time you encounter it. In garter stitch, we don’t need to do that. Yay.)
3. Make each row one stitch shorter than the previous row. Wrap and turn at the end of every row. After you’ve done this for a little while, you’ll have built up a sweet little blob of color.
4. When you feel that the blob is just about the right size, or when you can’t get any shorter with your rows, finish a wrong side row and then knit part of the way across a right side row.
5. At this point, join in a new color for the next blob, on this same right side row. You’ll be back at Step 1.
Working in this fashion will gradually take you all the way around the live stitches at the edge of the bottom–and when you’re back to the beginning, just carry on with more short row blobs in different colors until the bag is as tall as it needs to be.
Such is my theory, anyhow. How did the swatch look?
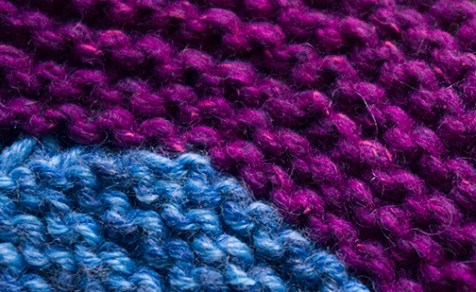
After doing this with three different colors (and two different yarns) on my swatch…
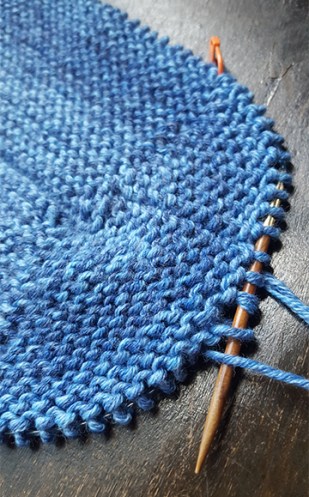
…I decided to take the piece off the needles and see what I was getting.
I’m excited. I think the curvy top selvedge is something we might want to accentuate.
With a little more swatching to refine the details, I feel confident we’ll be on the way to a fun to knit (and fun to look at) liner for the purse.
He travels constantly to teach knitters at shops and guilds across the country and internationally; and has been a popular member of the faculties of such festivals as Vogue Knitting Live!, STITCHES Events, the Maryland Sheep and Wool Festival, Squam Arts Workshops, the Taos Wool Festival, Sock Summit, and the Madrona Fiber Arts Winter Retreat.
Franklin’s varied experience in the fiber world includes contributions of writing and design to Vogue Knitting, Yarn Market News, Interweave Knits, Interweave Crochet, PieceWork, Twist Collective; and a regular columns and cartoons for Mason-Dixon Knitting, PLY Magazine, Lion Brand Yarns, and Skacel Collection/Makers’ Mercantile. Many of his independently published designs are available via Ravelry.com.
He is the longtime proprietor of The Panopticon, one of the most popular knitting blogs on the Internet (presently on hiatus).
Franklin lives in Chicago, Illinois, cohabiting shamelessly with 15,000 books, a Schacht spinning wheel, four looms, and a colony of yarn that multiplies whenever his back is turned.
It scarcely seems possible, but by the close of this series we will have reached the fiftieth installment of Fridays with Franklin. Fifty! Can you imagine?
I was flipping through my binder of shade cards from Makers’ Mercantile looking for the next yarn to play with when my elbow knocked over a little basket of yarn that was sitting on the work table. Odd balls of yarn spilled all over the floor. Or they would have, if they’d hit the floor. Instead they spilled all over the four open boxes on the floor that were already full of other odd balls of yarn. You couldn’t actually see the floor.
It appears that nearly fifty columns full of knitting, crochet, and weaving have landed me with quite the buffet of leftovers.
That’s not something to cry about, I know; but please keep in mind that I live in a large city and do my work in a very small room. How small? Not much larger than the footprint of a king-sized bed. It is crammed, absolutely crammed, with things I need. Here, I’ve drawn you a little plan:
Of course, what you don’t see in the plan are the things I have hanging from the walls and ceiling, including my Schacht Cricket Rigid Heddle Loom, my card weaving loom from John Mullarkey, my swift, my project bags full of things in progress, and other hanging bags full of weaving, spinning, and embroidery tools. Every inch is spoken for.
I try to keep leftover yarns organized and sorted into the bins under the bed in the next room. That’s the place where, by mutual agreement, my stash lives. If it won’t fit under the bed it has to leave the apartment. Fortunately, it’s a big bed. Good intentions don’t sort skeins, though; so I have a perpetual backlog on the workroom floor. The prettiest little tripping hazard you ever saw.
Seeing as we’re celebrating a milestone of sorts with this adventure, I think it’d be fun (and prudent) to hold back from ordering new stuff and make use of what’s already to hand.
These are wildly different yarns, in wildly different fiber blends, constructed in all manner of methods from chainette (Kenzington) to felted singles (Leinen Los).
Pushing the pile around didn’t give me fun ideas for using them all together. An obvious choice would have been some sort of scrap blanket, but one of the yarns (Leinen Los) isn’t really well suited to that. A scrappy shawl might be fun–but a shawl made with a significant quantity of hefty Kenzington might suffocate you.
Then I got a note from one of my friends at Makers’ Mercantile in which she mentioned one of their most popular kits–the Cage Purse. You may well have seen a friend with one of these, or you may well have one yourself.
The cage bit…
…comes ready to use. The fun is knitting (or crocheting) a liner for it. The open cage supports your work, which means you don’t have to resort to felting in order to get a bag that won’t droop and sag when you fill it. And because it’s a cage–well made from good leather and handsome, sturdy rivets…
…whatever sort of liner you create is beautifully shown off.
Makers’ Mercantile sells the cages as part of several kits (like this Brown Kit, or the Red Kit shown below) – each with yarn, pattern, and fabric for a lining…
…or you can buy just the cage (in a choice of colors such as Basil) and use your imagination. That’s what I decided to do.
…had so much going on (miters! shadow knitting! duplicate stitch! I-cord!) that I felt this piece ought to be as simple as possible. When you have four very different, eye-catching yarns in eight or ten colorways all smooshed together, I think it’s unwise to make the structure of the fabric complicated as well.
So, what’s the least complicated knit fabric? Probably garter stitch: when working flat, knit all stitches and all rows. I cast on for a small swatch…
…and within a few inches I got that tingle in my chest that either means I’m onto something I like, or that I shouldn’t eat half a pan of brownies right before bed. I hadn’t been eating brownies.
This is nothing but garter stripes with changes from yarn to yarn at will. Most of the colors are fairly closely related (clearly I have a thing for purples and blues), but as we noted the yarns themselves are strange bedfellows. And I like that. The fabric was looking good, and the swatch was (brace yourself) fun to knit. Truly fun.
When you find yourself smiling at a swatch, that’s a good sign.
I sketched out what I needed to make. Pretty simple, really.
All that remained before calculating my cast-on numbers was a plan for how to make that happen. There were two obvious options.
Option 1…
…was flat construction. Knit panels and sew them together. That would make sense, as garter stitch is a natural result of flat knitting. I don’t mind sewing–it’s quite fun, really, once you know a little bit about what you are doing–and the side seams would give the bag some structure.
On the other hand, a seam sewn in a fabric with this many yarns would never be invisible. Not a deal-breaker, but a point to consider. It also might be tricky to sew a good seam when joining panels where two very different yarns are meant to align at the selvedges. In fact, just getting all four sides to be exactly the same length might be a challenge.
Option 2…
…was primarily circular construction. Knit the bottom as a flat panel, then pick up and knit around the edges and work the body of the bag in the round. Without doing anything special at the corners, this bag would have softly contoured sides. It might be possible to give those corners a touch more definition using Elizabeth Zimmermann’s “phoney [sic] seams” technique–slipping the corner stitches every other round.There would be no sewing. But every other round, in order to make garter stitch, would have to be purled.
Either way, we’re talking about a ton of ends to weave in. Happily, I like weaving in ends.
He travels constantly to teach knitters at shops and guilds across the country and internationally; and has been a popular member of the faculties of such festivals as Vogue Knitting Live!, STITCHES Events, the Maryland Sheep and Wool Festival, Squam Arts Workshops, the Taos Wool Festival, Sock Summit, and the Madrona Fiber Arts Winter Retreat.
Franklin’s varied experience in the fiber world includes contributions of writing and design to Vogue Knitting, Yarn Market News, Interweave Knits, Interweave Crochet, PieceWork, Twist Collective; and a regular columns and cartoons for Mason-Dixon Knitting, PLY Magazine, Lion Brand Yarns, and Skacel Collection/Makers’ Mercantile. Many of his independently published designs are available via Ravelry.com.
He is the longtime proprietor of The Panopticon, one of the most popular knitting blogs on the Internet (presently on hiatus).
Franklin lives in Chicago, Illinois, cohabiting shamelessly with 15,000 books, a Schacht spinning wheel, four looms, and a colony of yarn that multiplies whenever his back is turned.
This morning, when what was to have been the final word on the mitered, shadowed HiKoo Llamor cowl appeared online, I took a fresh look at that duplicate stitch embroidery.
It was…fine. Scattered around like speckles, albeit speckles (as I wrote) speckles for a control freak, since I was able to put them exactly where I wanted them.
Fine is fine, but don’t you hate settling for fine?
On a human neck–because that’s where a cowl counts–the piece as a whole had some of the verve I wanted, what with the happy jumble of stripes going every which way.
But the duplicate stitches in pink, the color I loved best, the key to everything, weren’t doing much. A strong color should not make a feeble show.
I ripped ’em all out and started again. This time, I echoed the triangles in the knitting with the embroidery, all the way down the line.
That was more like it.
Now, as far as I’m concerned, the piece is finished. Maybe another adjustment here or there; but the embroidered triangles are amplifying the iridescent effect I was hoping to create with the use of shadow shadow knitting.
I am not displeased. I think this might even be worthy of writing up a pattern, if folks are interested.
I’m going to call it–in honor of certain Amazon princess and her countrywomen–“Amazon’s Arrows.”
It’s not a tough knit at all, you know. Any advanced beginner should be able to handle it readily, and seasoned pros might enjoy the novelty of the construction. What do you think?
And now…back to work on our next adventure. See you in two weeks!
Tools and Materials Appearing in This Addendum
HiKoo® Llamor (100% baby llama; 109 yd per 50g ball), available in the Peruvian Palette, the Natural Palette, and the Carnival Palette Skacel Buttons from the Corozo, Agoya Shell, and Horn lines addi® Olive Wood Circular knitting needles used to work the entire project
He travels constantly to teach knitters at shops and guilds across the country and internationally; and has been a popular member of the faculties of such festivals as Vogue Knitting Live!, STITCHES Events, the Maryland Sheep and Wool Festival, Squam Arts Workshops, the Taos Wool Festival, Sock Summit, and the Madrona Fiber Arts Winter Retreat.
Franklin’s varied experience in the fiber world includes contributions of writing and design to Vogue Knitting, Yarn Market News, Interweave Knits, Interweave Crochet, PieceWork, Twist Collective; and a regular columns and cartoons for Mason-Dixon Knitting, PLY Magazine, Lion Brand Yarns, and Skacel Collection/Makers’ Mercantile. Many of his independently published designs are available via Ravelry.com.
He is the longtime proprietor of The Panopticon, one of the most popular knitting blogs on the Internet (presently on hiatus).
Franklin lives in Chicago, Illinois, cohabiting shamelessly with 15,000 books, a Schacht spinning wheel, four looms, and a colony of yarn that multiplies whenever his back is turned.
I find that so often that the finishing touches on project can make or break it.
After weeks of fooling about with the structure, the mitered shadow cowl in HiKoo Llamor had reached full length.
But it was missing something.
This pink (1775):
Before I go any further, remember that color choices are always personal. You may look at that pink and cringe. You may hate all pinks, or that pink in particular. You may look at the full length of the cowl and feel that there is already, if anything, too much color packed into it without adding more.
To my eye, though, these foreground colors–unto and including the orange (1752)–are all muted. Dimmed. Pretty, but subdued. My intent was a piece full of energy. The crowd needed a brilliant party-starter to wake it up. Therefore:
My first thought was to throw one ridge of the pink into a garter border running right round the edges. A test showed pretty quickly that even a narrow border like that…
…was too much. Too heavy, visually, for the piece. There’s so much pattern in the center that even garter stripes at the edge were de trop. I wanted a party. Not a riot.
Yet–is there not always a yet?–the cowl needed an edge treatment. Not only for color, but–is there not always a but?–for structure. HiKoo Llamor, being 100% baby llama, is buttery soft and superbly warm. It also drapes like crazy. That’s fabulous, unless the drape is so uncontrolled that the cowl sags around the neck like a wet rag and all the fancy mitering and shadowing has been for nothing.
I turned to an old ally, applied I-cord.
There. Yes. Color (but not too much) and structure.
I Need Closure
This was supposed to be a cowl, not a scarf, so it needed to close into a tube. That meant buttons. Lucky for me, Makers’ Mercantile is gearing up to present the entire (gigantic) line of Skacel Buttons.
Skacel Buttons is a new enterprise, so I was given special permission to dip into stock before it became generally available. If you want to see the full range, you can get a peek here–but do please keep in mind that you’re looking at a wholesale site. This means you can’t order directly from Skacel. If you see something you like, and you will, ask your favorite yarn, craft, or sewing retailer to order for you. The lines have just hit the market this season, so they’re ready when you are.
I asked to play with four different styles.
From the Corozo line…
From the Agoya Shell line…
From the Horn line…
And engaged in the time-honored custom of laying them on the fabric and pushing them around and squinting…
…until I determined that the iridescence, shape, and color of the Agoya Shell buttons were just right. Interesting, eye-catching, yet quiet enough to play second fiddle to the yarn.
I churned out a little more of the I-cord, unattached,
to create three button loops. Everything got sewed on.
And, done! Well. Sorta done! Not quite done.
Because now the pink at the perimeter was so very pink that the center was sunk into gloom. It needed a lift.
Out came the tapestry needle. I spent a pleasant hour duplicate stitching random bits of pink into the stockinette stripes of the rectangles. Think of it as speckled yarn for control freaks.
Better.
Success?
Hmm.
When the cowl is worn, the flickery effect of the shadow work appearing and disappearing isn’t as pronounced as I hoped, though it’s certainly there.
I think my ultimate idea–a blanket–might show it off more because there’d be more surface area. On the other hand, the color work is handsome enough that I don’t feel too crushed. But still…it needs…
Wait a minute. Wait wait wait. This will be the first Fridays with Franklin with an Afternoon Addendum. Yes.
Our next adventure starts in two weeks. But I’ll be back here in a few hours. I need to go get my scissors.
Tools and Materials Appearing in This Issue
HiKoo® Llamor (100% baby llama; 109 yd per 50g ball), available in the Peruvian Palette, the Natural Palette, and the Carnival Palette HiKoo Kenzie(50% New Zealand Merino Wool, 25% Nylon, 10% Angora, 10% Alpaca, 5% Silk Noils; 160 yd per 50g ball) – used as the background in the button photographs Skacel Buttons from the Corozo, Agoya Shell, and Horn lines addi® Olive Wood Circular knitting needles
He travels constantly to teach knitters at shops and guilds across the country and internationally; and has been a popular member of the faculties of such festivals as Vogue Knitting Live!, STITCHES Events, the Maryland Sheep and Wool Festival, Squam Arts Workshops, the Taos Wool Festival, Sock Summit, and the Madrona Fiber Arts Winter Retreat.
Franklin’s varied experience in the fiber world includes contributions of writing and design to Vogue Knitting, Yarn Market News, Interweave Knits, Interweave Crochet, PieceWork, Twist Collective; and a regular columns and cartoons for Mason-Dixon Knitting, PLY Magazine, Lion Brand Yarns, and Skacel Collection/Makers’ Mercantile. Many of his independently published designs are available via Ravelry.com.
He is the longtime proprietor of The Panopticon, one of the most popular knitting blogs on the Internet (presently on hiatus).
Franklin lives in Chicago, Illinois, cohabiting shamelessly with 15,000 books, a Schacht spinning wheel, four looms, and a colony of yarn that multiplies whenever his back is turned.
Looking at my little heap of Hikoo Llamor shadow knit mitered squares–version 2.0–I found myself wanting to simplify the piece even further.
These squares made less noise, but they were still squares I’d need to sew together. No matter how I might arrange them, seam lines would be a distraction.
Turning over ideas, I noted that if you make a mitered square like this:
then it stands to reason that you make a mitered rectangle like this:
and that could be interesting. (If you’re unfamiliar with the basic principle behind the mitered square in knitting, take a look at Part Two of this adventure.)
I intended the cowl to be two mitered squares high. Working each pair of squares as a single mitered rectangle would eliminate half the seams while giving me the same changes in grain. Groovy.
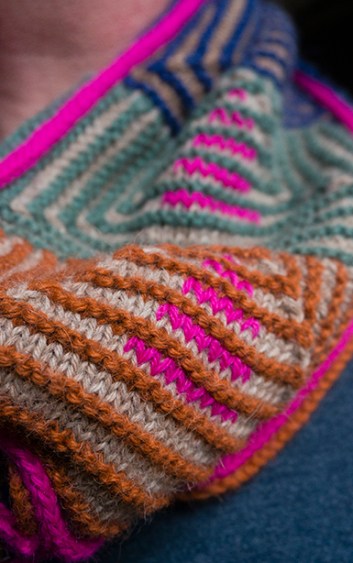
The effect in shadow knitting, viewed from the long edge, should be a large central triangle in a solid color, while the smaller triangles at either side would be in stripes.
Viewed from the short edge, the same rectangle should offer small colored triangles flanking one large striped triangle.
This is an arrangement quilters will recognize as the classic block “Flying Geese.”
At the end of the first rectangle, I goofed around with attaching the next rectangle seamlessly. The first go was…weird. It was one of those times when theory was fine…
…but the reality was a mess.
On the other hand, that mess has gone into my files for use in another project. When you try something new and it fails, take careful notes before you rip or cut or throw the whole thing out the window. I cannot tell you how many times Tuesday’s sad snarl has become the basis for Wednesday’s cover story.
Once I’d hit on a solution for the seamless join, I started fiddling with other details as the swatch progressed:
I mixed the colors to see what they do to each other.
I decided after some to make all the spine stitches in stockinette (even in the garter stitch stripes) to preserve the sharp line of the double decrease. I like the way it boldly divides the central triangle from the smaller triangles.
I fretted over the selvedges. They’re important to me. I wanted the upper and lower selvedges to be neat (of course) and also wanted them to match; and, if possible, I wanted them to be genuinely handsome, possibly even a design feature.
My swatch grew until it was nearly the length I needed for the finished cowl.
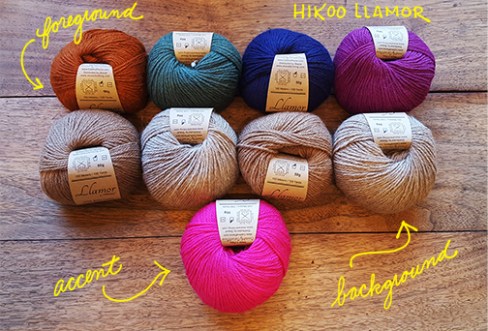
By this point, my yarns had been knit, ripped and cut so much that I ordered up a fresh pile of Hikoo Llamor. I worked out my color order. The foreground colors are the top line, the background colors are the bottom line.
You’ll note that the hot pink–aptly named Rosa Fuerte, number 1775 from the Carnival Palette–is outside the line. That’s because it’s going to come into play as an accent and liven things up.
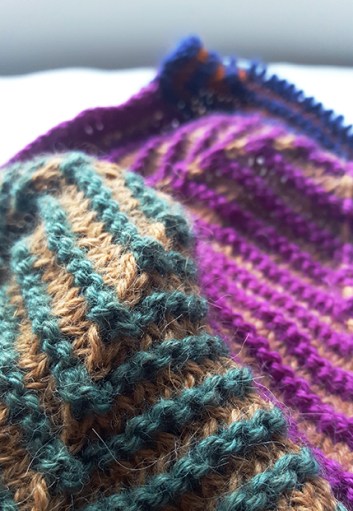
As I write this, the body of the cowl is nearing completion. I’m pleased to see the shadow effect is working pretty much as I had hoped.
Here it is from the top…
…from the side…
…and from the end.
That means trim and finishing, and the final verdict on this experiment, are all that’s yet to come–in two weeks.
He travels constantly to teach knitters at shops and guilds across the country and internationally; and has been a popular member of the faculties of such festivals as Vogue Knitting Live!, STITCHES Events, the Maryland Sheep and Wool Festival, Squam Arts Workshops, the Taos Wool Festival, Sock Summit, and the Madrona Fiber Arts Winter Retreat.
Franklin’s varied experience in the fiber world includes contributions of writing and design to Vogue Knitting, Yarn Market News, Interweave Knits, Interweave Crochet, PieceWork, Twist Collective; and a regular columns and cartoons for Mason-Dixon Knitting, PLY Magazine, Lion Brand Yarns, and Skacel Collection/Makers’ Mercantile. Many of his independently published designs are available via Ravelry.com.
He is the longtime proprietor of The Panopticon, one of the most popular knitting blogs on the Internet (presently on hiatus).
Franklin lives in Chicago, Illinois, cohabiting shamelessly with 15,000 books, a Schacht spinning wheel, four looms, and a colony of yarn that multiplies whenever his back is turned.