The Adventure of the Llama on the Corner, Part Three

fwf-logo-v11For an introduction to what goes on in this column, click here.

For the first part of this adventure, click here.

It’s not there yet.

This project, this mitered shadow knitting project, is knocking for me a loop right here on stage in front of you all. I won’t whine, though–this is what I signed on for back in the first column. When it doesn’t work, I’ll show you.

My last word on the first set of a squares…

Llama 2.7

…was that I liked them enough to move forward with them. That feeling didn’t last long.

As is so often the case, they’re weren’t “bad.” Just not right.

single-large-sq

The wide borders took up a lot of real estate. The shadow-knit spaces inside were puny. Squashed. And they were supposed to have been the main event. This, plus the changes in color, plus the texture of the yarn–it was all becoming too much.

Time to re-think and to simplify.

Over-complication is a perennial issue for me. When making plans, the imaginative half of my brain gallops while the sensible half trots. My notebooks fill up with schemes for projects with unusual structures and complicated color work and fine yarns and interesting texture, and

There’s an old saying in classic menswear that if a man wishes to be eye-catching but remain elegant, he gets one thing. One statement piece. That may be a boutonnière, a pocket square, a bowler hat, a bright bow tie, a boldly patterned jacket–but he must pick one and only one.

menswear

As a wise fellow behind a Savile Row counter once said to me, as I ogled an ornate silver set comprising cufflinks, tie clasp, money clip, pocket watch with chain and fob, lapel pin, and signet ring: “Respectfully, sir does not wish to appear to be a Christmas tree.”

franklin-tree

You may or may not agree with that notion, but I find it helps me whittle my designs down to a point where they don’t sag under the weight of too many Interesting Features. Also, to a point where they become something you can knit with only two hands and one brain.

What was the one thing to show off in this cowl? Why had I started this in the first place?

It was, I remembered, the potential magic of the shifting patterns in a piece of shadow knitting created with multiple changes of grain. I hoped that as the viewer’s viewpoint shifted, pattern would appear or vanish in different parts of the piece at the same time.

The borders interfered with that, so I took them out. I also made the spine as small as possible.

What had been arranged like this over seven stitches…

old-spine

…I now arranged over only three stitches.

new-spine

That caused a very abrupt change in grain at the decrease point. Now the differences between the two halves of the square really popped. Exactly what I wanted.

single-small-sq

I used a centered (sometimes called vertical) double decrease (sl2-k1-psso), which turns three stitches into one and gives you a neat, symmetrical bundle with the central stitch on top. It looks like this:

double-dec

Here’s how you do it.

  1. Work to the three stitches involved in the decrease.
  2. Slip the first two stitches together, as if to knit, from the left needle to the right needle.
  3. Knit the next stitch.
  4. Past the first two stitches, together or separately, over the knit stitch.

I use this double decrease all the time. It doesn’t lean to the right, like a knit three together (k3tog). That’s nice when, for example, you are bringing together a pair of converging lace diagonals. In fine and/or slippery yarns, it’s also much easier to control. When I k3tog in fine silk or cotton, I almost invariably drop one of the three live stitches before I’ve got them all secured. Not so with sl2-k1-psso.

I made these new squares little smaller, too, thinking they might look less clunky.

My square pile started growing again.

small-sq-pile

Then I got another idea. A much better idea. I think.

Dang it.

See you in two weeks?

Tools and Materials Appearing in This Issue

HiKoo® Llamor (100% baby llama; 109 yd per 50g ball), available in the Peruvian Palette, the Natural Palette, and the Carnival Palette
addi® Olive Wood Circular knitting needles

About Franklin

Designer, teacher, author and illustrator Franklin Habit is the author of It Itches: A Stash of Knitting Cartoons (Interweave Press, 2008). His new book, I Dream of Yarn: A Knit and Crochet Coloring Book was brought out by Soho Publishing in May 2016 and is in its second printing.

He travels constantly to teach knitters at shops and guilds across the country and internationally; and has been a popular member of the faculties of such festivals as Vogue Knitting Live!, STITCHES Events, the Maryland Sheep and Wool Festival, Squam Arts Workshops, the Taos Wool Festival, Sock Summit, and the Madrona Fiber Arts Winter Retreat.

Franklin’s varied experience in the fiber world includes contributions of writing and design to Vogue Knitting, Yarn Market News, Interweave Knits, Interweave Crochet, PieceWork, Twist Collective; and a regular columns and cartoons for Mason-Dixon Knitting, PLY Magazine, Lion Brand Yarns, and Skacel Collection/Makers’ Mercantile. Many of his independently published designs are available via Ravelry.com.

He is the longtime proprietor of The Panopticon, one of the most popular knitting blogs on the Internet (presently on hiatus).

Franklin lives in Chicago, Illinois, cohabiting shamelessly with 15,000 books, a Schacht spinning wheel, four looms, and a colony of yarn that multiplies whenever his back is turned.

Follow Franklin online via Twitter (@franklinhabit), Instagram (@franklin.habit), his Web site (franklinhabit.com) or his Facebook page.

Fridays with Franklin: The Adventure of the Warm Puppy, Part Four

fwf-logo-v11

The Adventure of the Warm Puppy: Part Four

For an introduction to what goes on in this column, click here.

For the the first part of this adventure, click here.


Rosamund is still waiting patiently for her new sweater.

Warm 4.1

A View of the Bridge

When last we left our steek, it looked like this.

Warm 4.2

Before we go further, let’s take a closer look at the place where all the action is going to happen: the bridge.

The bridge is the fabric we created specifically so that we could cut it open. Our version–used in making the leg openings for Rosamund’s sweater–requires an odd number and a minimum of five. This swatch steek has seven stitches, worked in reverse stockinette.

Warm 4.3

That center stitch is where we cut. The pairs of stitches on either side are where we secure the fabric before cutting, so that cutting does not lead to unraveling.

To this point we’ve been looking at the steek from the right side of the fabric…

Warm 4.4

…but now we’re going to flip it over so that the wrong side is uppermost. This shows us the little Vs of the reverse stockinette, which makes it easier find our way around.

Warm 4.5

It’s useful to have guideline for both the securing and the
cutting; so once the knitting is finished, I sew a running stitch right
up the center column with a piece of scrap yarn. I can, quite literally,
cut along the dotted line.

Securing the Bridge: Part I

We will secure our bridge using my favorite method: the crocheted steek. I didn’t invent it, I just love it. There are several variations; this one is not the “correct” one–it’s the one I use, and therefore the one I feel comfortable demonstrating.

If you don’t think of yourself as one who crochets, even if you have never used a hook to do more than pick up dropped stitches, don’t stop reading just because I used the C word. This is about the simplest crochet there is. You can do it.

We need, of course, a crochet hook. While knitting Rosamund’s sweaters I fell so in love with my addi® Olive Wood circular needle that I decided I should try out the Olive Wood crochet hooks, as well. The construction is top-notch, and the handles aren’t just comfortable; they’re little works of art.

Warm 4.6

The size hook I choose is usually equal to or slightly smaller in diameter than the needle used to knit the fabrics. If you’re using a slippery fiber, choose the smaller size.

Recall that we wish to secure the pairs of stitch columns immediately on either side of the center stitch. To be specific, we wish to crochet together the legs at the center of each pair, here colored red.

Warm 4.7

We’ll begin by inserting the hook under the legs at the base of the right-hand column, then pulling through a loop of our crochet yarn.

Warm 4.8

(I could have used the sweater yarn, but the purple Simpliworsted is easier to see in this demonstration.)

Then, bring the working yarn over the hook once more to make a loop, and pull this loop through the stitch legs and through the first loop on the hook.

Warm 4.9

*We move up to the next pair of legs, and put the hook through both.

Warm 4.10

Yarn over the hook again, and pull this new loop through the stitch legs and through the loop on the hook.

Warm 4.11

Repeat from * until you have secured all the legs in the pair of columns.

Warm 4.12

When you’ve finished, snip the working yarn leaving a six-inch tail and pull the yarn through the final loop to secure it.

Confession Interlude

The sharp-eyed among you will have noticed that in the above photos, I actually moved out from the center one stitch too far when working my chain. I could pretend that never happens to me, but I promised when this column began that I would show you stuff that goes wrong.

So what did I do? I pulled the crochet out and did it over. Both the bridge and I survived the operation unharmed.

My point? It’s no big deal.

Steeks are no big deal.

Securing the Bridge: Part II

When side one is complete, turn the work upside-down (so the last of your chain crochet stitches is now nearest you) and work side two exactly the same way.

When you’re finished, this is what you get. (I’ve trimmed the yarn tails here to get them out of the way.)

Warm 4.13

Get the Scissors

Then we cut along the dotted line. Use small, sharp scissors (embroidery scissors are my favorite). Take your time. If you’re cutting something circular, put a piece of paper or cardboard or a slim book inside the tube to make sure you cut only the bridge.

Warm 4.14

Warm 4.15

Warm 4.16

Voilà, a beautifully shaped and utterly stable opening in our knitting.

Warm 4.17

Was that so hard?

Warm 4.18

The edges of what used to be the bridge fold to the wrong side, and can be gently sewn down using whip stitch. I prefer to do this using the yarn used to knit the fabric.

Warm 4.19

And here we have the view from the right side.

Warm 4.20

The edges of the opening are now ready for whatever you wish to do next. One of the reasons I left the reserved stitches on a scrap of yarn is that nine times out of ten, I will finish the opening with a picked-up edging or by picking up stitches for a sleeve. Those reserved stitches are waiting for me to do either. It saves a bit of time and trouble.

Puppy, Warmed

And so my experimental sweater for Rosamund is complete.

Warm 4.21

My finishing touches–to mitigate the over-large leg holes and the unintended off-the-shoulder neckline–were additional ribbing at the legs and collar. I think the turtleneck rather suits her, don’t you?

Warm 4.22

Warm 4.23

Warm 4.24

She loves the sweater. I had to chase her around to get it off her, even though she knew that as a reward for modeling nicely we would play in the sprinkler.

This test piece has shown me what to do and not to do for her next sweater. I learned a lot about knitting to fit a dog, and I had a blast doing it. There will be a lot more Rosamund sweaters in “Fridays with Franklin,” because it seems to me they could be fun way to test new techniques and design new fabrics.

Plus, as Charles M. Schulz famously wrote, happiness is a warm puppy.

Ready for a new adventure? I’ll meet you back here in two weeks.

Floralia Update

Kits and patterns for the Floralia Blanket (and a matching pillow) from this adventure are available from Makers’ Mercantile.

Warm 4.25

If you’d like help in choosing colors for your project, a member of staff will be delighted to assist you. They’re awfully good at that sort of thing.

Tools and Materials Appearing in This Issue

Simpliworsted by HiKoo® (55% Merino Superwash, 28% Acrylic, 17% Nylon; 140 yds per 100g skein). Color: 611, Earth and Sky.

addi® Olive Wood circular needles size US 4, 16 inch (40 cm)

addi® Olive Wood crochet hooks

About Franklin

Designer, teacher, author and illustrator Franklin Habit is the author of It Itches: A Stash of Knitting Cartoons (Interweave Press, 2008). His newest book, I Dream of Yarn: A Knit and Crochet Coloring Book was brought out by Soho Publishing in May 2016 and is in its second printing.

He travels constantly to teach knitters at shops and guilds across the country and internationally; and has been a popular member of the faculties of such festivals as Vogue Knitting Live!, STITCHES Events, the Maryland Sheep and Wool Festival, Squam Arts Workshops, the Taos Wool Festival, Sock Summit, and the Madrona Fiber Arts Winter Retreat.

Franklin’s varied experience in the fiber world includes contributions of writing and design to Vogue KnittingYarn Market News, Interweave KnitsInterweave CrochetPieceWorkTwist Collective; and a regular columns and cartoons for Mason-Dixon Knitting, PLY Magazine, Lion Brand Yarns, and Skacel Collection/Makers’ Mercantile. Many of his independently published designs are available via Ravelry.com.

He is the longtime proprietor of The Panopticon, one of the most popular knitting blogs on the Internet (presently on hiatus).

Franklin lives in Chicago, Illinois, cohabiting shamelessly with 15,000 books, a Schacht spinning wheel, four looms, and a colony of yarn that multiplies whenever his back is turned.

Follow Franklin online via Twitter (@franklinhabit), Instagram (@franklin.habit), his Web site (franklinhabit.com) or his Facebook page.


Fridays with Franklin: The Adventure of the Warm Puppy, Part Three

fwf-logo-v11The Adventure of the Warm Puppy: Part Three


For an introduction to what goes on in this column, click here.

For the the first part of this adventure, click here.


In the two weeks since the last installment, I’ve had more than a few inquiries about one aspect of Rosamund’s sweater-in-progress…

Warm 3.1

…namely, the leg openings and how they were made.

I knew from the first that I wanted to work this piece in the round, with steeks cut for the forelegs. That aroused comment, because there is a widespread sentiment in the knitting community about steeks.

Warm 3.2

This is silly.

Steeks are not frightening in the least, nor are they difficult. They’re like everything else in knitting: bewildering, when you don’t know how they’re done; and exciting, once you do.

Since so many of you asked for more information about steeks, we’re going to devote the next two parts of this adventure to those in Rosamund’s sweater.

Steek?

A steek, if you are unfamiliar with the term, is an opening cut into a piece of knit fabric that follows the vertical* grain–the columns of stitches, as opposed to the rows or rounds. The word comes to us (thanks to the inimitable Alice Starmore) from the Shetland word for “gate” or “opening.” Steeks are traditionally much used on Fair Isle sweaters.

Warm 3.3

You will sometimes find “steek” definied as a “slashed vertical opening” because “slashed” sounds more dramatic than “cut,” as though you went at your sweater with a kitchen knife or meat cleaver. Indeed, who among us has not felt the impulse?

But steeks are almost never impulsive. You plan for them.

Planning the Opening(s)

Rosamund has two front legs. Therefore, two steeks. Therefore, double the fun. Where to place them?

Let’s take another look at the measurements.

Warm 3.4

Measurement F, the distance from the collar to the shoulder, tells us how long our top-down sweater must be when the openings begin: 5 inches.

The sweater reached 5 inches after a series of increase rounds–described in detail in the previous installment. At this point, the number of stitches per round had risen to 124 stitches.

To figure out where in that round to start the openings, this is what we do.

1. Take note of our gauge, which is 4.5 stitches and 6.5 rounds per inch.

2. We look at measurement E, the space between the legs: 4 inches. At our gauge, that means we must preserve 18 stitches at the bottom center between the openings.

3. Next we look at measurement H, the leg circumference, to figure out how many stitches are required in this first round for each opening. The total measurement is 9 inches, and we will make use of roughly one half** of that number: 4.5 inches, which at our gauge is roughly 20 stitches.

And so that first round–the foundation round of our steeks–will look something like this:

Warm 3.5

Knitting the Openings

With calculations complete, we start knitting.

It would have been kind of messy to show this on the actual sweater, so instead I cooked up a simple swatch to demonstrate how one steek opening is made. The swatch is small–only 26 stitches wide–and knit flat; but the process was the same on the circular sweater.

Here I’ve knit a few rows of stockinette to stand in for the sweater from the collar down to the foundation round of the leg holes–the round we planned above.

Warm 3.6

In that foundation round, when we reach the stitches needed to begin the opening, we slip them onto a piece of scrap yarn

Warm 3.7

and then we cast on*** a certain number of brand new stitches to serve as the foundation of what is often called the “bridge.” This is the fabric that’ll be cut. The number of stitches in the bridge can vary. For the steek technique I have in mind, we need an odd number and a minimum of five. I used five in Rosamund’s sweater, but to make this demonstration very clear I cast on seven.

Warm 3.8

Now, if you are accustomed to reading your knitting, you won’t necessarily need stitch markers on either side of your bridge stitches. But if you are new to steeks and/or not confident in reading your knitting, they can be helpful.

Warm 3.9

With the bridge stitches cast on we simply continue knitting.

The main fabric, as before, is in stockinette. To distinguish the bridge fabric, we work it in reverse stockinette.

Warm 3.10

If we want to shape the opening, and we often do, it’s easy and frankly rather magical. Let’s say we want to expand the width of this opening at both sides. First, we knit up to the last two stitches before the first marker, and we knit two together.

Warm 3.11

We slip the marker and work the bridge stitches as usual. THIS IS IMPORTANT: All shaping happens outside the bridge. The bridge stitches do not decrease or increase; if we start with seven, we end with seven.

Once past the bridge and second marker, we slip, slip, knit to decrease in the first two stitches.

Warm 3.12

In the following row, we do not decrease.

If we repeat these two rows–one with decreases, one without–five times, we begin to see that our opening is changing shape**** and the knitting looks extremely odd. People who have never worked steeks will begin to think you are some kind of mad genius. There is no reason to tell them otherwise.

Warm 3.13

Once the steek has reached its full height, we bind off only (only!) the bridge stitches. Be sure not to bind off any stitches that are part of the main fabric. If you’ve been using markers, you can discard them now.

Warm 3.14

When, in the following row or round, we come to the place where the bridge used to be, we cast on whatever number of stitches the pattern calls for. This number will vary. In the photograph above, you’ll see that I cast on ten stitches–the total number I had decreased–so the swatch will lie nice and flat while I demonstrate the cutting process…in two weeks.

Warm 3.15

See you then!

*There is a method for cutting an opening that follows the horizontal grain, and we will certainly play with it another time because it’s super fun.

**This was a guess on my part, and gave a very wide leg hole. Next time, I will probably go with a smaller fraction of the total measurement–something closer to about a quarter.

***Working with a single color, I typically use a simple backward loop cast on.

****Please don’t get the impression that you must mirror your shaping. You may shape in any way that suits you. Rosamund’s leg openings were shaped only along the upper edge, rather like a racer-back tank top, because I didn’t want to remove any of the fabric covering her delicate pink undercarriage.

Tools and Materials Appearing in This Issue

Simpliworsted by HiKoo® (55% Merino Superwash, 28% Acrylic, 17% Nylon; 140 yds per 100g skein). Color: 611, Earth and Sky.

addi® Olive Wood circular needles size US 4, 16 inch (40 cm)

About Franklin

Designer, teacher, author and illustrator Franklin Habit is the author of It Itches: A Stash of Knitting Cartoons (Interweave Press, 2008). His newest book, I Dream of Yarn: A Knit and Crochet Coloring Book was brought out by Soho Publishing in May 2016 and is in its second printing.

He travels constantly to teach knitters at shops and guilds across the country and internationally; and has been a popular member of the faculties of such festivals as Vogue Knitting Live!, STITCHES Events, the Maryland Sheep and Wool Festival, Squam Arts Workshops, the Taos Wool Festival, Sock Summit, and the Madrona Fiber Arts Winter Retreat.

Franklin’s varied experience in the fiber world includes contributions of writing and design to Vogue KnittingYarn Market News, Interweave KnitsInterweave CrochetPieceWorkTwist Collective; and a regular columns and cartoons for Mason-Dixon Knitting, PLY Magazine, Lion Brand Yarns, and Skacel Collection/Makers’ Mercantile. Many of his independently published designs are available via Ravelry.com.

He is the longtime proprietor of The Panopticon, one of the most popular knitting blogs on the Internet (presently on hiatus).

Franklin lives in Chicago, Illinois, cohabiting shamelessly with 15,000 books, a Schacht spinning wheel, four looms, and a colony of yarn that multiplies whenever his back is turned.

Follow Franklin online via Twitter (@franklinhabit), Instagram (@franklin.habit), his Web site (franklinhabit.com) or his Facebook page.

Fridays with Franklin: The Adventure of the Warm Puppy, Part Two

fwf-logo-v11The Adventure of the Warm Puppy: Part Two

For an introduction to what goes on in this column, click here.

For the the first part of this adventure, click here.


With my HiKoo Simpliworsted and measurements at the ready,

Warm 2.1

it was time begin to cooking up a sweater for Rosamund.

Warm 2.2

It would be a very simple sweater, likely quite imperfect, meant to serve as a fitting guide for other, more complex designs. Rosamund is going to need a whole wardrobe, you see. This is no ordinary dog. This is a dog so clever, good-tempered, and beautiful that she might well have a lucrative career ahead of her as a therapy dog, or even a Tumblr meme.

Warm 2.3

Warm 2.4

Warm 2.5

Warm 2.6

You can’t have a dog of such quality walking around in just any old thing.

Sketching It Out

Even when I’m planning a project this plain, it helps to do up a simple sketch that maps the key features.

Warm 2.7

Then I like to mark up the sketch with thoughts about what techniques might work best.

Warm 2.8

I reserve the right to change my mind at any time, of course. I usually do. But this gives me a place to start.

Down the Slope

In Part One, I wrote about a knitter I met who got her jollies by knitting fitted rock cozies. We didn’t get to know each other well, but she once showed me the fundamental principle for figuring where and how much to increase and decrease. I’ve used it ever since, in countless and varied projects.

Here’s an example of how I put it to work in shaping Rosamund’s new sweater, literally right at the start.

First, note two places in which you have a noticeable difference in circumference. In this case, the first was the neckline–where the sweater would begin–and the shoulders, where Roz’s legs join her body.

Warm 2.9

That’s a difference of seven inches.

And we note how long the distance is between these two measurements, along the shoulder slope.

Warm 2.10

Now we take into account what this means in terms of our gauge, which is 4.5 stitches and 6.5 rounds per inch.

Warm 2.11


A Brief Diversion on Fudging

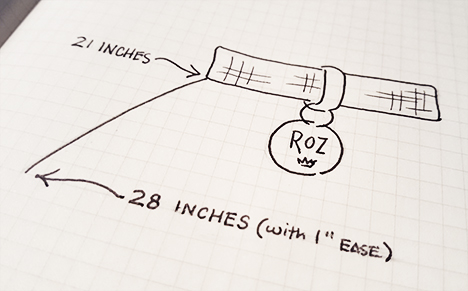
The mathy among you will have noticed some funny business is going in the photograph above. For one thing, the neck measurement is 21 inches, and at 4.5 stitches to the inch, that means the neck should be 94.5 stitches around. Instead, it’s given as approximately 92 stitches.

What gives?

Well, first of all–we can’t cast on half a stitch.

Second, our original sketch indicates that we want to begin this circular sweater with a collar of knit 2, purl 2 (k2p2) ribbing. That requires a number of stitches evenly divisible by 4, and neither 94 nor 94.5 will work.

So what do we do? We fudge. We find the nearest number to 94.5 that is divisible by 4. We could go higher, but I chose to go slightly lower, to 92 stitches.

It’s a tiny difference. It’s not going to throw the piece out of whack.

By the same token, we don’t worry that the shoulder measurement of 28 inches “should” require 126 stitches, not 124. We also want to end the sweater with k2p2 ribbing, and so it will be convenient if we maintain numbers evenly divisible by 4 throughout. Therefore, 124.

I could have chosen to use 128 as my fudged number, rather than 124. Why didn’t I? It just felt like the right thing to do at the time. If I had been worried that two stitches less would make the piece too small, I could have gone up. Instead, I decided that with a limited yarn supply (only two skeins to hand) it would be a good idea to eliminate stitches where possible, and went down.

A big part of becoming a confident, adventurous knitter is learning not to sweat the small stuff. Two stitches in a worsted weight dog sweater is small stuff.

Fudge it.

Now, Back to the Math

So this is our problem (and it’s a math problem, but the sort of math problem even I can do).

We need to increase from 92 stitches to 124 stitches, a total of 32 stitches.

Warm 2.12

And we have, potentially, 32.5 (we’ll call it an even 32–more fudging) rounds over which to increase this number of stitches.

This is where things get slightly fuzzy, if you will pardon the expression. You have a choice to make based on your own judgement. Is the shaping gentle (like, for example, most sweater waist shaping) or sharp (like the explosion of stitches that shape a knitted tam)?

Warm 2.13
Roz’s shoulder slope looks to me gradual, which means we want to space the increases out over many rounds, rather than do them all at once. The nice thing about working with knitted fabric is that it is obligingly stretchy and drapey–it almost wants to fit whatever you put inside it. That means there’s not one correct answer, but a range of possible correct answers. So, we can take a guess and try it out.

Here’s my guess. To calculate 32 increases over 32 rows, we divide the number of rounds by the number of stitches. And we get…drum roll, please:

1

Which means 1 increase in every round.*

For gentle shaping, it’s usually best to put at least one plain round between increase rounds. (The more plain rounds between increases, the gentler the shaping will be.) So here, at Rosamund’s shoulders, I prefer to increase two stitches every other round. Spreading decreases out also gives the shaped area of the fabric a smoother line, though of course the change will still be noticeable.

A reasonable plan, right? Right. The only remaining question was where in each round to place the increases. It seemed logical to stick them opposite each other another along the lines of the shoulder. Where the body grows, so does the fabric.

To sum up:

  1. Figure the difference in stitches between Point A and Point B.
  2. Figure the number of rows/rounds between Point A and Point B.
  3. Divide the number of rows/rounds by the number of stitches to increase.** This will give you the number of increases per row/round. If you end up with fractions, choose a nearby whole number using your best judgment.
  4. Decide exactly where in your rows/rounds you want your shaping stitches to occur.

Decreases work the same way.

Many Rounds Later…

We’re going to jump ahead now to the first fitting. I had decided early on to work the entire body in one piece, in the round, with steeks for the leg holes. Perhaps you shudder at the mention of steeks–because there is a widespread misconception that steeks are frightening. They aren’t, but I want to set aside steek talk for our next installment.

Today, let’s look at where all the calculating and knitting and calculating and knitting got us.

Warm 2.14

These are catch-as-catch-can photos, because Rosamund was not as interested in showing off her sweater as she was in the squirrels making whoopee in the porch rafters.

Verdict: Not bad.

Warm 2.15

I could have given this another inch or two of length from neck to shoulder. And it might be cute to knit her a turtleneck. I think she could carry that off. (In case you’re wondering, the orange scrap yarn is holding live stitches conveniently created during the formation of the steeks.)

Warm 2.16

I used short rows to make the sweater longer on the back than the belly, so she’d be nice and warm at the rear but wouldn’t pee on my knitting. I could have done more short rows for additional back length. In fact, I could use an additional two to three inches all around here. So that’s duly noted for next time.

Warm 2.17

Clearly–meaning, you can see it from down the block–the biggest flaw is the size of the leg*** holes. After I opened the steeks I realized that my own biceps fit easily through them. I’m small, but I’m not as small as Roz–whose legs measure about nine inches around where they join her body.

This is what happens when you don’t trust your own numbers. I kept looking at pictures of her (as opposed to actual her, since my travel schedule meant much of the knitting had to be away from home) and thinking, “That’s not big enough. She’s so muscular. Thighs like a shot put champion. Man, I’d love to have those thigh muscles. Let’s make this just a bit wider. And she’ll need ease, so she can run around. Lots of ease.”

So I wound up with 14-inch leg holes.

Still, now I know what not to do. That’s the point of this exercise, after all–to figure out what basic measurements and shaping Rosamund’s sweaters should (and shouldn’t) have.

I believe I can do something about the legs and make this into a wearable sweater, good for early fall if not the coldest parts of winter. Let’s talk more about the legs, and about steeks, in two weeks. By which time it may well be winter in Chicago.

*Have you any idea how relieved I was that the math worked out so nicely? Pure chance, but I’ll take it.

**If the number of stitches to increase is greater than the number of rows/rounds across which you will increase, flip this around. Divide the number of stitches by the number of rounds.

***I keep typing “arm holes.” Knitting for an animal is kinda weird.

Tools and Materials Appearing in This Issue

Simpliworsted by HiKoo® (55% Merino Superwash, 28% Acrylic, 17% Nylon; 140 yds per 100g skein). Color: 611, Earth and Sky.

addi® Olive Wood circular needles size US 4, 16 inch (40 cm)

About Franklin

Designer, teacher, author and illustrator Franklin Habit is the author of It Itches: A Stash of Knitting Cartoons (Interweave Press, 2008). His newest book, I Dream of Yarn: A Knit and Crochet Coloring Book was brought out by Soho Publishing in May 2016 and is in its second printing.

He travels constantly to teach knitters at shops and guilds across the country and internationally; and has been a popular member of the faculties of such festivals as Vogue Knitting Live!, STITCHES Events, the Maryland Sheep and Wool Festival, Squam Arts Workshops, the Taos Wool Festival, Sock Summit, and the Madrona Fiber Arts Winter Retreat.

Franklin’s varied experience in the fiber world includes contributions of writing and design to Vogue KnittingYarn Market News, Interweave KnitsInterweave CrochetPieceWorkTwist Collective; and a regular columns and cartoons for Mason-Dixon Knitting, PLY Magazine, Lion Brand Yarns, and Skacel Collection/Makers’ Mercantile. Many of his independently published designs are available via Ravelry.com.

He is the longtime proprietor of The Panopticon, one of the most popular knitting blogs on the Internet (presently on hiatus).

Franklin lives in Chicago, Illinois, cohabiting shamelessly with 15,000 books, a Schacht spinning wheel, four looms, and a colony of yarn that multiplies whenever his back is turned.

Follow Franklin online via Twitter (@franklinhabit), Instagram (@franklin.habit), his Web site (franklinhabit.com) or his Facebook page.


Fridays with Franklin: Adventure in the Shadows, Part Two

For the first part of this adventure, click here.

You know what I did first, don’t you? You know you do, you just don’t want to hear me say it.

I swatched.

Confession time: I love swatching.

If that makes you bristle, let me reassure you that I understand. I wasn’t always like this. I used to hate swatching. Swatching was vile. Swatching was the pile of green beans my mother used to force-feed me before I was allowed to have a cookie.  I hated green beans.*

2ILLO07

Why did I change? Experience. People say swatches lie, and swatches do. But the most deceitful swatch still tells you more that no swatch at all.

Swatching isn’t just about checking your gauge to make sure you end up with something of the correct size. It’s also about testing the fabric. Does it look good? Does it have the right amount of drape? Frankly, it doesn’t matter if you “get” gauge but the yarn you’ve chosen to get it gives you a fabric stiff as cardboard and you’re looking to make a shawl.

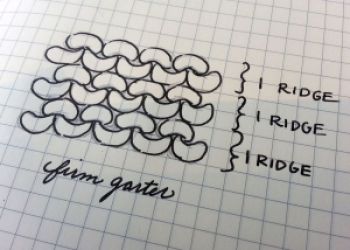
With shadow knitting, my favorite way to swatch is just to pick one color or the other and start knitting a piece of garter stitch. Here’s the kind of garter stitch I look for:

2

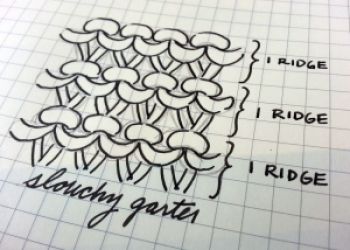
See how nice and snug those ridges are? That’s good. Here’s what I avoid:

3

If you get snug garter stitch, the gauge of your shadow fabric will generally give you a bold, legible hidden pattern.

This was also a good test flight for the Schoppel Gradient. As I mentioned in the last installment, I was concerned that the slightly irregular nature of the yarn might render it unsuitable for shadow knitting. But when I saw these nice, plump garter ridges

4

I knew I was good to go.

That’s what a swatch is supposed to do for you, you know–let you set forth without anxiety. Or at least with less anxiety.

What pattern to knit, though? I wanted, on this test flight, to try out the shifting colors and see how they’d play against one another. That meant keeping it simple. A square would have grown monotonous very quickly, so I charted up a circle.

Click here to download chart

As I’d hoped, what grew was a series of bold explosions on a moody background. The nature of shadow knitting is to stretch out motifs, so they were more oblong than circular. I liked that.

5

I also liked the way the simultaneous changes in the background and foreground led to the unexpected.

6 7 8 9 10 11 13 12

All the while, one thought kept nagging me. These looked like something I’d seen. What was it? Paints in a paintbox? Not quite. Candies on a tray? Definitely not.

I was talking with a knitter friend when it hit me.

“They look like the sun rising through clouds. In the morning, when they’re storm clouds full of city pollution, and I’m at the airport, and it’s really early, and my eyes are kind of bleary, and I have hours of horrible flying before I’ll get any kind of rest.”

“That’s cheery,” he said.

“Angry sunrises,” I said. “Eleven angry sunrises.”

“Some people are inspired by pretty flowers,” he said.

“That’s what I’m going to call this,” I said. “Eleven Angry Sunrises.”

“You can’t call a knitting pattern ‘Eleven Angry Sunrises.’”

“Why not?”

“Because it sounds angry. Knitting is supposed to make you think happy thoughts.”

“Well, I’m not calling it Eleven Happy Sunrises.”

“Why not?”

“Because it sounds like the name of a cult.”

“And what is knitting?”

I have to admit he had a point.

Your Own Adventure: Recipe for Eleven Happy (or Angry) Sunrises

Procure two skeins of Schoppel Gradient in different colorways. The more difference between your colorways, the bolder your surprises will be.

You will also need two stitch markers, and the shadow circle chart above. And of course, scissors and a tapestry needle. (Do I really have to tell you that? Patterns always tell you that, but do they really have to?)

As described above, knit a good-sized garter stitch swatch (about four inches by four inches will do it) to make sure you have a firm but not tight fabric. If the fabric could stand up in the corner by itself, it’s too firm. If it looks like fishnet, it’s too loose.

Don’t bind off the swatch; rip it out so you can use the yarn.

With your first color, cast on 27 stitches.

You’re going to put garter stitch borders around the sunrises just for pretty. So knit two rows with Color One, then join Color Two and knit two rows with that. From this point on, you will always alternate two rows of Color One, then two rows of Color Two.

Enough border. Time for pattern.

With Color One, knit three stitches. That’s your right-hand garter stitch border. Place a stitch marker. Knit the first row of the chart. You’ll have three stitches left; place a marker, then knit them. Those are your left-hand border.

Now, follow the chart when you’re inside the markers. Outside the markers, knit all stitches. Don’t cut the yarns at the end of each stripe, just carry them up the right-hand selvedge as you work.

When you have had quite enough, knit two more garter stripes–one in each color–and bind off using the color of the final stripe.

Block, if you like. Weave in ends. Admire.

Our next adventure begins in two weeks…click here.

*I still hate green beans.

Tools and Materials Appearing in This Issue

Schoppel Gradient: 100% Virgin Wool, 260m/100g per ball; colors: 1873 (red-orange) and 1508 (black-white).